Utilizzo del sistema di sigillatura dei pneumatici
The temporary tire sealing system (TMK1) can be used to seal a puncture in a tire. Read through all instructions before use.
Panoramica
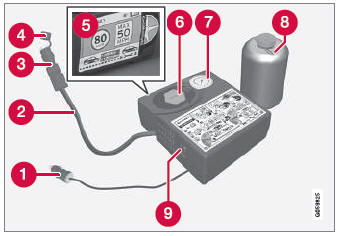
 Electrical cable
 Hose
 Air release valve
 Protective hose cover
 Speed limit sticker
 Bottle holder (orange cover)
 Air pressure gauge
 Sealing compound bottle
 Switch
Collegamento
- Il flacone del composto sigillante (n. 8 nell'illustrazione) contiene 1) lattice di gomma naturale e 2) etandiolo. Queste sostanze sono nocive se ingerite.
- The contents of this bottle may cause allergic skin reactions or otherwise be potentially harmful to the respiratory tract, the skin, the central nervous system, and the eyes.
Precauzioni:
- Tenere fuori dalla portata dei bambini.
- Non ingerire il contenuto.
- Evitare il contatto prolungato o ripetuto con la pelle. Rimuovere qualsiasi indumento che sia entrato in contatto con il sigillante.
- Lavare accuratamente dopo l'uso.
Primo soccorso:
- Pelle: lavare le zone interessate della pelle con acqua e sapone. Consultare un medico in caso di comparsa di sintomi.
- Occhi: sciacquare abbondantemente con acqua per almeno 15 minuti, sollevando occasionalmente le palpebre superiore e inferiore. Consultare un medico in caso di comparsa di sintomi.
- Inalazione: portare la persona all'aria aperta. Se l'irritazione persiste, consultare un medico.
- Ingestione: NON provocare il vomito, a meno che non sia indicato dal personale medico. Consultare un medico.
- Disposal: Dispose of this material and its container at a hazardous or special waste collection point.
- Procedura
Turn on the vehicle's hazard warning flashers if the tire sealing system is to be used in an area with traffic.
Se la foratura è stata causata da un chiodo o da un oggetto simile, non rimuoverlo. Ciò contribuirà a sigillare il foro.
- Rimuovere l'adesivo del limite di velocità dal lato del compressore. Applicare l'adesivo in una posizione chiaramente visibile sul parabrezza per ricordare al conducente di non superare questo limite di velocità. Non guidare a velocità superiori a 80 km/h mentre si utilizza un pneumatico riparato temporaneamente con il sistema di sigillatura.
- Make sure the switch is in the 0 (Off) position and take out the electric cable and the hose.
- Unscrew the orange cover on the compressor and unscrew the cap on the sealing compound bottle.
- Screw the bottle onto the bottle holder as far as possible.
The bottle and the bottle holder are equipped with catches to help prevent the sealing compound from leaking. Once the bottle is screwed into place into the bottle holder, it cannot be unscrewed. The bottle can only be removed by a workshop2.
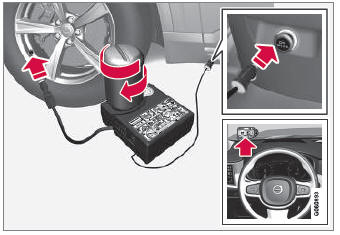
- Unscrew the tire's valve cap and screw the hose's valve connector as far as possible onto the valve.
Be sure the air release valve on the compressor's hose is completely closed.
- Avviare la procedura di sigillatura dei pneumatici
Connect the electrical cable to the nearest 12 V outlet and start the vehicle.
- Start the compressor by moving the switch to the I (On) position.
Quando il compressore si avvia, la pressione può salire fino a 6 bar (88 psi), ma diminuirà dopo circa 30 secondi.
- Inflate the tire for 7 minutes.
- Switch off the compressor and check the inflation pressure using the air pressure gauge. The inflation pressure should be between 1.8 bar (22 psi) and 3.5 bar (51 psi). If the inflation pressure is too high, use the air release valve to release air.
- Spegnere il compressore e scollegare il cavo elettrico.
- Unscrew the hose from the tire's valve and screw the valve cap back on.
- After inflating a tire, always replace the valve cap to help prevent valve damage caused by gravel, dirt, etc.
- Utilizzare solo tappi valvola in plastica. I tappi in metallo potrebbero corrodersi e diventare difficili da rimuovere.
- Applicare il copritubo protettivo sul tubo per aiutare a prevenire la fuoriuscita di eventuale liquido sigillante residuo. Riporre l'attrezzatura nel vano bagagli.
- Immediately drive the vehicle at least 3 km (2 miles) at a maximum speed of 80 km/h to allow the sealing compound to seal the tire, and then recheck the inflation pressure.
- Verificare la pressione di gonfiaggio
Connect the hose to the tire's valve and screw the hose connector onto the valve as far as possible. The compressor must be switched off.
- Check the inflation pressure on the air pressure gauge.
- Se la pressione è inferiore a 1,3 bar (19 psi), il pneumatico non è sufficientemente sigillato. Il veicolo non deve muoversi. Contattare l'assistenza stradale per far trainare il veicolo.
- If the inflation pressure is higher than 1.3 bar (19 psi), the tire must be inflated to the inflation pressure specified on the tire pressure decal on the driver's side door pillar (1 bar = 100 kPa = 14.5 psi). If the inflation pressure is too high, use the air release valve to release air.
Volvo consiglia di guidare fino all'officina Volvo autorizzata più vicina per far sostituire/riparare il pneumatico. Informare l'officina che il pneumatico contiene liquido sigillante.
Il flacone sigillato e il tubo devono essere sostituiti dopo l'uso. Volvo consiglia di contattare un'officina Volvo autorizzata per la sostituzione.
1 Mobilità temporanea
2 Si consiglia un’officina autorizzata Volvo.
Mettiti alla prova
Un breve quiz sulla Volvo XC90: ogni risposta ha una spiegazione e un link alla pagina del manuale.