Utilisation du système d'obturation des pneus
The temporary tire sealing system (TMK1) can be used to seal a puncture in a tire. Read through all instructions before use.
Présentation
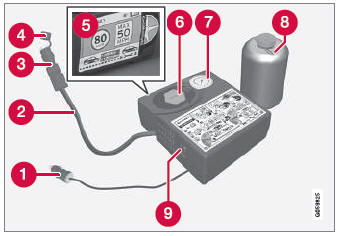
 Electrical cable
 Hose
 Air release valve
 Protective hose cover
 Speed limit sticker
 Bottle holder (orange cover)
 Air pressure gauge
 Sealing compound bottle
 Switch
Pose
- Le flacon de produit d'étanchéité (repère 8 sur l'illustration) contient 1) du latex de caoutchouc naturel et 2) de l'éthanediol. Ces substances sont nocives en cas d'ingestion.
- The contents of this bottle may cause allergic skin reactions or otherwise be potentially harmful to the respiratory tract, the skin, the central nervous system, and the eyes.
Précautions :
- Tenir hors de portée des enfants.
- Ne pas ingérer le contenu.
- Évitez tout contact prolongé ou répété avec la peau. Retirez tout vêtement entré en contact avec le produit d'étanchéité.
- Lavez-vous soigneusement après manipulation.
Premiers secours :
- Peau : laver les zones de peau touchées à l'eau savonneuse. Consultez un médecin en cas de symptômes.
- Yeux : rincer abondamment à l'eau pendant au moins 15 minutes, en soulevant de temps à autre les paupières supérieure et inférieure. Consultez un médecin en cas de symptômes.
- Inhalation : transporter la personne à l'air frais. Si l'irritation persiste, consultez un médecin.
- Ingestion : NE PAS faire vomir, sauf sur indication du personnel médical. Consultez un médecin.
- Disposal: Dispose of this material and its container at a hazardous or special waste collection point.
- Produits
Turn on the vehicle's hazard warning flashers if the tire sealing system is to be used in an area with traffic.
Si la crevaison a été causée par un clou ou un objet similaire, ne le retirez pas. Cela contribuera à obturer le trou.
- Retirez l'autocollant de limitation de vitesse du côté du compresseur. Apposez l'autocollant à un endroit bien visible sur le pare-brise pour rappeler au conducteur de ne pas dépasser cette vitesse. Ne roulez pas à plus de 80 km/h avec un pneu réparé provisoirement à l'aide du système d'obturation des pneus.
- Make sure the switch is in the 0 (Off) position and take out the electric cable and the hose.
- Unscrew the orange cover on the compressor and unscrew the cap on the sealing compound bottle.
- Screw the bottle onto the bottle holder as far as possible.
The bottle and the bottle holder are equipped with catches to help prevent the sealing compound from leaking. Once the bottle is screwed into place into the bottle holder, it cannot be unscrewed. The bottle can only be removed by a workshop2.
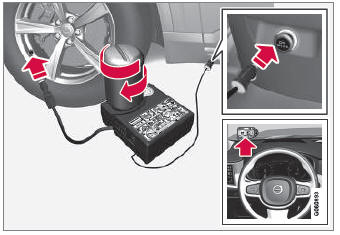
- Unscrew the tire's valve cap and screw the hose's valve connector as far as possible onto the valve.
Be sure the air release valve on the compressor's hose is completely closed.
- Démarrage de la procédure d'obturation des pneus
Connect the electrical cable to the nearest 12 V outlet and start the vehicle.
- Start the compressor by moving the switch to the I (On) position.
Lorsque le compresseur démarre, la pression peut atteindre 6 bars (88 psi), mais elle diminuera après environ 30 secondes.
- Inflate the tire for 7 minutes.
- Switch off the compressor and check the inflation pressure using the air pressure gauge. The inflation pressure should be between 1.8 bar (22 psi) and 3.5 bar (51 psi). If the inflation pressure is too high, use the air release valve to release air.
- Coupez le compresseur et débranchez le câble électrique.
- Unscrew the hose from the tire's valve and screw the valve cap back on.
- After inflating a tire, always replace the valve cap to help prevent valve damage caused by gravel, dirt, etc.
- Utilisez uniquement des capuchons de valve en plastique. Les capuchons métalliques peuvent se corroder et devenir difficiles à retirer.
- Mettez le capuchon de protection sur le tuyau afin d'éviter les fuites de produit d'étanchéité résiduel. Remettez l'équipement dans le coffre à bagages.
- Immediately drive the vehicle at least 3 km (2 miles) at a maximum speed of 80 km/h to allow the sealing compound to seal the tire, and then recheck the inflation pressure.
- Contrôler à nouveau la pression de gonflage
Connect the hose to the tire's valve and screw the hose connector onto the valve as far as possible. The compressor must be switched off.
- Check the inflation pressure on the air pressure gauge.
- Si la pression est inférieure à 1,3 bar (19 psi), le pneu n'est pas suffisamment étanche. Le véhicule ne doit pas être conduit. Faites appel à l'assistance routière pour faire remorquer le véhicule.
- If the inflation pressure is higher than 1.3 bar (19 psi), the tire must be inflated to the inflation pressure specified on the tire pressure decal on the driver's side door pillar (1 bar = 100 kPa = 14.5 psi). If the inflation pressure is too high, use the air release valve to release air.
Volvo recommande de vous rendre à l'atelier Volvo agréé le plus proche pour faire remplacer ou réparer le pneu. Informez l'atelier que le pneu contient du produit d'étanchéité.
Le flacon scellé et le tuyau doivent être remplacés après utilisation. Volvo recommande de contacter un atelier Volvo agréé pour leur remplacement.
1 Galette de secours temporaire
2 Il est recommandé de faire appel à un atelier agréé Volvo.
Testez-vous
Un quiz rapide sur Volvo XC90 : chaque réponse est expliquée, avec un lien vers la page du manuel.