Uso del sistema de sellado de neumáticos
The temporary tire sealing system (TMK1) can be used to seal a puncture in a tire. Read through all instructions before use.
Descripción general
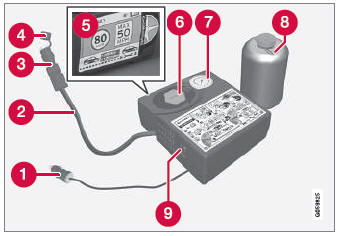
 Electrical cable
 Hose
 Air release valve
 Protective hose cover
 Speed limit sticker
 Bottle holder (orange cover)
 Air pressure gauge
 Sealing compound bottle
 Switch
Conexión
- El bote de sellador (n.º 8 de la ilustración) contiene 1) látex de caucho natural y 2) etanodiol. Estas sustancias son nocivas si se ingieren.
- The contents of this bottle may cause allergic skin reactions or otherwise be potentially harmful to the respiratory tract, the skin, the central nervous system, and the eyes.
Precauciones:
- Manténgalo fuera del alcance de los niños.
- No consuma el contenido.
- Evite el contacto prolongado o repetido con la piel. Retire cualquier prenda que haya entrado en contacto con el sellador.
- Lávese bien después de la manipulación.
Primeros auxilios:
- Piel: lave las zonas afectadas con agua y jabón. Busque atención médica si aparecen síntomas.
- Ojos: enjuague abundantemente con agua durante al menos 15 minutos, levantando ocasionalmente los párpados superior e inferior. Busque atención médica si aparecen síntomas.
- Inhalación: traslade a la persona afectada al aire libre. Si la irritación persiste, busque atención médica.
- Ingestión: NO provoque el vómito a menos que lo indique el personal médico. Busque atención médica.
- Disposal: Dispose of this material and its container at a hazardous or special waste collection point.
- Preparativos
Turn on the vehicle's hazard warning flashers if the tire sealing system is to be used in an area with traffic.
Si el pinchazo ha sido causado por un clavo o un objeto similar, no lo retire. Ayudará a sellar el orificio.
- Retire la etiqueta de límite de velocidad del lado del compresor. Péguela en un lugar bien visible del parabrisas para recordar al conductor que no debe superar esta velocidad. No conduzca a más de 80 km/h con un neumático reparado temporalmente con el sistema de sellado de neumáticos.
- Make sure the switch is in the 0 (Off) position and take out the electric cable and the hose.
- Unscrew the orange cover on the compressor and unscrew the cap on the sealing compound bottle.
- Screw the bottle onto the bottle holder as far as possible.
The bottle and the bottle holder are equipped with catches to help prevent the sealing compound from leaking. Once the bottle is screwed into place into the bottle holder, it cannot be unscrewed. The bottle can only be removed by a workshop2.
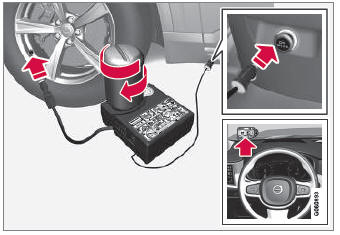
- Unscrew the tire's valve cap and screw the hose's valve connector as far as possible onto the valve.
Be sure the air release valve on the compressor's hose is completely closed.
- Inicio del procedimiento de sellado de neumáticos
Connect the electrical cable to the nearest 12 V outlet and start the vehicle.
- Start the compressor by moving the switch to the I (On) position.
Al arrancar el compresor, la presión puede aumentar hasta 6 bar (88 psi), pero disminuirá después de aprox. 30 segundos.
- Inflate the tire for 7 minutes.
- Switch off the compressor and check the inflation pressure using the air pressure gauge. The inflation pressure should be between 1.8 bar (22 psi) and 3.5 bar (51 psi). If the inflation pressure is too high, use the air release valve to release air.
- Apague el compresor y desconecte el cable eléctrico.
- Unscrew the hose from the tire's valve and screw the valve cap back on.
- After inflating a tire, always replace the valve cap to help prevent valve damage caused by gravel, dirt, etc.
- Utilice solo tapones de válvula de plástico. Los tapones metálicos pueden corroerse y resultar difíciles de retirar.
- Coloque la funda protectora sobre la manguera para evitar fugas del sellador residual. Devuelva el equipo al compartimento de carga.
- Immediately drive the vehicle at least 3 km (2 miles) at a maximum speed of 80 km/h to allow the sealing compound to seal the tire, and then recheck the inflation pressure.
- Vuelva a comprobar la presión de inflado
Connect the hose to the tire's valve and screw the hose connector onto the valve as far as possible. The compressor must be switched off.
- Check the inflation pressure on the air pressure gauge.
- Si la presión es inferior a 1,3 bar (19 psi), el neumático no está suficientemente sellado. El vehículo no debe moverse. Llame al servicio de asistencia en carretera para que remolquen el vehículo.
- If the inflation pressure is higher than 1.3 bar (19 psi), the tire must be inflated to the inflation pressure specified on the tire pressure decal on the driver's side door pillar (1 bar = 100 kPa = 14.5 psi). If the inflation pressure is too high, use the air release valve to release air.
Volvo recomienda conducir hasta el taller Volvo autorizado más cercano para sustituir o reparar el neumático. Informe al taller de que el neumático contiene sellador.
El bote de sellador sellado y la manguera deben sustituirse tras su uso. Volvo recomienda contactar con un taller Volvo autorizado para su sustitución.
1 Movilidad temporal
2 Se recomienda un taller autorizado Volvo.
Pon a prueba tus conocimientos
Un test rápido sobre el Volvo XC90: cada respuesta trae una explicación y un enlace a la página del manual.