Inspection and Replacement of the Generator and Voltage Regulator Brushes
Removal of the BOSCH Generator
PROCEDURE
1. Remove the drive belt (1) and the generator (2).
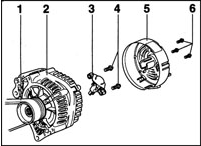
2. Unscrew the three mounting screws (6) and remove the protective cover (5).
3. Unscrew the two mounting screws (4) and carefully remove the voltage regulator (3) from the rear of the generator.
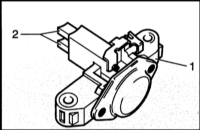
4. Replace the brushes (2) if their length is 5 mm or less. To do this, unsolder the leads. Refer to the accompanying illustration.
5. Check the slip rings for wear and, if necessary, lightly turn them down.
6. Clean the contact surfaces and check the spring tension; replace the springs if necessary.
INSTALLATION
1. Insert the brushes (A) and springs (B) into the brush holder (C) and solder them in place. Refer to the accompanying illustration.
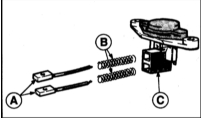
2. To prevent solder from entering the lead when soldering the brushes, clamp the lead with pliers.
* Solder entering the leads will make them stiff, preventing their installation.
3. The insulating sleeve over the lead next to the soldering point must be compressed with the lug.
4. After installation, check that the brushes move freely in the brush holder.
5. Hand-tighten the voltage regulator with one screw. Then carefully move it into the working position and tighten it fully.
6. Install the cover on the generator and secure it.
7. Install the generator.
Removal of the VALEO Generator
PROCEDURE
1. Remove the generator.
2. Unscrew the three mounting screws of the protective cover and remove it.
3. Unscrew the two mounting screws and one nut and remove the generator.
INSTALLATION
1. Install the new voltage regulator with its mounting cover and tighten the screws lightly.
2. Lift off the mounting cover.
3. Fit the supplied cover and secure it. M4 screws are tightened to a torque of 2 N·m, M5 screws to a torque of 4 N·m.
4. Secure the protective cover with the screws.
5. Install the generator.
Test yourself
A quick BMW 1 quiz: every answer comes with an explanation and a link to the manual page.