Generator - General Information
The BMW 5 Series is equipped with an alternating current (AC) generator. Depending on the vehicle model and equipment, generators rated at 80 A and 140 A may be installed.
The generator is driven by the engine through a V-ribbed belt. The rotor and stator of the generator have windings (the rotor winding is the field winding).
Electric current is supplied to the rotor field winding through the brushes and slip rings, creating an electromagnetic field in the generator.
As the rotor rotates, the position of its electromagnetic field changes, which induces an electric current in the stator windings.
Since the battery can only be charged with direct current, the alternating current is converted to direct current by a rectifier located on the diode plate. The voltage regulator changes the charging current by switching the field current on and off, depending on the state of discharge of the battery. The regulator keeps the operating voltage constant at 14 V, regardless of engine speed.
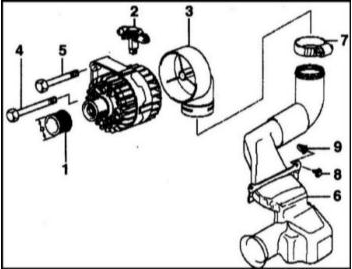
1 — pulley
2 — voltage regulator
3 — intake connection
4 — bolt
5 — bolt with washer
6 — air duct
7 — clamp
8 — self-tapping screw
9 — nut
Safety Precautions When Working on the Generator
• Do not mix up the voltage regulator and generator cables. Before disconnecting, mark the cables with adhesive tape.
• Do not connect the battery and voltage regulator while the engine is running.
• Do not remove the generator while the battery is connected.
• Always disconnect the battery before performing welding work.
Checking the Generator Charging Voltage
PROCEDURE
1. Connect a voltmeter between the positive and negative battery terminals.
2. Start the engine. The voltage may drop to 8 V (at an outside temperature of +20°C).
3. Increase the engine speed to 3000 rpm. The voltage should be 13.0 - 14.5 V. This indicates that the generator and regulator are serviceable. The generator output voltage must be higher than the battery voltage so that the battery is charged while driving.
4. Check the regulator. To do this, switch on the high beams and measure the voltage at 3000 rpm. The voltage must not exceed the value obtained in the previous measurement by more than 0.4 V.
5. If the fault has not been found, check the brushes or repair the generator (workshop job).
Removal and Installation of the Generator
REMOVAL
1. Disconnect the negative battery cable. The battery is located in the luggage compartment behind the right side trim.
When the battery is disconnected, the electronic memory is erased. Refer to Battery Removal and Installation.
2. Insulate the negative battery cable terminal with tape to prevent accidental contact with the battery terminals.
3. Remove the air filter. Refer to Air Filter Housing and Mass Air Flow Sensor Removal and Installation.
4. Remove the fan clutch. Refer to Fan and Fan Clutch Removal and Installation.
5. Remove the drive belt. Refer to Drive Belt Removal, Installation and Tensioning.
6. Disconnect the breather hose at the rear of the generator.
7. Disconnect the D+ terminal connector at the rear of the generator by pressing the lock.
8. Remove the B+ terminal cover. Remove the nut and take off the thick cover.
9. Unscrew the mounting bolts and remove the generator.
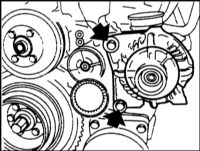
INSTALLATION
1. Install the generator and tighten the mounting bolts.
2. Secure the cable at the rear of the generator to a torque of 15 N·m.
3. Mate the connector and lock it.
4. Install the breather hose at the rear of the generator.
5. Install the drive belt. Refer to Drive Belt Removal, Installation and Tensioning.
6. Install the fan clutch. Refer to Fan and Fan Clutch Removal and Installation.
7. Install the air filter. Refer to Air Filter Housing and Mass Air Flow Sensor Removal and Installation.
Test yourself
A quick BMW 1 quiz: every answer comes with an explanation and a link to the manual page.