Tyre inflation kit
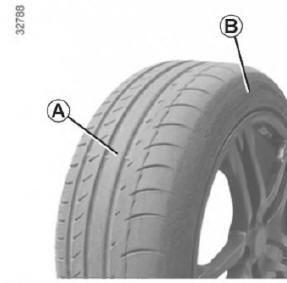
The kit allows repair of tyres whose tread A has been damaged by objects smaller than 4 millimetres. It cannot be used to repair all types of damage, e.g. cuts longer than 4 millimetres or cuts in the sidewall B of the tyre. Also check that the condition of the wheel rim is correct. Do not remove the object that caused the puncture if it is still stuck in the tyre. Do not use the kit for inflating if the tyre was damaged by driving on a punctured tyre. Before carrying out any repair, carefully check the sidewalls of the tyres. Driving with an under-inflated or even punctured tyre may be dangerous and may lead to a situation where repair of the damage is no longer possible. This repair is temporary. A punctured tyre must be thoroughly checked (and repaired if possible) by a specialist as soon as possible. When replacing a tyre previously repaired with the kit, inform the specialist carrying out the replacement.Vibrations caused by the presence of sealant in the tyre may be felt while driving. The inflation kit is approved only for vehicles that have it as original equipment. Under no circumstances may it be used to inflate tyres on other vehicles or to inflate inflatable objects (spare wheel, dinghy, etc.). Handle the container with tyre repair fluid carefully to avoid contact with skin. If the fluid does get on your skin, rinse the area with plenty of running water. Keep the tyre repair kit out of the reach of children. Do not dispose of empty containers in the environment. Hand them over to an Authorised Brand Partner or a specialist recycling facility. The container has a limited shelf life, which is stated on the label. Check the expiry date. To replace the inflation hose and the tyre repair fluid container, go to an Authorised Brand Partner.
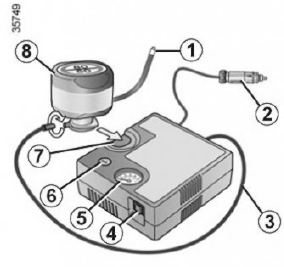
Depending on the vehicle version, in the event of a puncture, use the kit located in the luggage compartment or under the luggage compartment floor covering.
Before using the kit, park the vehicle far enough from the traffic zone, switch on the hazard warning lights, apply the parking brake and ask all passengers to leave the vehicle, making sure they keep a safe distance from the traffic zone.With the engine running and the parking brake applied,
- Unroll the hose of the canister;
- connect hose 3 of the compressor to the canister inlet 8
- - depending on the vehicle version, connect or screw the canister 8 to the compressor at its end fitting 7;
- unscrew the valve cap of the wheel and screw the inflation nozzle onto canister 1
- connect plug 2 necessarily to the vehicle's accessory socket;
- press switch 4 to inflate the tyre to the recommended pressure value (see the section "tyre pressures");
- after a maximum of 15 minutes, stop inflating to read the pressure value (on gauge 5).
Note: while the canister empties (approximately 30 seconds), gauge 5 briefly shows a pressure of up to 6 bar, then the pressure drops.
- adjust the tyre pressure to the recommended value: to increase the pressure, continue inflating using the kit; to decrease the pressure, press button 6.
If the minimum pressure of 1.8 bar cannot be reached within 15 minutes, the repair is not possible. Do not drive the vehicle; contact an Authorised Brand Partner.
If parking on the shoulder, warn other road users of the vehicle's presence using a warning triangle or other warning devices required by the local regulations of the country in which you are located.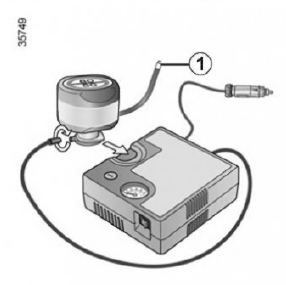
After the tyre has been correctly inflated, remove the kit: slowly unscrew nozzle 1 so as not to spray the product, and store the canister in its plastic bag so that the product does not leak.
No objects should be on the floor near the driver's seat: in the event of sudden braking they could slide towards the pedals and prevent their use.- Stick the sticker with the recommended driving conditions in a visible place on the dashboard;
- Stow the kit.
- After the first inflation of the tyre, air will continue to escape; it is necessary to drive a short distance to seal the hole.
- Start the vehicle immediately and drive at 20–60 km/h so that the product is distributed evenly in the tyre, then stop after 3 kilometres of driving to check the pressure.
- If the pressure exceeds 1.3 bar but is lower than the recommended value, adjust it (see the sticker on the edge of the driver's door). Otherwise, contact an Authorised Dacia Partner: repair is not possible.
Recommendation for using the kit
The kit must not run for more than 15 minutes in a row.
Note: a missing or incorrectly tightened valve cap may impair tyre sealing and cause pressure loss. Always use valve caps identical to the original ones and tighten them fully. After repairing with the kit, the maximum distance you may drive is 200 km. In addition, limit your speed, which must never exceed 80 km/h. A sticker reminding you of this must be placed in a visible location on the dashboard. Depending on the country of use or local regulations, the tyre repaired with the inflation kit must be replaced.Test yourself
A quick Dacia Sandero / Logan quiz: every answer comes with an explanation and a link to the manual page.