Inflating the tire
WARNINGS
- Before inflating, check the tire sidewall. If you can see any cracks, bulges or similar damage, do not attempt to inflate the tire.
- Do not stand close to the tire while the compressor is inflating it.
- Check the sidewall of the tire. If there are any cracks, bulges or similar damage, switch off the compressor and deflate the tire using the pressure release valve I. Do not continue driving with this tire.
- The sealant contains natural latex. Avoid contact with skin and clothing. If contact occurs, rinse the area immediately with plenty of water and contact a doctor.
- If the tire pressure does not reach 1.8 bar (26 psi) within 10 minutes, the tire may be seriously damaged and temporary repair is not possible. In this case, do not continue driving with this tire.
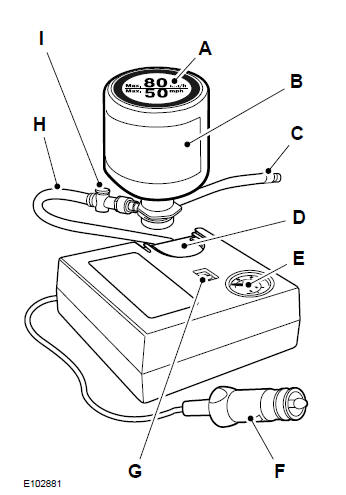
- Label
- Sealant bottle
- Sealant bottle hose
- Bottle holder
- Pressure gauge
- Power plug with cable
- Compressor switch
- Repair kit hose
- Pressure release valve
1. Remove the tire repair kit from its packaging.
2. Remove label A showing the maximum permitted speed (80 km/h) from the sealant bottle and attach it to the instrument panel within the driver's field of view.
Make sure the label does not cover any important component.
3. Remove hose H with pressure release valve I and power plug with cable F from the kit.
4. Connect hose H with pressure release valve I to sealant bottle B.
5. Secure sealant bottle B in holder D.
6. Remove the valve cap from the damaged tire.
7. Screw sealant bottle hose C firmly onto the valve of the damaged tire.
8. Make sure compressor switch G is in position 0.
9. Insert power plug F into the cigarette lighter socket or auxiliary power socket. See Cigarette lighter (page 90).
10. Start the engine.
11. Move compressor switch G to position 1.
12. Inflate the tire for no longer than 10 minutes to a pressure of at least 1.8 bar (26 psi) and at most 3.5 bar (51 psi). Move compressor switch G to position 0 and check the current tire pressure using pressure gauge E.
Note: If the tire pressure has not reached 1.8 bar (26 psi), do not continue.
Note: While the sealant is being pumped in through the tire valve, the pressure may rise to 6 bar (87 psi), but it will drop again after approximately 30 seconds.
13. Remove power plug F from the cigarette lighter socket or auxiliary power socket.
14. Quickly unscrew hose C from the tire valve. Refit the valve cap.
15. Leave sealant bottle B in holder D.
16. Make sure the kit is stored safely in the vehicle but is still easily accessible. The kit will be needed again when you check the tire pressure.
17. Drive immediately for approximately 3 km so that the sealant can seal the damaged area.
WARNING
If severe vibration, unstable steering behavior or noises occur while driving, reduce speed and carefully drive to a place where you can stop the vehicle safely. Check the tire and its pressure again. If the tire pressure is lower than 1 bar (14.7 psi) or if any cracks, bulges or similar damage are visible, do not continue driving with this tire.
18. Stop the vehicle after driving approximately 3 km. Check and, if necessary, adjust the pressure in the damaged tire.
19. Reconnect the kit and read the tire pressure on pressure gauge E.
20. Adjust to the recommended pressure value. See Technical specifications (page 161).
21. Once the tire is inflated to the correct pressure, move compressor switch G to position 0, remove power plug F from the socket, unscrew hose C and refit the valve cap.
22. Leave hoses C and H connected to sealant bottle B and store them in a safe place.
23. Drive to the nearest tire service center to have the damaged tire replaced. Before the tire is removed from the rim, inform the mechanic that it contains sealant. Replace sealant bottle B and hose C as soon as possible after use.
Note: Remember that emergency tire repair kits provide only temporary mobility. Regulations regarding tire repair after using a tire repair kit may vary by country. For information, consult a specialist.
WARNING
Before driving, make sure the tire pressure is at the recommended value. See Technical specifications (page 161).
Check the tire pressure until the sealed tire is replaced.
Empty sealant bottles can be disposed of in household waste containers. Sealant residues should be returned to a dealer or disposed of in accordance with local waste regulations.
Test yourself
A quick Ford Fiesta quiz: every answer comes with an explanation and a link to the manual page.