Back-Up Lamp Switch Inspection and Replacement
INSPECTION
PROCEDURE
1. First, check the condition of the 10 A fuse No. 9 in the fuse/relay junction block under the instrument panel. Replace a blown fuse with a new one. If the new fuse also blows immediately (without selecting reverse), check the wiring between the back-up lamp switch and the junction block. If the fuse blows when reverse is selected, check the wiring between the switch and the combination rear lamps.
2. Select reverse with the shift lever and turn the ignition on. The white back-up lamps in the rear combination lamp assemblies should come on. Turn the ignition off.
3. If the lamps do not come on, check the condition of the corresponding bulbs.
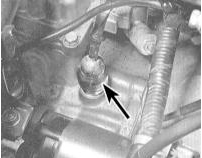
4. If the fuse and bulbs are good, locate the back-up lamp switch on the upper part of the transmission case, disconnect its wiring harness connector, and connect an ohmmeter across the two exposed terminals.
5. With reverse selected, there should be continuity between the connector terminals (switch closed). In any other lever position, the switch should be open (no continuity).
6. If the results of this check are negative, replace the back-up lamp switch.
7. If the switch is good, check the condition of its ground circuit. If the ground is good, check the entire wiring for open circuits.
Replacement
8. Disconnect the wiring from the back-up lamp switch.
9. Unscrew the back-up lamp switch from the transmission case.
10. Remove and discard the old washer.
11. Install a new washer and the new back-up lamp switch.
12. Connect the wiring.
Test yourself
A quick Honda Accord quiz: every answer comes with an explanation and a link to the manual page.