Transmission Removal
PROCEDURE
1. Disconnect both battery cables (negative cable first). Remove the battery and its tray (refer to the Engine Electrical Section).
If the vehicle is equipped with a stereo system that has an anti-theft code, make sure you have the correct code to reactivate the audio system before disconnecting the battery!
2. Remove the air intake hose and the air cleaner cover (refer to the Fuel and Exhaust Section).
3. Disconnect the starter motor wiring and remove the starter motor (refer to the Engine Electrical Section).
4. Disconnect the transmission ground strap and the back-up lamp switch wiring (refer to the Back-Up Lamp Switch Inspection and Replacement section). Remove the wiring harness clip from the transmission case.
5. Select reverse.
6. Disconnect the select and shift cables from the transmission (refer to the Shift Lever Removal and Installation section).
It is not necessary to release the cables from the support brackets.
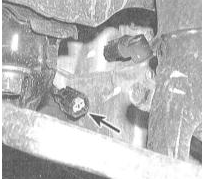
7. Disconnect the wiring from the vehicle speed sensor (VSS).
8. Disconnect the hydraulic clutch line fitting from the pressure line. Remove the pressure line and the clutch slave cylinder from the pushrod (refer to the Clutch and Drive Shafts Section).
Be careful not to bend or twist the pressure line. Once disconnected, immediately secure it with wire. Do not depress the clutch pedal while the slave cylinder is removed.
9. Remove the bolts securing the front engine mount bracket to the engine block, and remove the rear mount bracket (refer to the Engine Section).
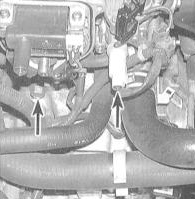
10. Free the transmission wiring harness from the retaining clips and remove the two upper transmission mounting bolts.
11. Loosen the front wheel nuts, raise the vehicle and support it on safety stands. Support the engine/transmission from above using a hoist, or a beam placed across the edges of the hood.
12. Remove the front wheels.
13. Remove the engine undershield.
14. Drain the transmission oil (refer to Chapter Routine Maintenance).
15. Disconnect the lower control arms from the steering knuckle assemblies, then disconnect the stabilizer links from the lower control arms (refer to Chapter Suspension and Steering).
16. Disconnect the left drive shaft from the intermediate shaft and the right drive shaft from the transaxle (refer to Chapter Clutch and Drive Shafts). Secure the drive shafts with wire to the suspension components, making sure they do not hang on the outer CV joints. To prevent dirt from entering, wrap the joint assemblies in plastic bags.
17. Remove the intermediate shaft support bearing bolts and remove the intermediate shaft from the left side of the transmission (refer to Chapter Clutch and Drive Shafts).
18. Remove the clamp bolt of the right stabilizer link and separate the link from its shock absorber (refer to Chapter Suspension and Steering).
19. Remove the mounting bolts from both tie rods (refer to Chapter Suspension and Steering).
20. Release the power steering hydraulic line from the brackets on the subframe.
21. Remove the subframe assembly, marking its position relative to the body beforehand.
22. Remove the clutch access cover or the engine support bracket assembly.
23. Remove the intake manifold mounting bracket.
24. Turn the inner CV joint of the right drive shaft so that it does not interfere with transmission removal.
25. Support the transmission with a floor jack (preferably with a special adapter), securing it to the jack head with a safety chain.
Special transmission adapters for the floor jack head are available. Raise the transmission slightly to fully unload its mounts.
26. Remove the transmission mount together with its bracket (refer to Chapter Engine). Remove the threaded stud from the transmission case.
27. Remove the transmission mounting bolts above the intermediate shaft and near the clutch slave cylinder. Remove the two engine mount bracket bolts.
28. Make sure all hydraulic lines and wiring harnesses are fully disconnected, then carefully separate the transmission from the engine by moving the jack. Once the transmission input shaft is fully clear of the clutch assembly, remove the transmission from under the vehicle.
29. After removing the transmission, the clutch components are accessible and their condition should be checked at this time. As a rule, the clutch is replaced when the transmission is removed (refer to Chapter Clutch and Drive Shafts).
Test yourself
A quick Honda Accord quiz: every answer comes with an explanation and a link to the manual page.