Charging System Check - Regulated Voltage Check (Voltage Regulator Check)
This check determines whether the alternator voltage regulator correctly controls the alternator output voltage.
PREPARATION FOR INSPECTION
1. Before starting the test, perform the following checks and repair as necessary:
1) Check that the battery installed in the vehicle is fully charged.
Refer to the "Battery" section for the inspection procedure.
2) Check the tension of the generator drive belt.
Refer to the "COOLING SYSTEM" section for the inspection procedure.
2. Turn the ignition switch to the "OFF" position.
3. Disconnect the wire from the negative (-) battery terminal.
4. Connect a digital voltmeter between the alternator "S (L)" terminal and ground.
First connect the (+) voltmeter lead to the alternator "S (L)" terminal, then connect the (-) lead to a suitable ground (body) or to the negative (-) battery terminal.
5. Disconnect the original wire from the alternator "B" terminal.
6. Connect an ammeter (DC, 0 – 100 A range) in series between the alternator "B" terminal and the disconnected original wire. Connect the (-) ammeter lead to the disconnected original wire.
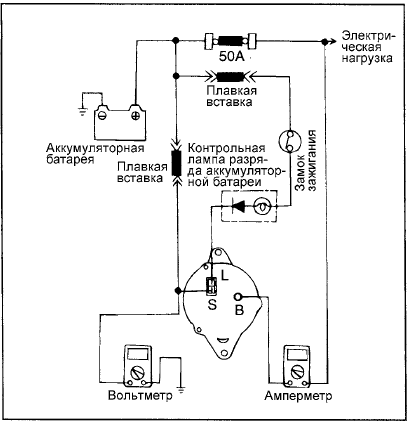
7. Connect a test tachometer according to the manufacturer's instructions. Connect the lead to the negative (-) battery terminal.
INSPECTION PROCEDURE
1. Turn the ignition on and check that the voltmeter shows the specified voltage.
Voltage: Battery voltage. If the voltmeter reads 0 V, either there is an open circuit between the alternator "S(L)" terminal and the positive (+) battery terminal, or the fuse has blown.
2. Turn off all lights and optional electrical equipment. Start the engine.
3. Set the engine speed to 2500 rpm. Read the voltmeter when the alternator output current is 10 A or less.
ANALYSIS OF RESULTS
1. If the voltmeter readings are within the regulated voltage specifications in the table, the voltage regulator is good. If the readings are not within the specified range, either the voltage regulator or the alternator is faulty.
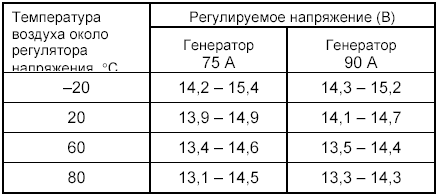
REGULATED VOLTAGE SPECIFICATIONS TABLE
2. After completing the check, gradually reduce engine speed to idle, then turn the ignition off.
3. Disconnect the wire from the negative (-) battery terminal.
4. Disconnect the ammeter, voltmeter and test tachometer.
5. Connect the original wire to the generator "B" terminal.
6. Connect the wire to the negative (-) battery terminal.
Test yourself
A quick Hyundai Elantra CN7 quiz: every answer comes with an explanation and a link to the manual page.