Engine Mechanical System
Engine Oil Repair Procedures
In this manual: Engine Mechanical System
13steps
~78min
3/5difficulty
Done 0 of 13
Replacement
|

- Park the vehicle on a level surface. Start the engine and allow it to warm up.
- Wait 5 minutes after loosening the oil filter cap to allow the oil to drain completely from the oil filter.
- Remove the engine under cover.
- Drain the engine oil.
- Remove the oil filler cap.
- Raise the vehicle, remove the drain plug (A) and drain the oil into a container.
- Replace the oil filter.
- Disconnect the oil filter cap (A) from the oil filter housing. Turn the cap slightly and wait one minute for residual oil in the filter to drain. Then remove the cap completely.
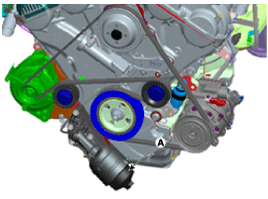
- Remove the oil filter element.
- Make sure the part number of the new oil filter matches the old one.
- Install a new oil filter element (A) and a new O-ring (B).
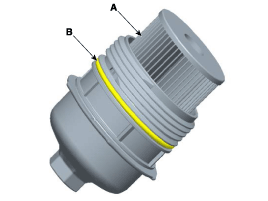
Check that the O-ring is installed correctly.
- Apply clean engine oil to the new O-rings. Screw the oil filter cap lightly into place and tighten it until the O-ring contacts the seat.
- Finally, retighten it to the specified torque.
Tightening torque: 31.4 ~ 38 N·m
- Disconnect the oil filter cap (A) from the oil filter housing. Turn the cap slightly and wait one minute for residual oil in the filter to drain. Then remove the cap completely.
- Fill with new engine oil.
- Install the drain plug (A) with a new gasket.
Tightening torque: 34.3 ~ 44 N·m
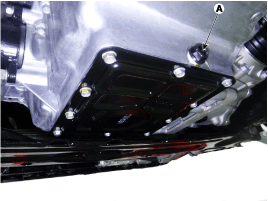
- Fill with new engine oil, checking the oil level with the dipstick. Total capacity: 7.3 L (7.71 US qt, 6.42 Imp qt, 1.92 US gal) Oil pan: 6.8 L (7.18 US qt, 5.98 Imp qt, 1.79 US gal) Drain and refill, including oil filter: 6.9 L (7.29 US qt, 6.06 Imp qt, 1.82 US gal)
- Install the oil filler cap.
- Install the drain plug (A) with a new gasket.
- Start the engine and check that oil does not leak from the drain plug or oil filter.
- Recheck the engine oil level.
Inspection
- Check the engine oil condition. Check for oil deterioration, water or coolant contamination, discoloration, or dilution. If the condition is clearly poor, replace the oil.
- Check the engine oil level. Warm up and stop the engine, then wait 5 minutes before checking whether the oil level is between the "F" and "L" marks on the dipstick. If the level is below "L", check for leaks and add oil up to the "F" mark.
Do not overfill the engine oil above the "F" mark.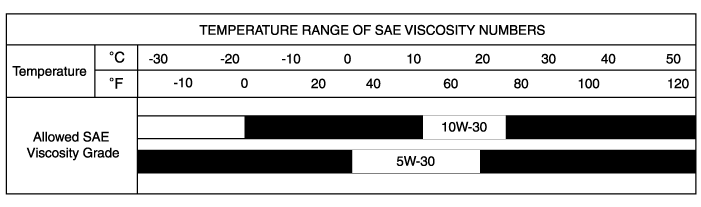
|
Test yourself
A quick Hyundai Genesis DH quiz: every answer comes with an explanation and a link to the manual page.
Was this page helpful?