Engine Mechanical System
Water Temperature Control Assembly Repair Procedures
In this manual: Engine Mechanical System
42steps
~252min
4/5difficulty
Done 0 of 42
Removal and Installation
Water Temperature Control Assembly- Disconnect the negative (-) battery cable from the battery.
- Remove the engine compartment cover. (Refer to Engine and Transaxle Assembly - "Engine Compartment Under Cover")
- Drain the engine coolant. (Refer to Cooling System — Engine Coolant)
- Remove the air cleaner assembly. (Refer to Intake and Exhaust System - "Air Cleaner")
- Disconnect the radiator lower hose (A).

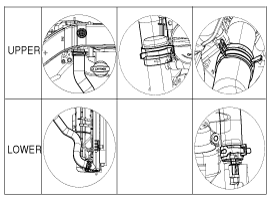
When installing the radiator hoses, follow the illustration below.
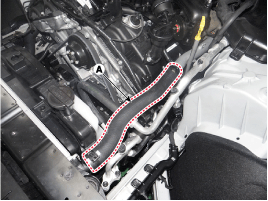
- Remove the water inlet pipe (A).
Tightening torque: 19.6 - 24 N·m

- Disconnect the upper radiator hose (A).
When installing the radiator hoses, follow the illustration below. - Disconnect the engine wiring harness.
- Engine control module connector (A)
- TCM connector (B)
- IDB connector (C)
- Ground cable (D)

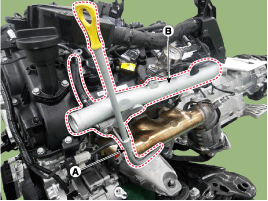
- Remove the oil level gauge.
- Remove the water outlet pipe and hose (B), then remove the oil level sensor (A).
Tightening torque: 19.6 - 24 N·m
- Remove the expansion tank. (Refer to Intake and Exhaust System - "Expansion Tank")
- Remove the upper hood cover.
- Remove the engine compartment partition (A).

- Disconnect the heater inlet and outlet hoses (A).
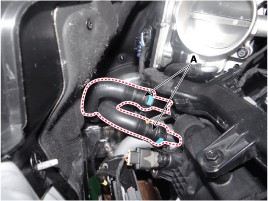
When installing the heater hoses, follow the illustration below.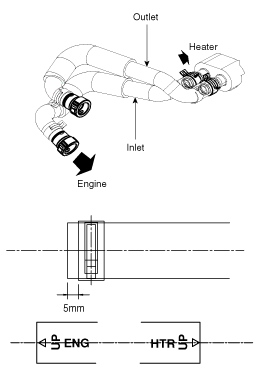
- Remove the ATF cooler hose (A) and heater hose (B).
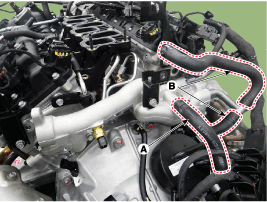
- Remove the water temperature control assembly (A) and gaskets. Bolt and nut tightening torque: 19.6 ~ 24 N·m
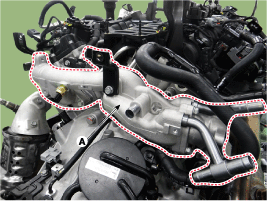
- Before installing the water temperature control assembly, clean the gasket surface.
- Do not reuse the gasket.
- To install, reverse the removal procedure.
- Fill the radiator with engine coolant and check for leaks. (Refer to Cooling System - "Engine Coolant")
- Disconnect the negative (-) battery cable from the battery.
- Remove the engine compartment cover. (Refer to Engine and Transaxle Assembly - "Engine Compartment Under Cover")
- Drain the engine coolant. (Refer to Cooling System — Engine Coolant)
- Remove the air cleaner assembly. (Refer to Air Intake and Exhaust System - "Air Cleaner").
- Disconnect the radiator lower hose (B).
When installing the radiator hoses, follow the illustration below. - Remove the oxygen sensor bracket (A) and sensor bracket (B).
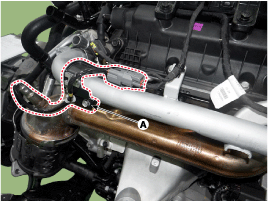

- Remove the water inlet pipe (A).
Torque: 19.6 ~ 24 N·m
Do not reuse the water pipe O-ring. - To install, reverse the removal procedure.
- Disconnect the negative (-) battery cable from the battery.
- Remove the engine compartment cover. (Refer to Engine and Transaxle Assembly - "Engine Compartment Under Cover")
- Disconnect the upper radiator hose (A).
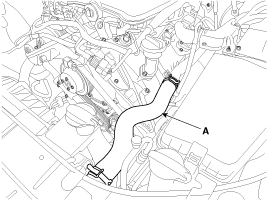
When installing the radiator hoses, follow the illustration below. - Remove the engine room cover and upper radiator grille cover. (Refer to Engine and Transaxle Assembly - "Engine Cover")
- Disconnect the engine wiring harness.
- Engine control module connector (A)
- TCM connector (B)
- IDB connector (C)
- Ground cable (D)
- Remove the oil level gauge.
- Remove the water outlet pipe and hose (B), then remove the oil level sensor (A).
Tightening torque: 19.6 ~ 24 N·m
- When installing, apply engine oil to the O-ring and take care not to damage the O-ring.
- Do not reuse the oil level gauge O-ring.
- Do not reuse the water pipe O-ring.
- To install, reverse the removal procedure.
- Recheck the coolant level. (Refer to Cooling System - "Coolant")
- Remove the water outlet pipe. (Refer to Cooling System - "Water Temperature Control Assembly")
- Remove the water inlet pipe. (Refer to Cooling System - "Water Temperature Control Assembly")
- Remove the intake manifold. (Refer to Intake and Exhaust Systems — Intake Manifold)
- Remove the delivery pipe and injector. (Refer to Engine Control / Fuel System - "Fuel Delivery System")
- Remove the water temperature control unit. (Refer to Cooling System - "Water Temperature Control Assembly")
- Remove the water center pipe (A).
Tightening torque: 9.8 ~ 11.8 N·m
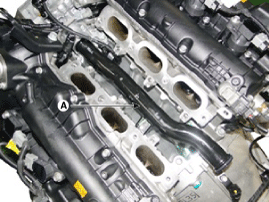
Do not reuse the water pipe O-ring. - To install, reverse the removal procedure.
Test yourself
A quick Hyundai Genesis DH quiz: every answer comes with an explanation and a link to the manual page.
Was this page helpful?