Automatic Transmission System (A8LF1)
Transmission Control Module (TCM)
In this manual: Automatic Transmission System (A8LF1)
13steps
~78min
3/5difficulty
Done 0 of 13
Components and Component Location
Component Location

| 1. Transmission Control Module (TCM) |
Description and Operation
Description
- Monitors vehicle driving conditions to determine the optimal gear setting.
- Performs a shift if the current gear setting differs from the determined optimal gear setting.
- Determines whether to engage and release the damper clutch (D/C) accordingly.
- Calculates the optimal line pressure level by constantly monitoring the torque level and adjusts the pressure accordingly.
- Diagnoses the automatic transmission (A/T) for malfunctions and failures.

Circuit Diagrams
TCM Connector
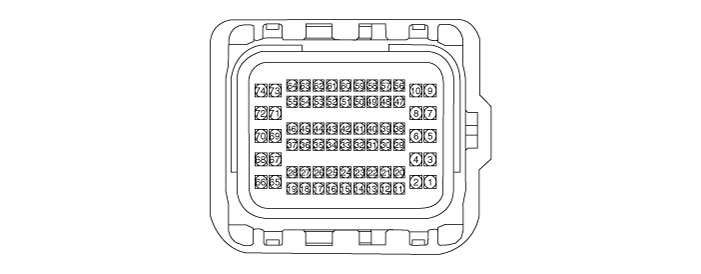
TCM Terminal Function
| Pin | Description | Pin | Description |
| 1 | UD Clutch Control Solenoid Valve (UD/C_VFS) | 34 | Input Speed Sensor Signal |
| 2 | 46 Clutch Control Solenoid Valve (46/C_VFS) | 43 | CAN High |
| 3 | Line Pressure Control Solenoid Valve (LINE_VFS) | 52 | CAN Low |
| 5 | Torque Converter Control Solenoid Valve (T/CON_VFS) | 56 | Output Speed Sensor Power |
| 7 | 28 Brake Control Solenoid Valve (28/B_VFS) | 57 | Mid Speed Sensor Power |
| 8 | 37R Clutch Control Solenoid Valve (37R/C_VFS) | 58 | Input Speed Sensor Power |
| 9 | OD Clutch and LR Brake Control Solenoid Valve (OD/C and LR/B_VFS) | 65 | Power Solenoid Valve 1 (2, 5, 7, 8) |
| 17 | IG1 | 66 | Power Solenoid Valve 2 (1, 3, 9, 27) |
| 25 | Transmission Fluid Temperature Sensor (+) | 67 | Power |
| 26 | Oil Temperature Sensor (-) | 68 | Power |
| 27 | SS-A Solenoid Valve (SS-A_ON/OFF) | 71 | Ground |
| 31 | Mid Speed Sensor Signal | 73 | Ground |
| 32 | Output Speed Sensor Signal | 74 | Ground |
TCM Terminal Input/Output Signal
| Pin | Description | Condition | Input/Output Value | |
| Type | Level | |||
| 1 | UD Clutch Control Solenoid Valve (UD/C_VFS) |
- | Output | 0 V/Battery Voltage Level |
| 9 V < Battery Voltage Level < 16 V | ||||
| 2 | 46 Clutch Control Solenoid Valve (46/C_VFS) |
- | Output | 0 V/Battery Voltage Level |
| 9 V < Battery Voltage Level < 16 V | ||||
| 3 | Line Pressure Control Solenoid Valve (LINE_VFS) |
- | Output | 0 V/Battery Voltage Level |
| 9 V < Battery Voltage Level < 16 V | ||||
| 5 | Torque Converter Control Solenoid Valve (T/CON_VFS) | - | Output | 0 V/Battery Voltage Level |
| 9 V < Battery Voltage Level < 16 V | ||||
| 7 | 28 Brake Control Solenoid Valve (28/B_VFS) |
- | Output | 0 V/Battery Voltage Level |
| 9 V < Battery Voltage Level < 16 V | ||||
| 8 | 37R Clutch Control Solenoid Valve (37R/C_VFS) |
- | Output | 0 V/Battery Voltage Level |
| 9 V < Battery Voltage Level < 16 V | ||||
| 9 | OD Clutch and LR Brake Control Solenoid Valve (OD/C and LR/B_VFS) | - | Output | 0 V/Battery Voltage Level |
| 9 V < Battery Voltage Level < 16 V | ||||
| 17 | IG1 | On | Power | 0 V/Battery Voltage Level |
| Off | 9 V < Battery Voltage Level < 16 V | |||
| 25 | Transmission Fluid Temperature Sensor (+) | ON | Input | 0V/5V |
| OFF | ||||
| 26 | Oil Temperature Sensor (-) | - | Ground | 0 V |
| 27 | SS-A Solenoid Valve (SS-A_ON/OFF) | High | Output | 0 V/Battery Voltage Level |
| Low | 9 V < Battery Voltage Level < 16 V | |||
| 31 | Mid Speed Sensor Signal | High | Input | 0.7 V/1.4 V |
| Low | ||||
| 32 | Output Speed Sensor Signal | High | Input | 0.7 V/1.4 V |
| Low | ||||
| 34 | Input Speed Sensor Signal | High | Input | 0.7 V/1.4 V |
| Low | ||||
| 56 | Output Speed Sensor Power | ON | Power | 0V/9V |
| OFF | ||||
| 57 | Mid Speed Sensor Power | On | Power | 0V/9V |
| Off | ||||
| 58 | Input Speed Sensor Power | On | Power | 0V/9V |
| Off | ||||
| 65 | Power Solenoid Valve 1 | - | Power | 0 V/Battery Voltage Level |
| 9 V < Battery Voltage Level < 16 V | ||||
| 66 | Power Solenoid Valve 2 | - | Power | 0 V/Battery Voltage Level |
| 9 V < Battery Voltage Level < 16 V | ||||
| 67 | Power | On | Power | 0 V/Battery Voltage Level |
| Off | 9 V < Battery Voltage Level < 16 V | |||
| 68 | Power | On | Power | 0 V/Battery Voltage Level |
| Off | 9 V < Battery Voltage Level < 16 V | |||
| 71 | Ground | - | Ground | 0 V |
| 73 | Ground | - | Ground | 0 V |
| 74 | Ground | - | Ground | 0 V |
Repair Procedures
Inspection
- TCM Ground Circuit Inspection: Measure the resistance between the TCM and chassis ground. (Inspect the terminal connected to chassis ground at the rear of the harness connector as the check point on the TCM side.)
Specification: Less than 1 ohm
- TCM Connector Inspection: Disconnect the TCM connector and visually inspect the ground terminals on the TCM side and harness side for bent pins or poor contact pressure.
- If no problem is found in steps 1 and 2, the TCM may be faulty. If so, replace the TCM with a new one, then recheck the vehicle. If the vehicle operates normally, the problem was most likely in the TCM.
- Recheck the original TCM: Install the original TCM (presumed faulty) into a known good vehicle and check the vehicle. If the problem recurs, replace the original TCM with a new one. If the problem does not recur, the problem is intermittent and another part may be faulty.
Removal
- Perform the oil pressure characteristics backup procedure with the diagnostic tool when replacing with a new TCM.
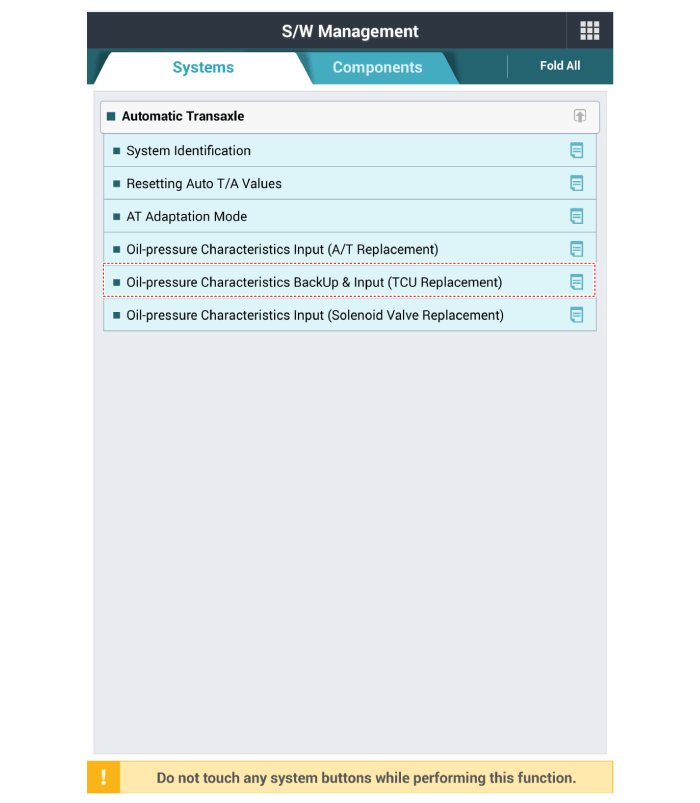
- Turn the ignition switch OFF and disconnect the negative (-) battery cable.
- Remove the glove box. (Refer to Body (Interior and Exterior) - Glove Box)
- Remove the Integrated Body Control Unit (IBU). (Refer to Body Electrical System - Integrated Body Control Unit (IBU))
- Remove the Integrated Control Module (ICM) relay block. (Refer to Body Electrical System - Fuse and Relay)
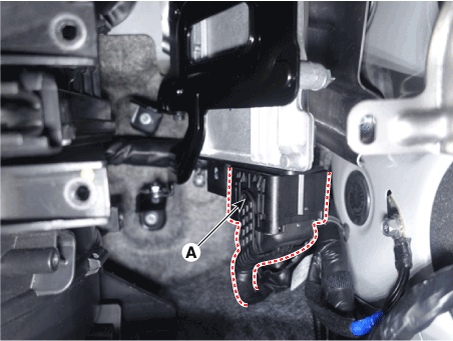
- Remove the TCM
- Disconnect the TCM connector (A).
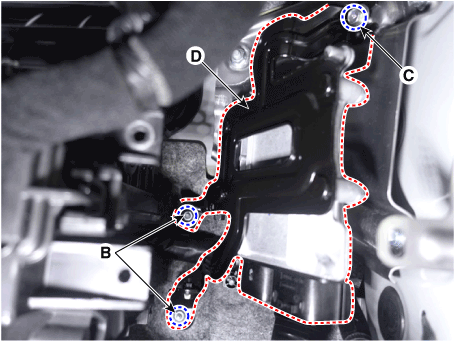
- Remove the TCM (D) by loosening the mounting nuts (B) and then the bolts (C).
- Remove the TCM (F) by loosening the nuts (E) on the bracket.
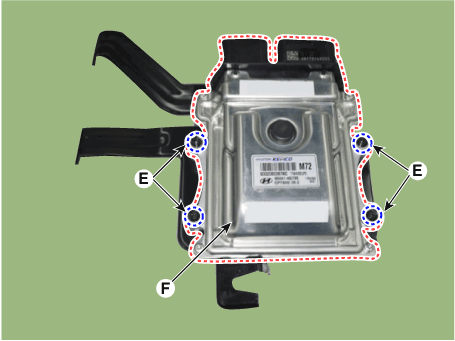
- Disconnect the TCM connector (A).
Installation
- To install, reverse the removal procedure.
- Perform the oil pressure characteristics input procedure with the diagnostic tool when replacing with a new TCM.
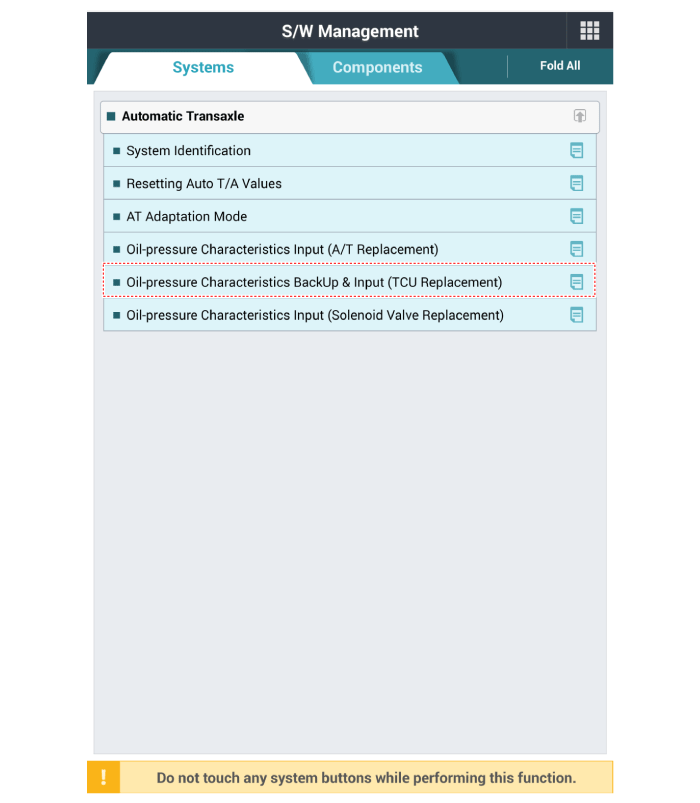
- To avoid any problems, including a feeling of delayed transmission engagement and shock during acceleration and vehicle start, be sure to perform the TCM learning procedure after replacing the transmission/TCM. (Refer to Automatic Transmission Control System - Repair Procedures)
Test yourself
A quick Hyundai Palisade quiz: every answer comes with an explanation and a link to the manual page.
Was this page helpful?