IN CASE OF EMERGENCY
Jacking Instructions
In this manual: IN CASE OF EMERGENCY
15steps
~90min
5/5difficulty
Done 0 of 15
- Always park on a hard, level surface as far as possible from the edge of the roadway before raising the vehicle.
- Turn on the hazard warning flashers.
- Firmly apply the parking brake and place the automatic transmission in PARK; manual transmission in REVERSE.
- Block the wheel diagonally opposite the wheel being raised.
- Never start or run the engine with the vehicle on the jack.
- Do not allow anyone to sit in the vehicle when it is on the jack.
- Do not get under the vehicle when it is supported by the jack. If you need to get under a raised vehicle, take it to a service center where it can be raised on a hoist.
- Use the jack only in the specified positions and only for raising this vehicle during tire service.
- If you are working on or near the roadway, be extremely cautious of vehicle traffic.
- To ensure that the spare tire, whether flat or inflated, is securely stowed, the spare must be stowed with the valve stem facing the ground.
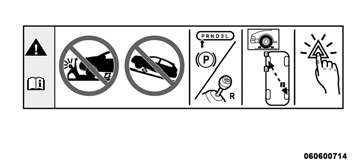
Jack Warning Label
- Remove the spare tire, jack, and tools from their stored location.
- Loosen (but do not remove) the wheel lug nuts by turning them counterclockwise one turn while the wheel is still on the ground.
- Assemble the jack and jack tools. Connect the jack handle drive to the extension, then to the lug wrench.
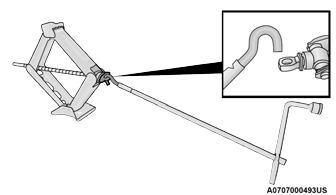
Assembled Jack and Tools
- Position the jack at the front or rear of the vehicle. Place the jack under the axle tube as shown. Do not raise the vehicle until you have confirmed that the jack is fully seated.
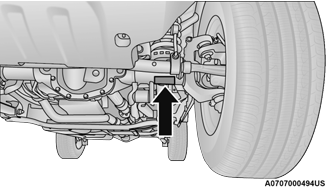
Front Jack Point
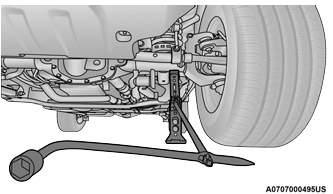
Front Jack Location
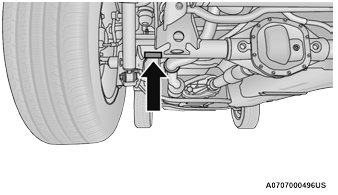
Rear Jack Point
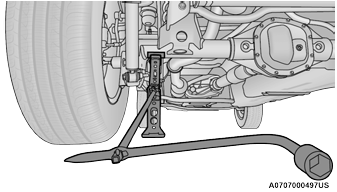
Rear Jack Location
- Raise the vehicle by turning the jack screw clockwise. Raise the vehicle only until the tire just clears the surface and there is enough clearance to install the spare tire. Minimal tire lift provides maximum stability.
- Remove the lug nuts and wheel.
- Install the spare tire onto the hub.
- Install the lug nuts with the tapered end facing the wheel. Lightly tighten the nuts clockwise.
- Lower the vehicle by turning the jack screw counterclockwise and remove the jack.
- Complete the wheel nut tightening. Push down on the wrench while at the end of the handle to increase leverage. Tighten the wheel nuts in a star pattern until each wheel nut has been tightened twice. If you are unsure of the correct tightness, have the torque checked with a torque wrench at an authorized dealer or service station.
- After 25 miles (40 km), check the wheel nuts. Tighten them with a torque wrench to make sure all wheel nuts are properly seated against the wheel.
- Remove the jack assembly and wheel blocks.
- Secure the jack and tools in their places.
- Secure the damaged wheel/tire to the spare wheel holder. Tighten the wheel nuts and locking nut.
- Return the locking bolt to the locked position on the camera cover by turning the lock clockwise with the supplied Torx #40 driver head and ratchet. Then reinstall the camera cover by placing it over the camera/tire holder until it clicks into place.
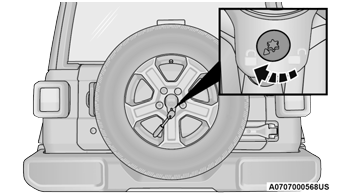
Locking Bolt Location
Test yourself
A quick Jeep Wrangler quiz: every answer comes with an explanation and a link to the manual page.
Was this page helpful?