Electrical System
Fuel Reserve Switch Inspection
In this manual: Electrical System
~1min read
- Fill the fuel tank with fuel and close the fuel tank cap.
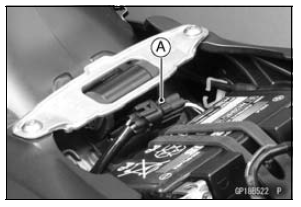
- Remove the front seat (see Front Seat Removal in the Frame chapter).
- Disconnect the fuel pump lead connector [A].
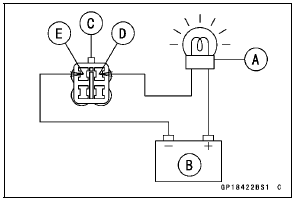
- Connect the test light [A] (12 V 3.4 W bulb in a socket with leads) and the 12 V battery [B] to the fuel pump lead connector [C].
Connections: Battery (+) → 12 V 3.4 W Bulb (One Side) 12 V 3.4 W Bulb (Other Side) → R/BK lead [D] Battery (–) → BK/W lead [E]
If the test light turn on, the reserve switch is defective.
Replace the fuel pump.
- Draw the fuel out from the fuel tank with a commercially available pump (see Fuel Tank Removal in the Fuel System (DFI) chapter).
- Connect the test light (12 V 3.4 W bulb in a socket with leads) and the 12 V battery to the fuel pump lead connector in the same way again.
Connections: Battery (+) → 12 V 3.4 W Bulb (One Side) 12 V 3.4 W Bulb (Other Side) → R/BK lead Battery (–) → BK/W lead
If the test light does not light, replace the fuel pump.
NOTE
It may take a long time to turn on the test light in case that the fuel reserve switch is inspected just after the fuel is drawn. Leave the fuel pump lead connector with leads for inspection connected for few minutes.
Test yourself
A quick Kawasaki Ninja ZX-10R quiz: every answer comes with an explanation and a link to the manual page.
Was this page helpful?