Engine Mechanical System
Timing Chain Cover Repair Procedures
In this manual: Engine Mechanical System
11steps
~66min
3/5difficulty
Done 0 of 11
Removal
- Remove the LH/RH cylinder head cover. (Refer to Cylinder Head Assembly - "Cylinder Head Cover").
- Remove the lower oil pan. (Refer to Lubrication System - "Oil Pan").
- Remove the automatic drive belt tensioner. (Refer to Valve Timing System - "Drive Belt Tensioner").
- Remove the crankshaft damper pulley. (Refer to Valve Timing System - "Crankshaft Damper Pulley")
- Remove the engine mounting bracket. (Refer to Engine and Transaxle Assembly - Engine Mounting)
- Carefully raise the engine assembly with a jack to access the side of the engine.
- Remove the water pump and gasket. (Refer to Cooling System - Water Pump)
- Remove the timing chain cover (A).
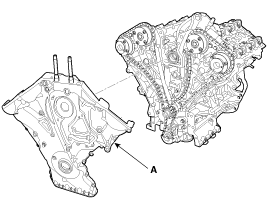
Be careful not to damage the contact surfaces of the cylinder block, cylinder head and timing chain cover.
Installation
- Install the timing chain cover.
- The sealant application areas on the timing chain cover and mating surfaces (cylinder head, cylinder block and lower oil pan) must be free of engine oil and other contaminants.
- Before installing the timing chain cover, apply liquid sealant TB 1217H to the gap between the cylinder head and the cylinder block. Assemble the parts within 5 minutes after applying the sealant.
Bead width: 2.5 mm (0.1 in)
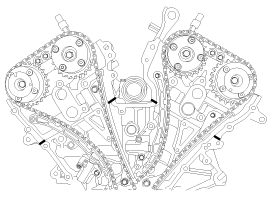
- After applying liquid sealant TB 1217H to the timing chain cover, assemble the parts within 5 minutes after applying the sealant. Apply the sealant without gaps.
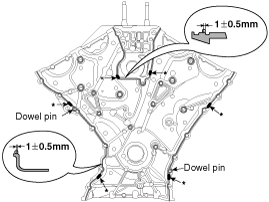
- Fill the T-joint area (6EA*) with sealant.
- Apply sealant around the dowel pin holes (2 places).
- Install a new gasket (A) to the timing chain cover.
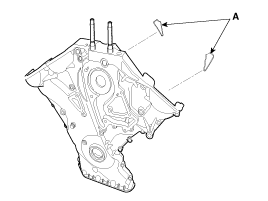
When installing the timing chain cover, make sure the sealant applied to the cover does not contact other components. - Use the locating pins on the cylinder block and the holes in the timing chain cover as a reference. The timing chain cover must be in the exact position for assembly. Tightening Torque: A (17 EA): 18.6 ~ 22 N·m N·m; B (2 EA): 24.5 ~ 26 N·m N·m; C (1 EA): 58.8 ~ 69 N·m N·m; D (1 EA): 58.8 ~ 69 N·m N·m; E (3 EA): 9.8 ~ 11.8 N·m N·m
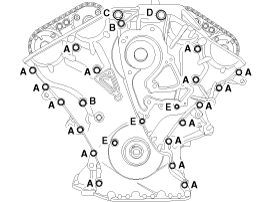
- Do not start the engine or perform a pressure test within 30 minutes after assembly.
- Install the front oil seal. (Refer to Valve Timing System - Front Oil Seal)
- Install the remaining parts in the reverse order of removal.
- Fill the engine oil.
- Clean the battery terminal posts and cable clamps with sandpaper. Assemble, then apply grease to prevent corrosion.
- Inspect for fuel leaks.
- After assembling the fuel line, turn the ignition ON (do not crank the engine) so the fuel pump operates for approximately two seconds to pressurize the fuel line.
- Repeat this operation two or three times, then check all fuel lines for leaks.
- Fill the radiator and the coolant reservoir with engine coolant.
- Bleed air from the cooling system.
- Start the engine and let it run until it warms up (until the radiator fan has cycled 3 or 4 times).
- Stop the engine and let it cool down. Check the radiator coolant level and add coolant if necessary. This allows trapped air to be purged from the cooling system.
- Tightly close the radiator cap, then restart the engine and check for leaks.
Test yourself
A quick Kia Cadenza VG Owner's Manual quiz: every answer comes with an explanation and a link to the manual page.
Was this page helpful?