Automatic Transmission
Shift Lever Repair Procedures
In this manual: Automatic Transmission
24steps
~144min
4/5difficulty
Done 0 of 24
Removal
- Disconnect the negative (-) battery cable from the 12V battery.
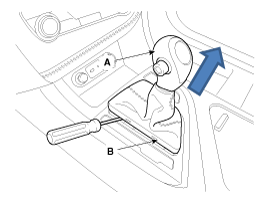
- Remove the knob (A) and boots (B) by pulling in the direction of the arrow after removing the boots from the upper console cover.
- Remove the floor console assembly. (Refer to Body - "Console")
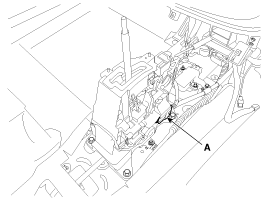
- Disconnect the main connector (A).
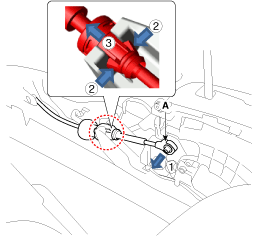
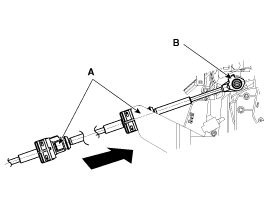
- Disconnect the shift cable (A) from the shift lever.
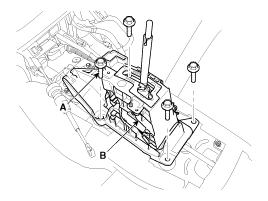
- Remove the bolt (A-4) and remove the shift lever assembly (B).
Tightening torque: 8.8 ~ 13.7 N·m
Installation
- Install in the reverse order of removal.

- Before installing the shift cable, make sure the shift lever and manual control lever are in the "N" position.
- Insert securely after checking the orientation of the cable connector (A).
- Insert the shift cable after checking the direction of the protrusion (B) to prevent incorrect assembly.
Disassembly
Replace "P" Position Switch
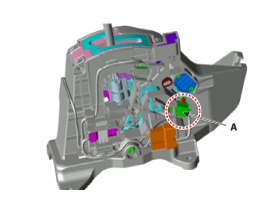
- Remove the screw and remove the "P" position switch (A).
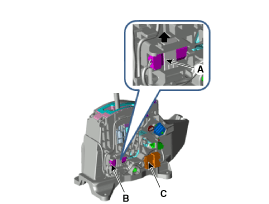
- Remove the plastic clip (A) and remove the shift lock solenoid (B).
- Remove the main connector (C).
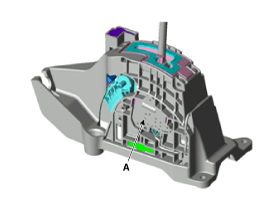
- Loosen the screw and remove the manual shift switch housing (A).
- Remove the wiring fixing clip (A) of the main connector.
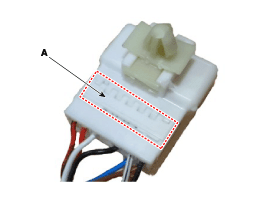
- Disconnect the "P" position switch wiring from the main connector.
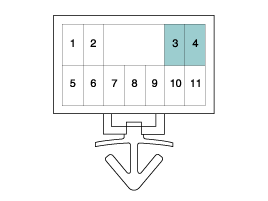
|
Replace Shift Lock Solenoid
- Loosen the screw and remove the "P" position switch (A).
- Remove the plastic clip (A) and remove the shift lock solenoid (B).
- Remove the main connector (C).
- Loosen the screw and remove the manual shift switch housing (A).
- Remove the wiring fixing clip (A) of the main connector.
- Disconnect the shift lock solenoid wiring from the main connector.
Before disconnecting the wiring, check the wire color.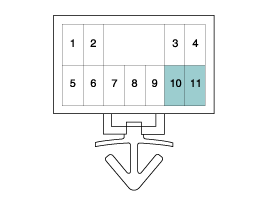
Terminal Function 3 "P" position switch (+) 4 "P" position switch (+) 5 Manual mode off 6 Manual mode selection 7 Manual mode up 9 Ground 10 Shift lock solenoid (-) 11 Shift lock solenoid (-)
Replace Manual Shift Switch Housing
- Loosen the screw and remove the "P" position switch (A).
- Remove the plastic clip (A) and remove the shift lock solenoid (B).
- Remove the main connector (C).
- Loosen the screw and remove the manual shift switch housing (A).
- Remove the wiring fixing clip (A) of the main connector.
- Disconnect the manual shift switch housing wiring from the main connector.
Before disconnecting the wiring, check the wire color.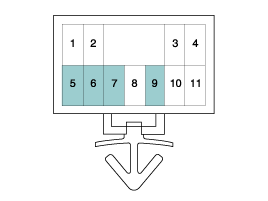
Terminal Function 3 "P" position switch (+) 4 "P" position switch (+) 5 Manual mode off 6 Manual mode selection 7 Manual mode up 9 Ground 10 Shift lock solenoid (-) 11 Shift lock solenoid (-)
Test yourself
A quick Kia Optima Hybrid Owner's Manual quiz: every answer comes with an explanation and a link to the manual page.
Was this page helpful?