CVVT and Camshaft
Components and Component Location
Components
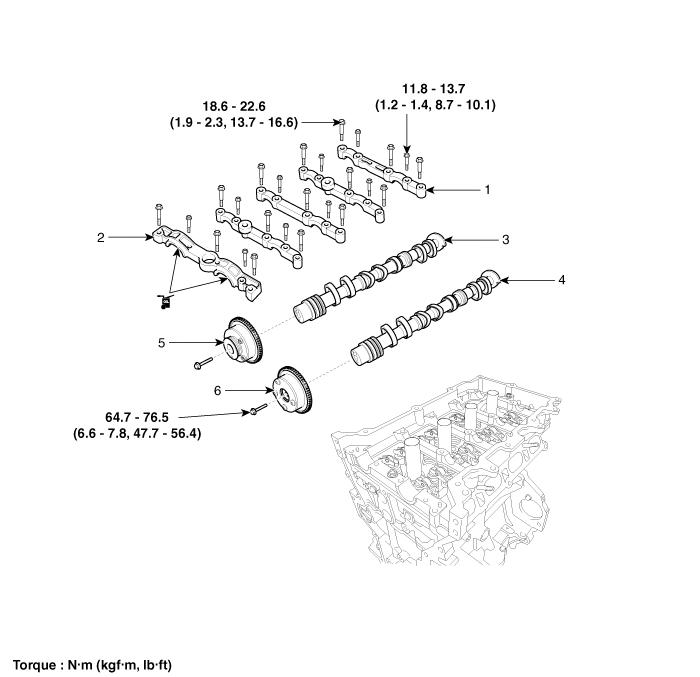
| 1. Camshaft Bearing Cap 2. Front Camshaft Bearing Cap 3. Exhaust Camshaft |
4. Intake Camshaft 5. Exhaust CVVT Assembly 6. Intake CVVT Assembly |
Description and Operation
Description
The Continuously Variable Valve Timing (CVVT) system advances or retards the intake and exhaust valve timing according to the control signal from the ECM, which is calculated based on engine speed and load.
CVVT control provides valve overlap or underlap, which improves fuel economy and reduces exhaust emissions (NOx, HC) and improves engine performance by reducing pumping losses, internal exhaust gas recirculation effect, improving combustion stability, improving volumetric efficiency, and increasing expansion work.
This system consists of the following:
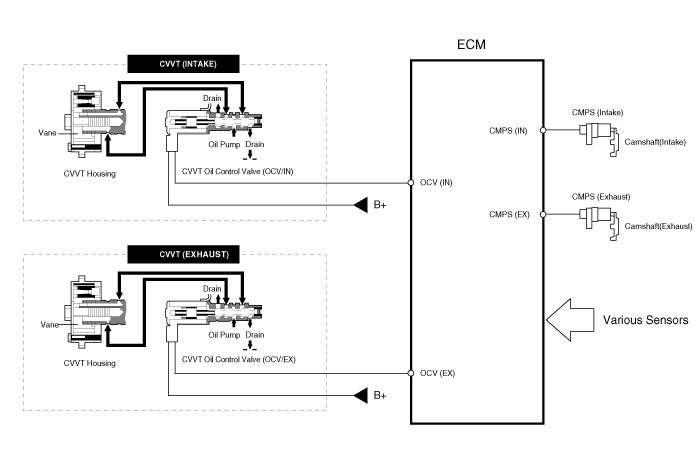
CVVT Oil Control Valve (OCV), which supplies engine oil to the cam phaser or drains engine oil from the cam phaser according to the ECM PWM (Pulse Width Modulation) control signal,
CVVT oil temperature sensor (OTS), which measures the engine oil temperature.
and Cam Phaser, which changes the cam phase by hydraulic force of engine oil.
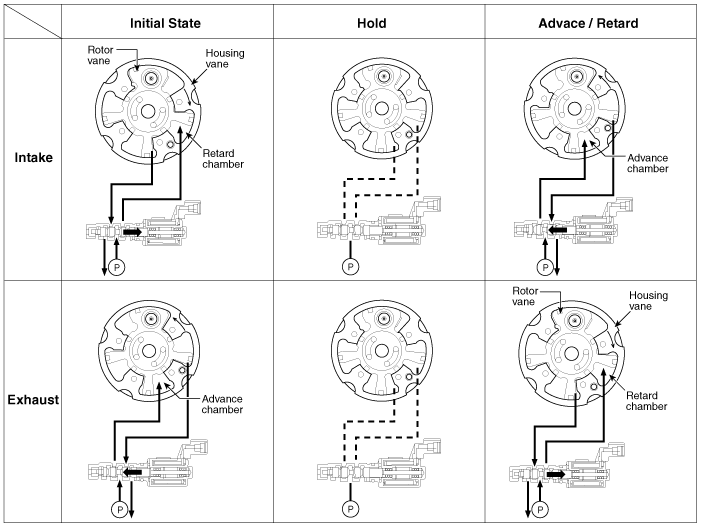
Engine oil flowing from the CVVT oil control valve changes the camshaft phase in the advance direction (intake advance / exhaust retard) or in the opposite direction (intake retard / exhaust advance) relative to engine rotation, by rotating the rotor connected to the camshaft inside the cam phaser.
Operating Principle
CVVT has a mechanism that rotates the rotor vane with hydraulic pressure generated by engine oil supplied to the advance or retard chamber according to the CVVT oil control valve control.
[CVVT System Mode]
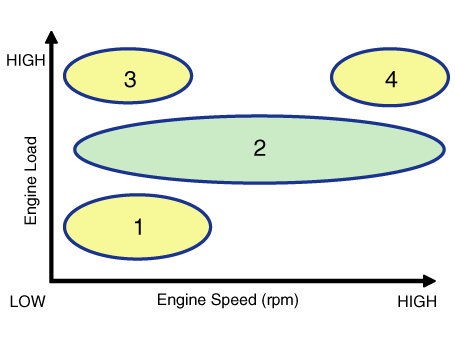
| (1) Low Speed/Low Load | (2) Partial Load |
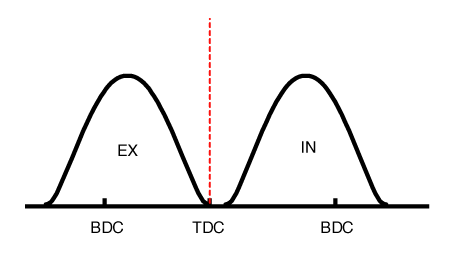 |
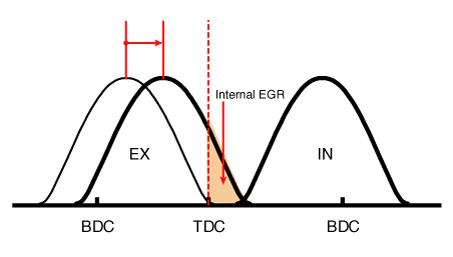 |
| (3) Low Speed/High Load | (4) High Speed/High Load |
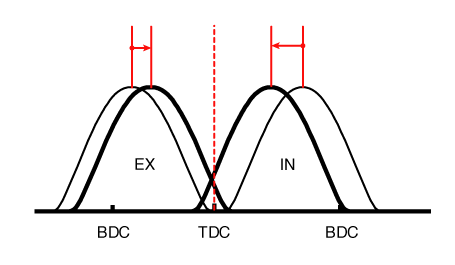 |
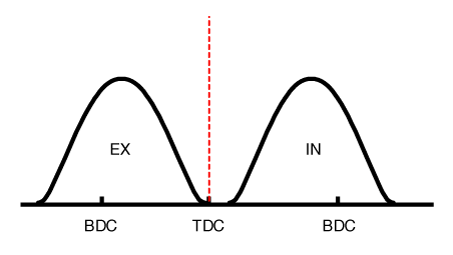 |
| Driving Condition |
Exhaust Valve | Intake Valve | ||
| Valve Timing |
Effect | Valve Timing |
Effect | |
| (1) Low Speed /Low Load |
Fully Advance |
* Lower valve overlap * Improved combustion stability |
Fully Retard |
* Lower valve overlap * Improved combustion stability |
| (2) Partial Load | Retard | * Increased expansion work * Reduced pumping losses * Reduced HC |
Retard | * Reduced pumping losses |
| (3) Low Speed /High Load |
Retard | * Increased expansion work | Advance | * Prevents intake backflow (improves volumetric efficiency) |
| (4) High Speed /High Load |
Advance | * Reduced pumping losses | Retard | * Improved volumetric efficiency |
Repair Procedures
Removal
Removal of the timing chain cover is not required for this procedure.
Remove the cylinder head cover.
(Refer to Cylinder Head Assembly - "Cylinder Head Cover")
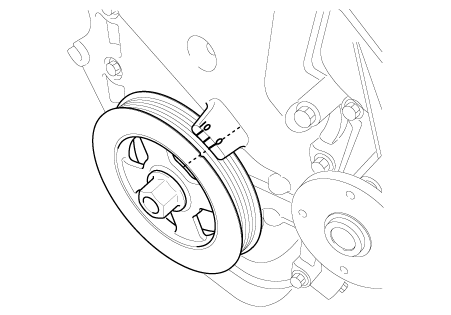
Set the No. 1 cylinder to TDC (top dead center) on the compression stroke.
Turn the crankshaft pulley and align its groove with the valve timing mark on the timing chain cover.
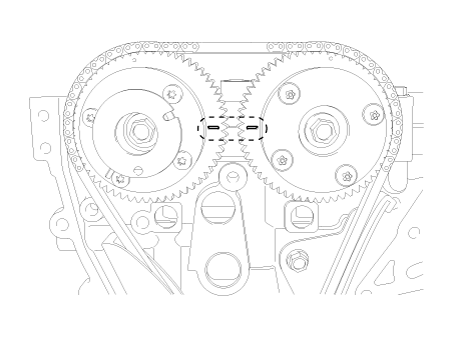
Make sure the TDC marks of the intake and exhaust CVVT sprockets are in a straight line with the cylinder head surface, as shown in the illustration. If not, turn the crankshaft one full revolution (360°) or more.
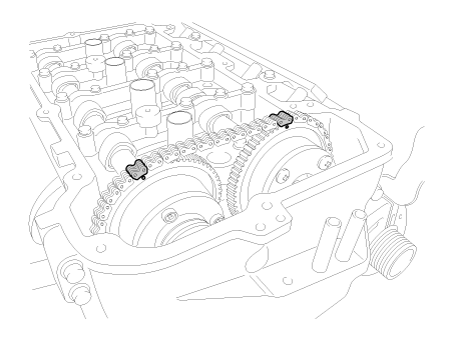
Mark the timing chain according to the timing marks on the CVVT sprockets.
Remove the crankshaft damper pulley.
(See Drive Belt System - "Crankshaft Damper Pulley")
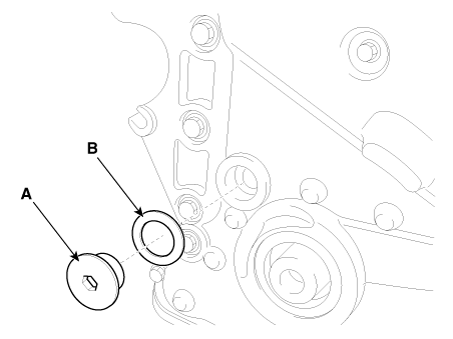
Remove the service plug bolt (A) and gasket (B).
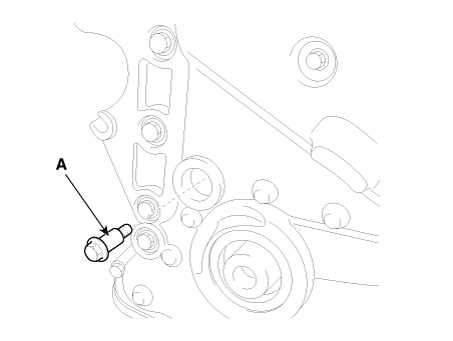
Remove the tensioner lever bolt (A).
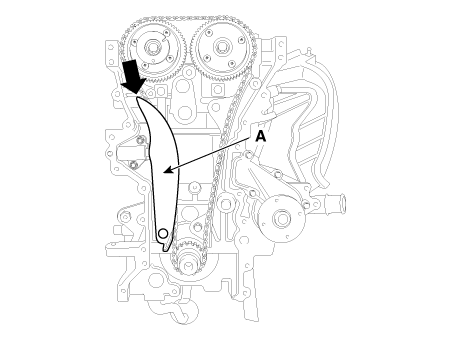
Press the tensioner lever (A). [Timing cover removed for illustration only]
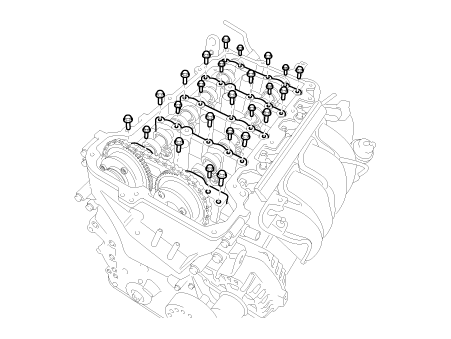
Remove the camshaft bearing caps.
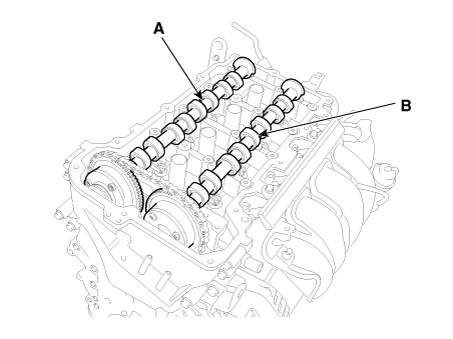
First remove the exhaust camshaft (A), then the intake camshaft (B).
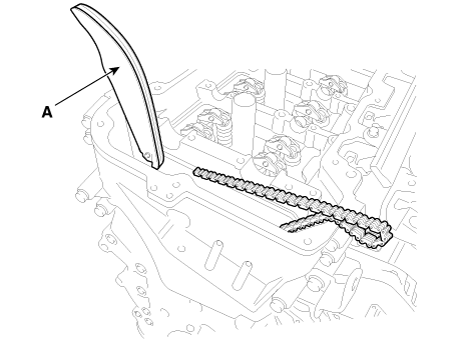
Remove the tensioner lever (A).
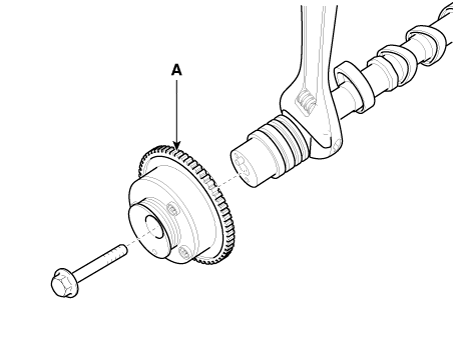
Remove the CVVT unit (A) from the camshaft.
Inspection
Camshaft
Inspect the cams.
Using a micrometer, measure the cam lobe height.
If the cam lift is less than specification, replace the camshaft.
Cam lift Intake: 39.0 mm (1.5354 in.) Exhaust: 38.66 mm (1.5220 in.)
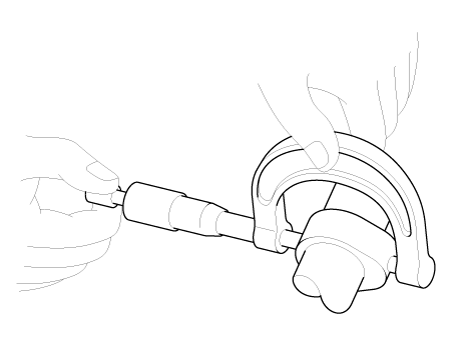
Inspect the camshaft journal surface for wear.
If the journal is excessively worn, replace the camshaft.
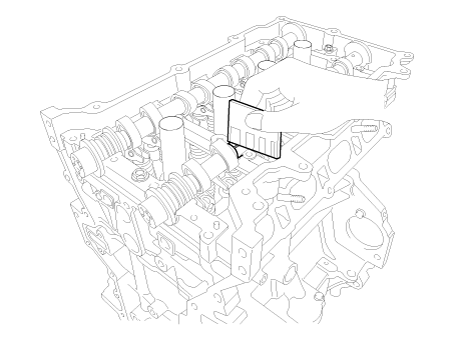
Inspect the camshaft journal oil clearance.
Clean the camshaft bearing caps and journals.
Install the camshafts on the cylinder head.
Place a strip of Plastigage on each camshaft journal.
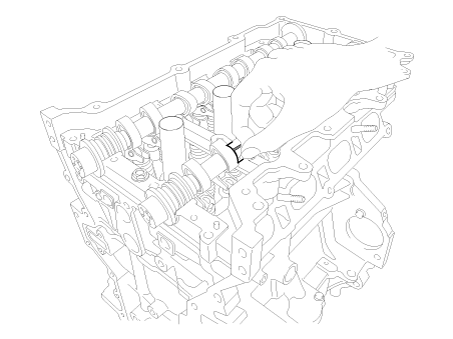
Install the bearing caps and tighten the bolts to the specified torque.
Tightening Torque
M6 bolts:
11.8–13.7 N·m (1.2–1.4 kgf·m, 8.7–10.1 ft-lbf)
M8 bolts:
18.6–22.6 N·m (1.9–2.3 kgf·m, 13.7–16.6 ft-lbf)
Remove the bearing caps.
Measure the Plastigage at its widest point.
If the oil clearance is greater than specified, replace the camshaft. If necessary, replace the bearing caps and cylinder head as a set.
Bearing oil clearance Standard: 0.032–0.062 mm (0.00126–0.00244 in.)
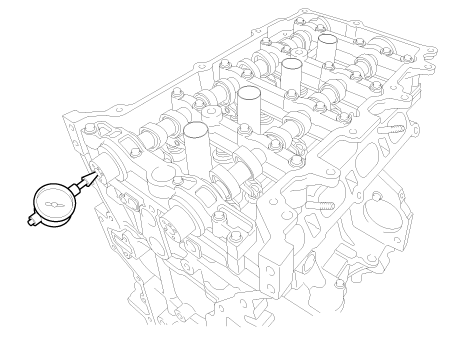
Inspect the camshaft end play.
Install the camshaft bearing caps.
Using a dial indicator, measure the camshaft end play by moving the camshaft back and forth.
If the end play is greater than specified, replace the camshaft.
If necessary, replace the bearing caps and cylinder head as a set.
Camshaft End Play
Standard:
0.10–0.19 mm (0.0039–0.0075 in)
Remove the camshafts.
Continuously Variable Valve Timing (CVVT) Assembly
Inspect the CVVT for smooth rotation.
Clamp the camshaft in a vise. Be careful not to damage the cam lobes and journals in the vise.
Make sure the CVVT is locked by turning it clockwise or counterclockwise. It should not rotate.
Intake CVVT: Seal one of the two advance holes in the camshaft journal with tape.
Exhaust CVVT: Seal one of the two holes in the camshaft journal with tape.
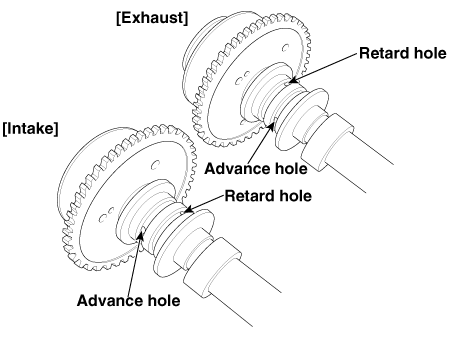
Intake CVVT: Apply approx. 150 kPa (1.5 kgf/cm², 21 psi) compressed air to the unsealed advance hole to release the lock.
Exhaust CVVT: Apply approx. 150 kPa (1.5 kgf/cm², 21 psi) compressed air to the unsealed retard hole to release the lock.
Intake CVVT: While applying compressed air, turn the CVVT in the advance direction (counterclockwise) within its phase range, and make sure the CVVT rotates smoothly.
Exhaust CVVT: While applying compressed air, turn the CVVT in the retard direction (clockwise), and make sure the CVVT rotates smoothly.
CVVT phase range
Intake: 25°±1° (from most retarded position to most advanced position)
Exhaust: 20°±1° (from most advanced position to most retarded position)
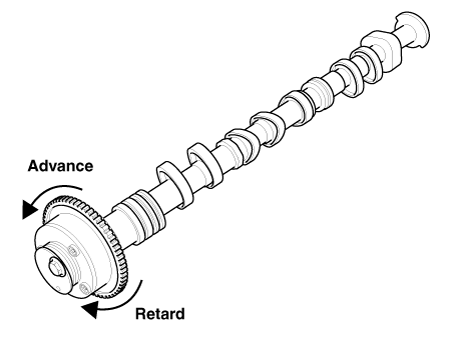
Intake CVVT: Turn the CVVT to the most retarded position (clockwise), then make sure the CVVT is locked.
Exhaust CVVT: Turn the CVVT to the most advanced position (counterclockwise), then make sure the CVVT is locked.
Installation
Install the CVVT assembly (A) onto the camshaft.
Tightening torque: 64.7–76.5 N·m (6.6–7.8 kgf·m, 47.7–56.4 ft-lbf)
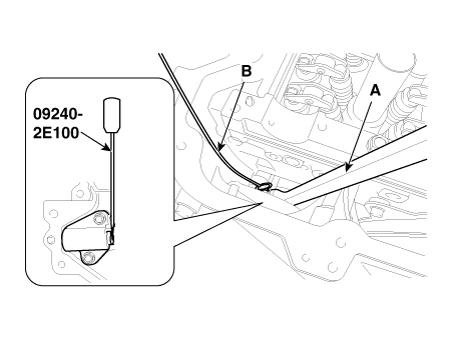
Compress the tensioner piston using the handle (A) and insert the stopper pin (B) into the hole in the tensioner to hold the piston compressed.
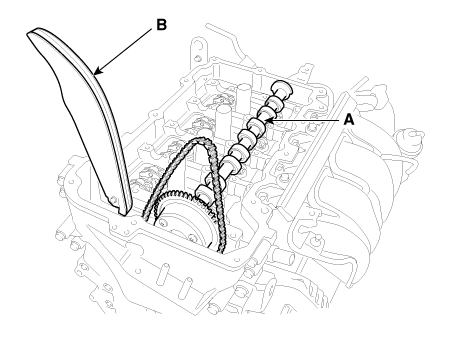
Position the intake camshaft (A), then insert the tensioner lever (B) along the timing chain.
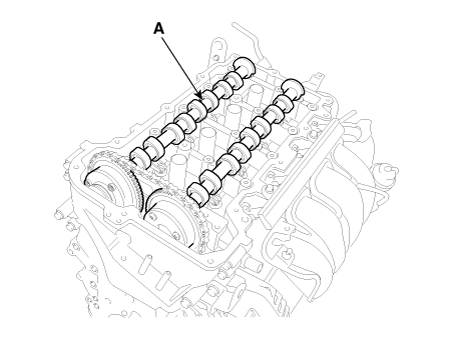
Install the exhaust camshaft (A).
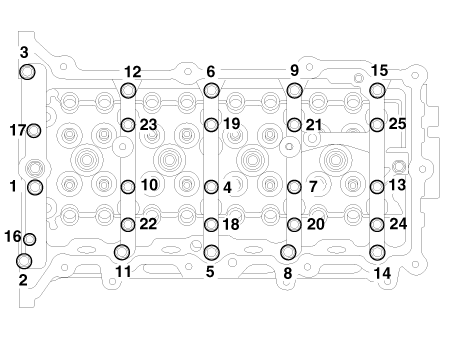
Install the camshaft bearing caps.
Tighten the bolts in several passes in the sequence shown.
Tightening Torque
M6 bolts:
11.8–13.7 N·m (1.2–1.4 kgf·m, 8.7–10.1 ft-lbf)
M8 bolts:
18.6–22.6 N·m (1.9–2.3 kgf·m, 13.7–16.6 ft-lbf)
Using a suitable tool, move the tensioner lever to align the tensioner bolt hole with the service hole.
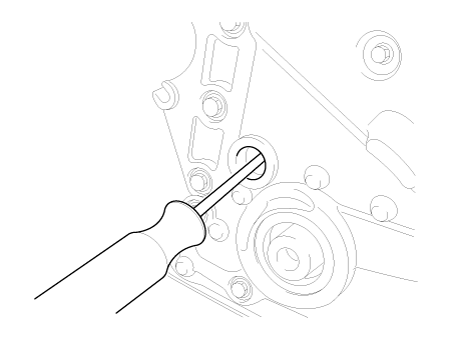
Install the tensioner lever bolt (A).
Tightening torque: 18.6–22.6 N·m (1.9–2.3 kgf·m, 13.7–16.6 ft-lbf)
Remove the stopper pin from the tensioner.
Rotate the crankshaft two turns in the normal direction of rotation (clockwise), then check that the CVVT sprocket timing marks are in line with the cylinder head surface.
Install the service plug bolt (A) with a new gasket.
Torque: 29.4–39.2 N·m (3.0–4.0 kgf·m, 21.7–28.9 ft·lbf)
Install the remaining parts in the reverse order of removal.
Test yourself
A quick Kia Optima DL3 quiz: every answer comes with an explanation and a link to the manual page.