Cylinder head cover
Components and Component Location
Components
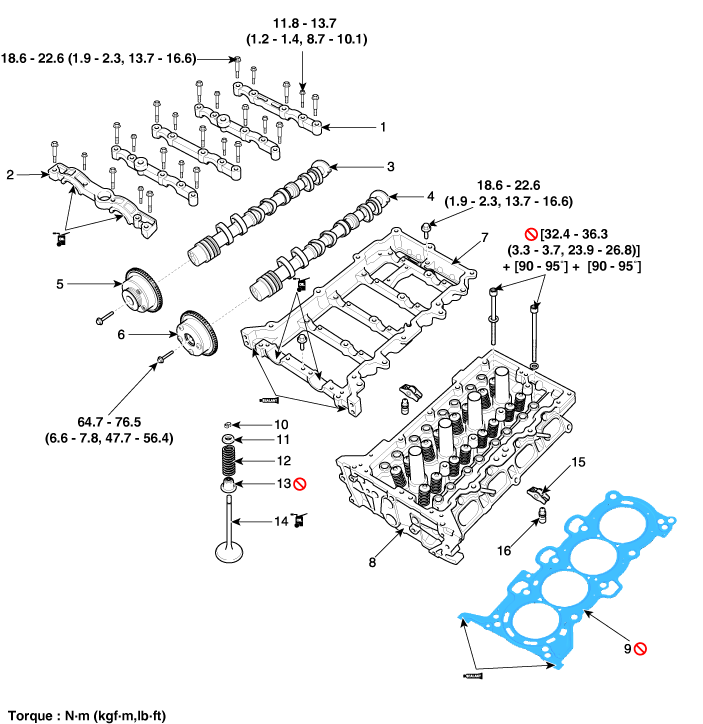
| 1. Camshaft Bearing Cap 2. Front Camshaft Bearing Cap 3. Exhaust Camshaft 4. Intake Camshaft 5. Exhaust CVVT Assembly 6. Intake CVVT Assembly |
7. Camshaft Holder 8. Cylinder Head 9. Cylinder Head Gasket 10. Lock Retainer 11. Retainer 12. Valve Spring |
13. Valve Stem Seal 14. Valve 15. Rocker Arm 16. Hydraulic Lash Adjuster (HLA) |
Repair Procedures
Removal
Engine removal is not necessary for this procedure.
Remove the battery.
(See Engine Electrical System - Battery)
Remove the air cleaner assembly.
(See Intake and Exhaust System - "Air Cleaner")
Remove the battery tray.
(See Engine Electrical System - Battery)
Remove the engine room cover.
(See Engine and Transaxle Assembly - Engine Compartment Cover)
Drain the engine coolant.
(Refer to Cooling System - "Engine Coolant")
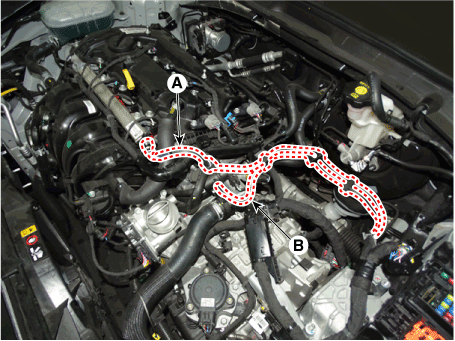
Disconnect the fuel hose (A) and the purge control solenoid valve (PCSV) hose (B).
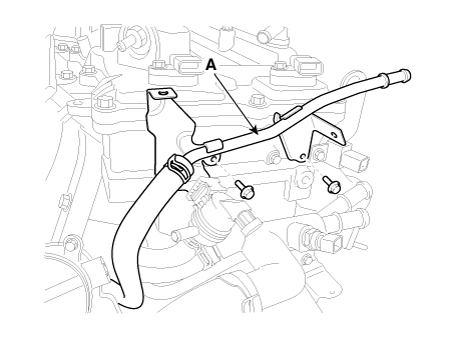
Remove the vacuum hose (A).
Tightening torque: 9.8–11.8 N·m (1.0–1.2 kgf·m, 7.2–8.7 ft-lbf)
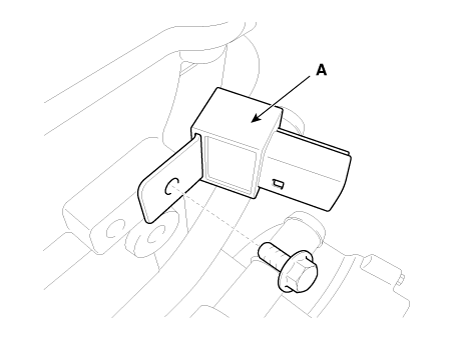
Remove the condenser (A).
Tightening torque: 9.8–11.8 N·m (1.0–1.2 kgf·m, 7.2–8.7 ft-lbf)
Remove the bracket (A) for the purge control solenoid valve (PCSV).
Tightening torque: 9.8–11.8 N·m (1.0–1.2 kgf·m, 7.2–8.7 ft-lbf)
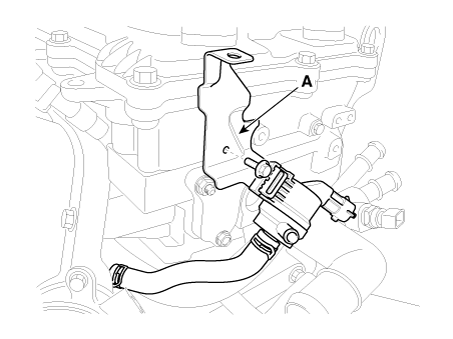
Remove the discharge pipe.
(See Engine Control/Fuel System - Delivery Pipe)
Remove the cylinder head cover.
(Refer to Cylinder Head Assembly - "Cylinder Head Cover")
Remove the timing chain.
(See Timing System - Timing Chain)
Remove the exhaust manifold.
(See Intake and Exhaust System - Exhaust Manifold)
Remove the intake manifold.
(See Intake and Exhaust System - Intake Manifold)
Remove the water temperature control assembly.
(See Cooling System - Water Temperature Control Assembly)
Remove the heater hose.
(See Cooling System - Thermostat)
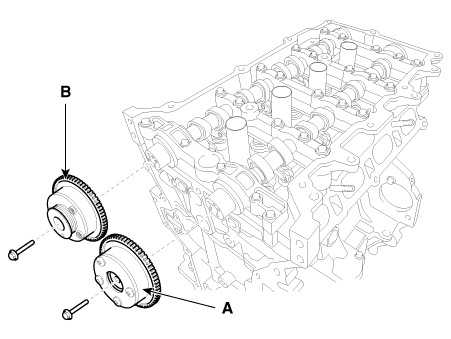
Remove the intake CVVT assembly (A) and the exhaust CVVT assembly (B).
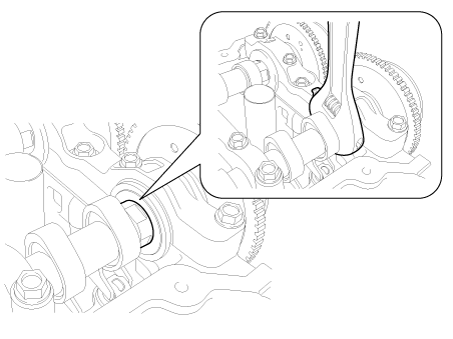
Remove the camshaft.
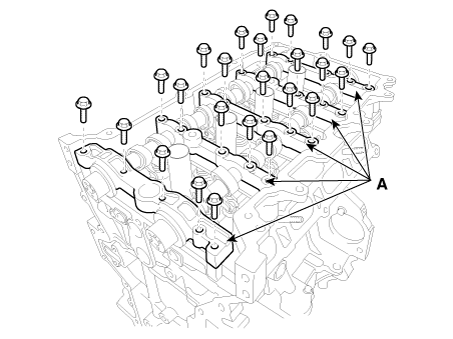
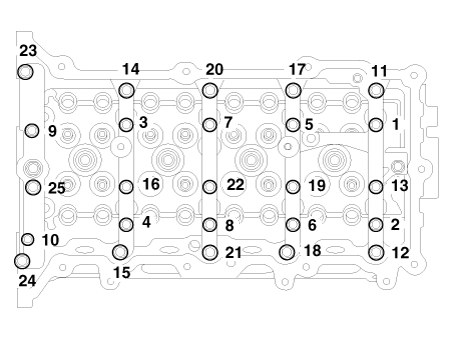
Remove the camshaft bearing cap (A) by loosening the bolts in the sequence shown.
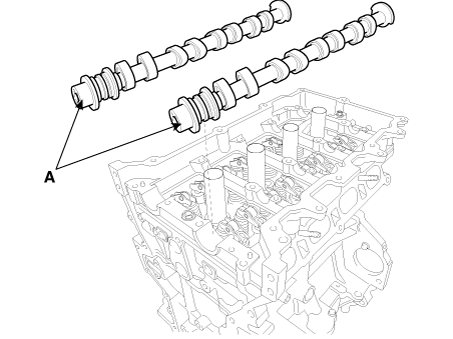
Remove the camshafts (A).
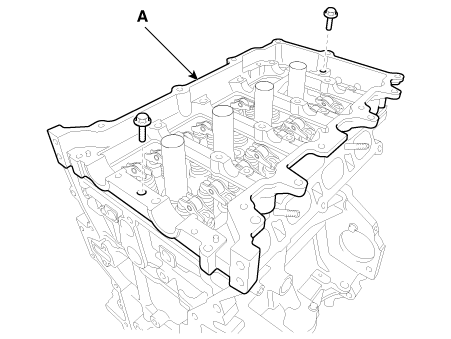
Remove the cam holder (A).
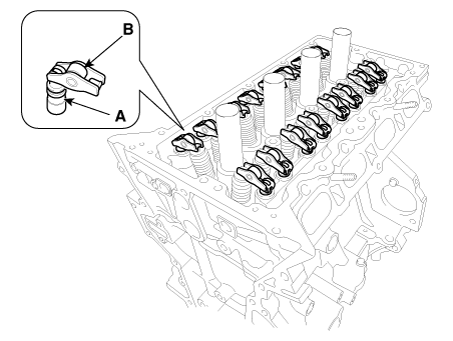
Remove the hydraulic lash adjuster (HLA) (A) and the rocker arm (B).
Remove the oil control adapter (A) with the gasket (B).
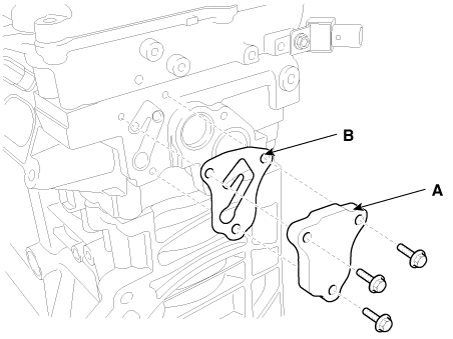
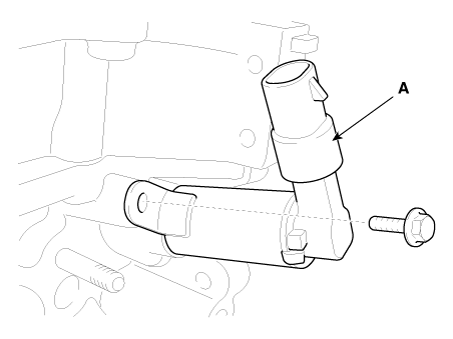
Remove the intake oil control valve (OCV) (A).
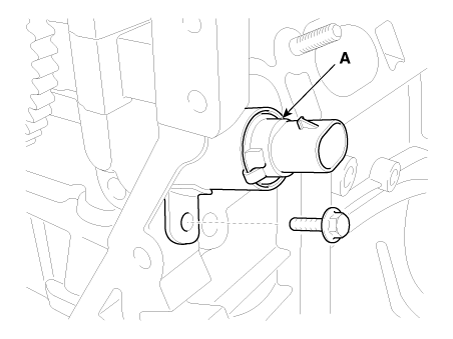
Remove the Oil Control Valve (OCV) (A).
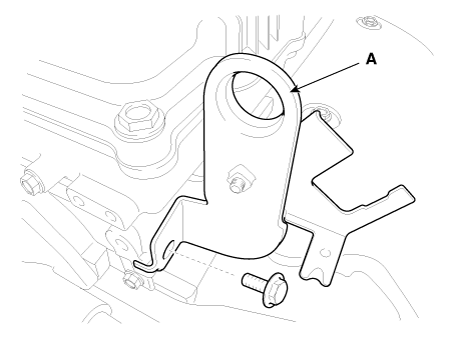
Remove the rear engine mounting bracket (A).
Remove the spark plugs.
(Refer to Engine Electrical System - Spark Plug)
Remove the cylinder head.
Using a (12PT) socket, evenly loosen and remove the cylinder head bolts in several passes in the sequence shown.
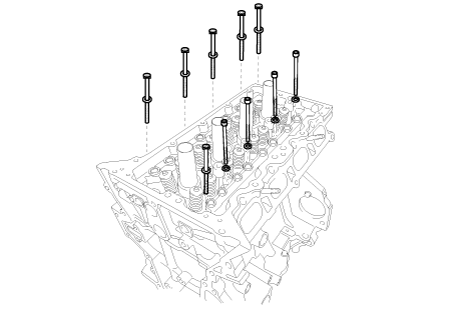
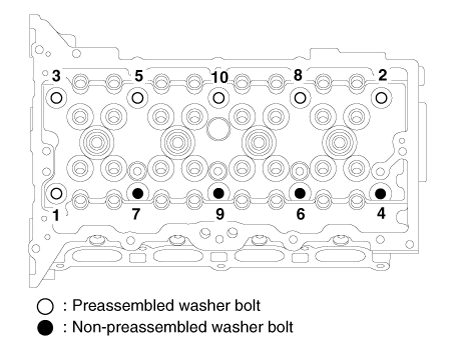
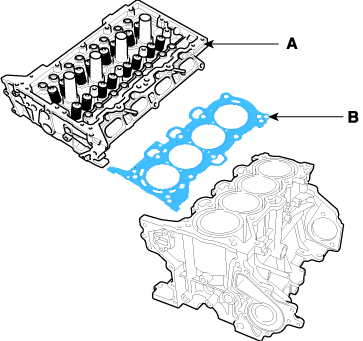
Lift the cylinder head (A) off the dowels on the cylinder block and place the cylinder head on wooden blocks on the workbench.
Remove the cylinder head gasket (B).
Disassembly
Remove the valves.
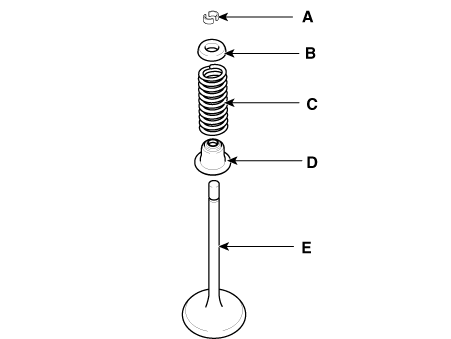
Using SST (09222-3K000, 09222-3K100), compress the valve spring and remove the valve cotter (A).
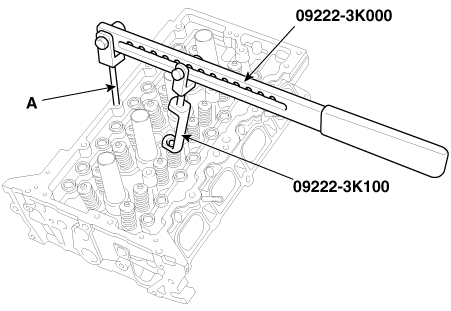
Remove the spring seat (B).
Remove the valve spring (C).
Remove the valve (D).
Using needle-nose pliers, remove the valve stem seal (E).
Inspection
Cylinder head cover
Inspect for flatness.
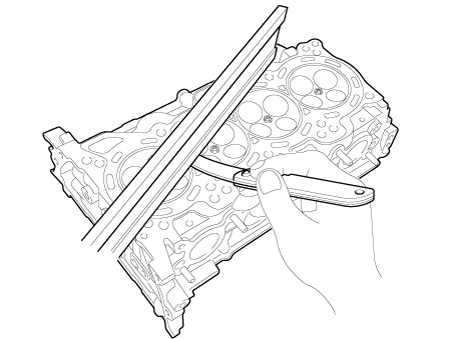
Using a precision straightedge and feeler gauge, measure the cylinder block and manifold surfaces for distortion.
If the flatness exceeds the maximum, replace the cylinder head.
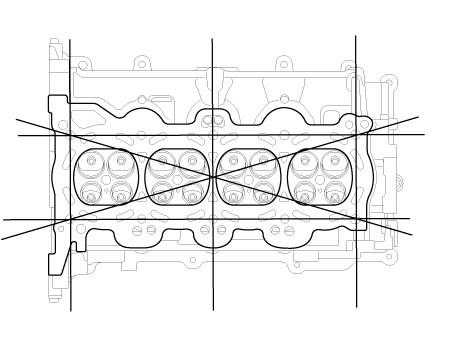
Cylinder head gasket surface flatness:
Total area less than 0.05 mm (0.0020 in.)
Less than 0.02 mm (0.0008 in.) for a 100 mm (3.9370 in.) x 100 mm (3.9370 in.) section
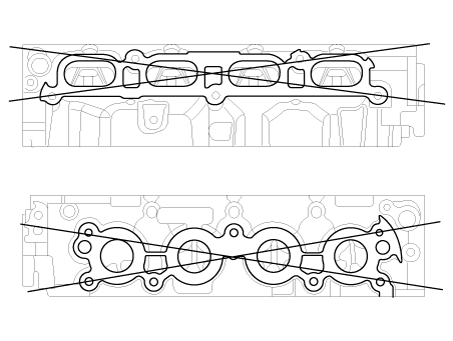
Manifold mounting surface flatness: Less than 0.10 mm (0.0039 in.)
Inspect for cracks.
Check the combustion chamber, intake ports, exhaust ports and cylinder block surface for cracks. If any cracks are found, replace the cylinder head.
Valve and Valve Spring
Inspect the valve stems and valve guides.
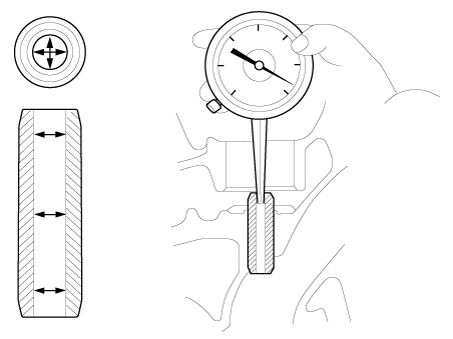
Using a caliper gauge, measure the inside diameter of the valve guide.
Valve guide inside diameter
Intake: 5.500–5.512 mm (0.21654–0.21701 in.)
Exhaust: 5.500–5.512 mm (0.21654–0.21701 in.)
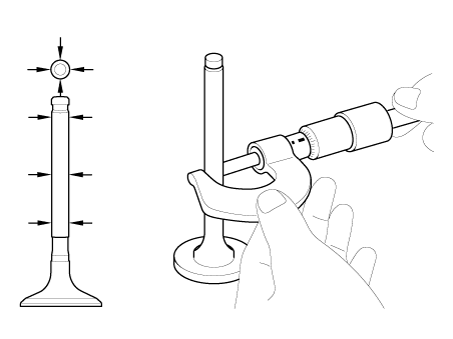
Using a micrometer, measure the diameter of the valve stem.
Valve stem outside diameter
Intake: 5.465–5.480 mm (0.21516–0.21575 in.)
Exhaust: 5.458–5.470 mm (0.21488–0.21535 in.)
Subtract the valve stem diameter measurement from the valve guide inside diameter measurement.
If the clearance is greater than specified, replace the valve or cylinder head.
Valve stem-to-guide clearance
[Standard]
Intake: 0.020–0.047 mm (0.00079–0.00185 in.)
Exhaust: 0.030–0.054 mm (0.00118–0.00213 in.)
Inspect the valves.
Make sure the valve face is ground to the correct valve face angle.
Check the valve face for wear.
If the valve face is worn, replace the valve.
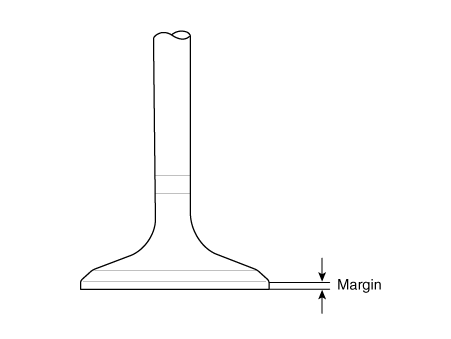
Check the valve head margin thickness.
If the margin thickness is less than specification, replace the valve.
Margin thickness [Standard] Intake: 1.30 mm (0.0512 in.) Exhaust: 1.26 mm (0.0496 in.)
Check the valve length.
Valve Length
[Standard]
Intake: 102.22 mm (4.0244 in.)
Exhaust: 104.04 mm (4.0961 in.)
[Limit]
Intake: 101.97 mm (4.0146 in.)
Exhaust: 103.79 mm (4.0862 in.)
Check the valve stem tip surface for wear.
If the valve stem tip is worn, replace the valve.
Inspect the valve seats and valve guides.
Inspect the valve seat for signs of overheating and improper contact with the valve face.
If the valve seat is worn, replace the cylinder head.
Inspect the valve guide for wear. If the valve guide is worn, replace the cylinder head.
Inspect the valve springs.
Using a steel square, measure the valve spring squareness.
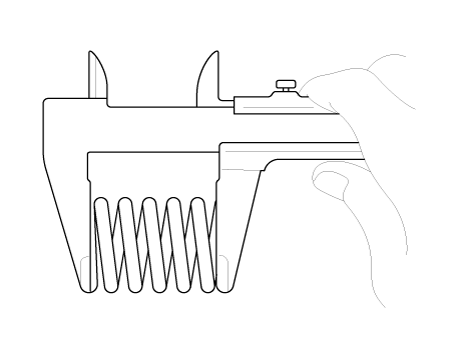
Using vernier calipers, measure the valve spring free length.
If the free length is not within specification, replace the valve spring.
Valve Spring
[Standard]
Free length: 45.93 mm (1.8083 in.)
Out-of-square: Less than 1.5°
Hydraulic Lash Adjuster (HLA)
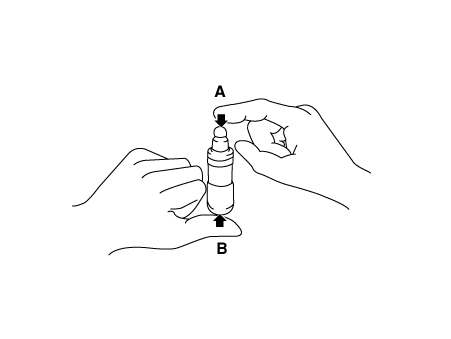
When the HLA is filled with engine oil, hold A and push B by hand.
If B moves, replace the HLA.
| Symptom | Possible Cause | Action |
| 1. Temporary noise when starting a cold engine | Normal | This noise will disappear after the engine oil reaches normal pressure. |
| 2. Continuous noise when starting the engine after being parked for more than 48 hours | Oil leakage from the high-pressure chamber of the HLA allows air to enter | The noise will disappear within 15 minutes with the engine running at 2000-3000 rpm. If it does not disappear, see step 7 below. |
| 3. Continuous noise at the first engine start after cylinder head replacement | Insufficient oil in the cylinder head oil passage | |
| 4. Continuous noise when starting the engine after excessive cranking with the starter or belt |
|
|
| 5. Continuous noise while the engine is running after HLA replacement | ||
| 6. Continuous noise at idle after high engine speed operation. | Engine oil level is too high or too low |
|
| Excessive air in the oil at high engine speed | Check the oil supply system. | |
| Deteriorated oil | Check the oil quality. If deteriorated, replace with the specified type. |
|
| 7. Noise continues for more than 15 minutes | Low oil pressure | Check the oil pressure and the oil supply system to each engine component. |
| Faulty HLA | Remove the cylinder head cover and press the HLA by hand. If it moves, replace the HLA. |
Installation
Install the valves.
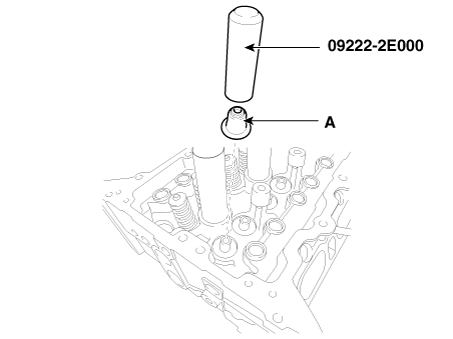
Using SST (09222-2E000), install a new stem seal (A).
Install the valve, valve spring and spring seat.
Using SST (09222-3K000, 09222-3K100), compress the spring and install the valve cotters.
Before releasing the valve spring compression, make sure the cotters are seated correctly by pressing and releasing the compressor handle 2–3 times.
When replacing the cylinder head, check whether the steel ball (A) is installed in the cylinder head.
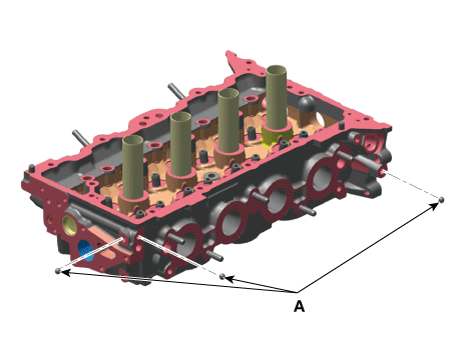
If the steel ball is not installed, be sure to install the steel ball.
Attach the steel ball (A) to the SST (0K221-2M100).
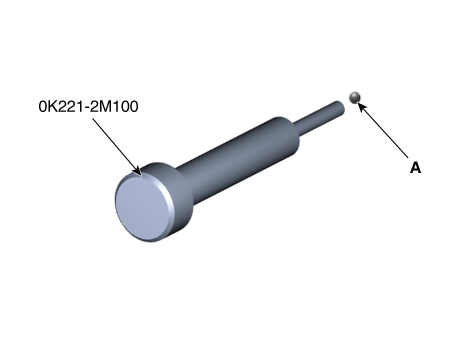
Tap the SST (0K221-2M100) with a hammer to install the steel ball (A).
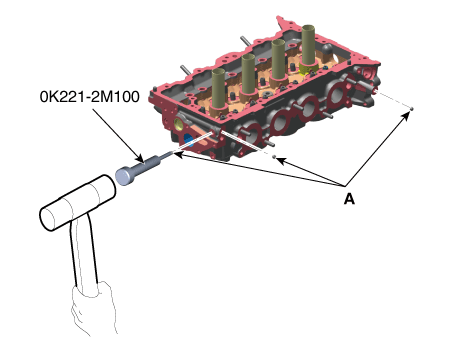
Installation
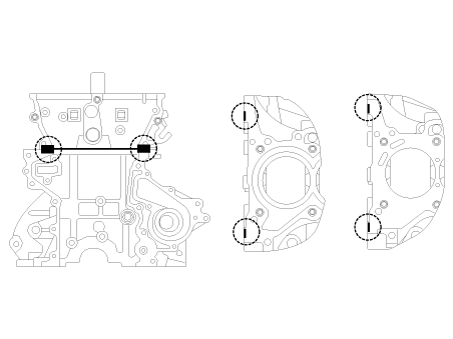
Install the cylinder head gasket (B) on the cylinder block.
Remove hardened sealant, oil, dust, moisture and harmful foreign materials from the cylinder block and cylinder head.
Apply liquid gasket to the edge of the cylinder block.
Install the cylinder head gasket using the cylinder block locating pins.
Apply liquid gasket to the edge of the cylinder head gasket.
Sealant: Threebond 1217H or equivalent
Carefully place the cylinder head (A) so as not to damage the cylinder head gasket (B) during installation.
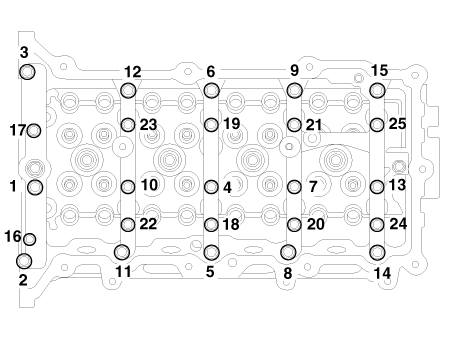
Install the cylinder head bolts with washers.
Using SST (09221-4A000), install and tighten the 10 cylinder head bolts in several passes in the sequence shown.
Tightening Torque
Step 1:
32.4–36.3 N·m (3.3–3.7 kgf·m, 23.9–26.8 ft·lbf)
Second step: 90–95°
Third step: 90–95°
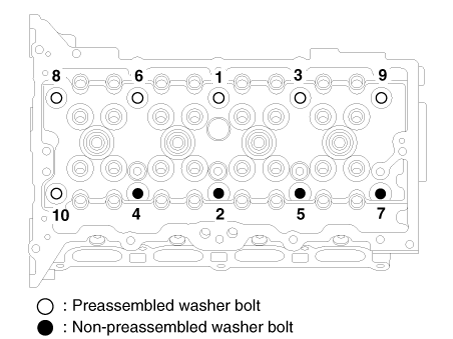
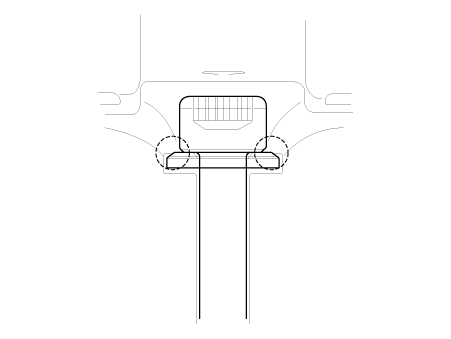
Install the rear engine mount (A).
Torque: 34.3–39.2 N·m (3.5–4.0 kgf·m, 25.3–28.9 ft·lbf)
Install the oil control valve (OCV) (A).
Tightening torque: 9.8–11.8 N·m (1.0–1.2 kgf·m, 7.2–8.7 ft-lbf)
Install the intake oil control valve (OCV) (A).
Tightening torque: 9.8–11.8 N·m (1.0–1.2 kgf·m, 7.2–8.7 ft-lbf)
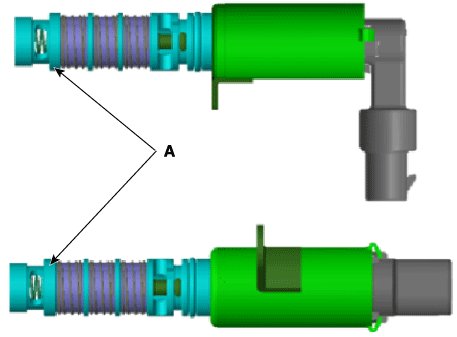
Install the oil control adapter (A) with a new gasket (B).
Tightening torque: 9.8–11.8 N·m (1.0–1.2 kgf·m, 7.2–8.7 ft-lbf)
Install the hydraulic lash adjuster (HLA) (A) and rocker arm (B).
When installing the HLA, hold it upright so that engine oil in the HLA does not spill and dust does not adhere to the HLA.
Insert the HLA carefully into the cylinder head to avoid spilling engine oil.
If engine oil has spilled out of the lash adjuster, bleed the HLA according to the procedure below.
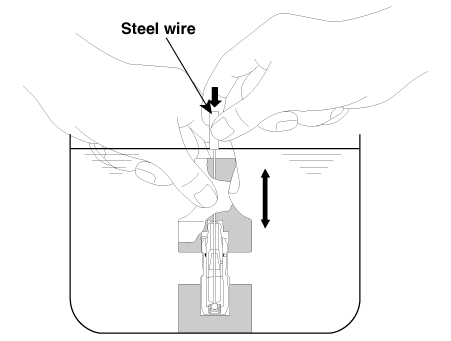
HLA Bleeding Procedure
Submerge the lash adjuster in engine oil, and push its cap 4 to 5 times until it bottoms out, lightly pressing the ball with a hard steel wire. Be careful not to give the ball a strong impact, because the ball weighs only a few grams.
If the HLA is installed with engine oil leaked out of it and air inside, it may make an abnormal noise.
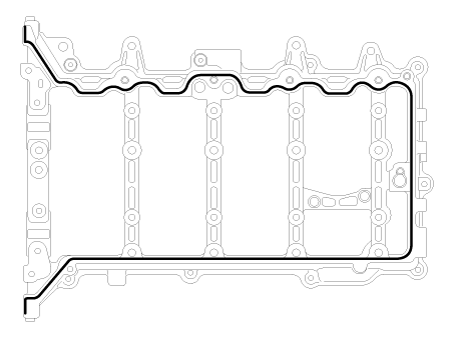
Install the camshaft carrier.
Using a gasket scraper, remove all old gasket material from the sealing surfaces.
The mating surfaces of the camshaft carrier and the cylinder head must be cleaned of harmful foreign material, oil, dust, and moisture. Spray the cleaner onto the surface and wipe with a clean cloth.
After applying liquid sealant to the lower surface of the camshaft carrier, assemble the camshaft carrier. A continuous bead of sealant must be applied to prevent any oil leakage path.
Bead width: 2.5–3.5 mm (0.10–0.14 in.)
Sealant: Threebond 1217H or equivalent.
Place the camshaft carrier (A) on the cylinder head. Use the dowel pins on the camshaft carrier and the holes in the cylinder head as guides to install the camshaft carrier in the correct position.
Tighten the camshaft carrier bolts.
Tightening torque: 18.6–22.6 N·m (1.9–2.3 kgf·m, 13.7–16.6 ft-lbf)
Install the camshafts.
Place the intake and exhaust camshafts (A) on the camshaft holder.
Install the camshaft bearing cap (A).
Tighten the bolts in several passes in the sequence shown.
Tightening Torque
M6 bolts:
11.8–13.7 N·m (1.2–1.4 kgf·m, 8.7–10.1 ft-lbf)
M8 bolts:
18.6–22.6 N·m (1.9–2.3 kgf·m, 13.7–16.6 ft-lbf)
Install the intake CVVT assembly (A) and exhaust CVVT assembly (B).
Tightening torque: 64.7–76.5 N·m (6.6–7.8 kgf·m, 47.7–56.4 ft-lbf)
Install the remaining parts in the reverse order of removal.
Add all necessary fluids and check for leaks. Connect the GDS. Check for DTCs, notes, and clean up. Recheck.
Test yourself
A quick Kia Optima DL3 quiz: every answer comes with an explanation and a link to the manual page.