In the event of a puncture
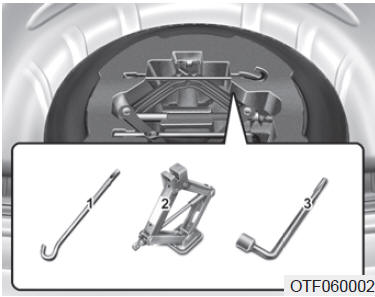
Jack and Tools
The spare tire, jack, crank handle, and lug wrench are stored in the trunk. Remove the luggage board to access the equipment.
(1) Crank handle
(2) Jack
(3) Lug wrench
Jack Instructions
The jack is provided only for changing a wheel in an emergency.
Store the jack properly to prevent it from rattling while the vehicle is moving.
Follow the jack instructions to reduce the risk of injury.
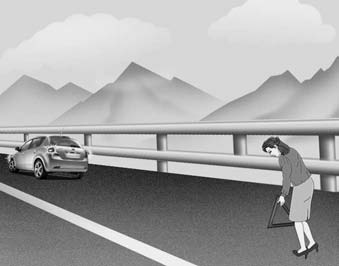
WARNING - Changing a Wheel- Never attempt to repair the vehicle while it is on the traffic lane of a road or highway.
- Always move the vehicle off the road onto the shoulder before attempting to change a flat tire. The jack should be used on a firm, level surface.
If you cannot find a level, solid place along the side of the road, contact a roadside assistance service.
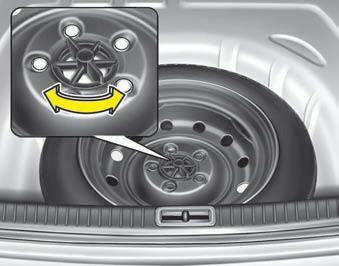
Removing and Stowing the Spare Wheel
Turn the wing bolt counterclockwise.
Stow the wheel by reversing the removal procedure.
To prevent the wheel and tools from rattling when the vehicle is moving, stow them securely.
Changing a Tire
- Park the vehicle on a level surface and apply the parking brake.
- Shift the transmission into reverse (manual transmission) or P (automatic transmission).
- Turn on the hazard warning lights.
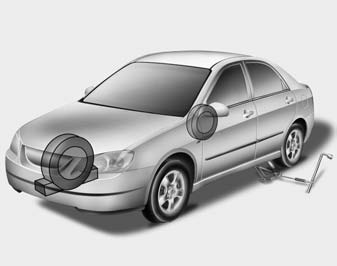
- Remove the wheel nut wrench, jack, jack handle, and spare wheel.
- Chock the front and rear wheels diagonally opposite the jack position.
- To prevent the vehicle from moving while you change a wheel, always apply the parking brake and chock the wheel diagonally opposite the wheel you are changing.
- We recommend that you chock the vehicle's wheels and that no one remain inside the vehicle while it is raised.
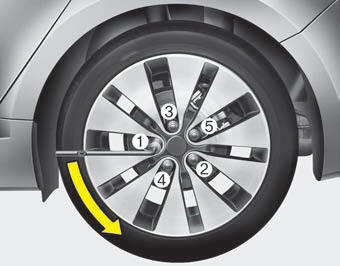
- Loosen the wheel nuts counterclockwise by one turn each, but do not remove the nuts until the wheel is raised off the ground.
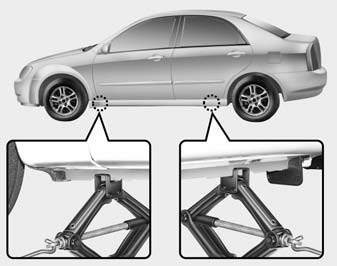
- Place the jack at the front or rear jacking point nearest the wheel being changed. Place the jack at the designated point on the frame.
To reduce the risk of injury, make sure you use only the jack supplied with the vehicle and the correct jacking point. Never use the jack at any other point on the vehicle.
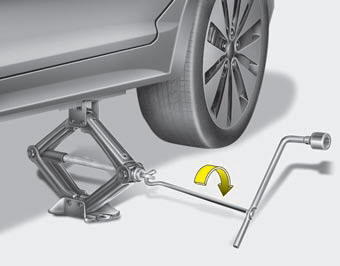
- Insert the jack handle into the jack and turn it clockwise to raise the vehicle until the tire is about 30 mm (1 in) off the ground. Before removing the wheel nuts, make sure the vehicle is stable and there is no risk of it moving or slipping.
- Loosen the wheel nuts and remove them by hand. Pull the wheel off and lay it flat on the ground to keep it from rolling away.
Wheels and wheel covers may have sharp edges. Handle them carefully to avoid injury. Before mounting the wheel, make sure nothing on the hub or rim (mud, asphalt, gravel, or other debris) prevents the wheel from seating correctly on the axle.
Remove any obstruction. If the mounting surfaces between the wheel and axle do not make proper contact, the wheel nuts could loosen and the wheel could come off.
Losing a wheel can cause loss of vehicle control and serious or fatal injury.
- To reinstall the wheel, place it on the wheel studs, screw the nuts onto the studs, and tighten them by hand. Move the wheel to make sure it is seated properly, then tighten the nuts as much as possible by hand.
- Lower the vehicle to the ground by turning the jack handle counterclockwise.
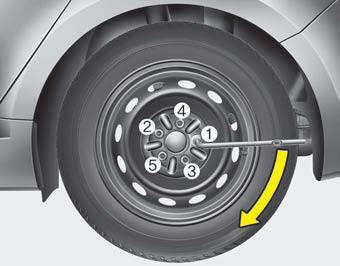
Position the wrench as shown in the illustration and tighten the wheel nuts. Make sure the wrench socket is fully engaged on the nut. Do not tighten the nuts by pressing down on the wrench with your foot or by using an extension pipe.
Tighten each wheel nut in the numerical sequence shown in the illustration until all nuts are tightened. Check each nut again. After changing a wheel, have the nuts tightened to the correct torque as soon as possible at an authorized Kia dealer.
Wheel Nut Torque: Steel and aluminum alloy wheels: 9 to 11 kg-m (65 to 79 lb-ft)
If you have a tire pressure gauge, remove the valve cap and check the tire pressure.
If the pressure is lower than the recommended pressure, drive slowly to the nearest service station and inflate the tire to the correct pressure. If the pressure is too high, adjust it. Always replace the valve cap after checking or adjusting the tire pressure. Air may leak from the tire if the cap is not installed. If you lose the cap, buy a new one and install it as soon as possible.
After changing a wheel, place the flat tire in the trunk together with the jack and tools.
CAUTIONThe wheel studs and wheel nuts are metric.
When removing a wheel, make sure the same nuts are reused. If they are replaced, make sure the new nuts have metric threads with the same pitch as the originals. Installing non-metric nuts on metric studs, or metric nuts on non-metric studs, will not hold the wheel securely against the axle and will damage the studs, which must then be replaced.
Note that most wheel nuts do not have metric threads. Be extremely careful when checking the thread type before installing aftermarket nuts or wheels. If you are not sure, consult an authorized Kia dealer.
WARNING - Wheel StudsIf the wheel studs are damaged, they may not hold the wheel securely. This could result in loss of the wheel and a collision causing serious injury.
Stow the jack, jack handle, wheel nut wrench, and flat tire securely so they do not rattle while the vehicle is moving.
WARNING - Improper Air Pressure in the Spare TireCheck the tire pressure as soon as possible after installing the spare wheel.
Adjust the pressure by referring to "Tires and Wheels" in Section 8.
Important - Compact Spare Tire (if equipped)
Your vehicle is equipped with a compact spare tire. This wheel takes up less space than a standard wheel. The tire is smaller than a standard tire and is designed for temporary use only.
CAUTION- Drive carefully when using the spare tire. The compact spare tire should be replaced with a standard wheel as soon as possible.
- Using more than one compact spare tire on this vehicle at the same time is not recommended.
The temporary spare tire is for emergency use only.
Do not drive faster than 80 km/h with the spare wheel installed on the vehicle.
The original tire should be repaired or replaced as soon as possible to avoid possible failure of the temporary spare tire, which could result in injury or death.
The compact temporary spare tire should be inflated to 420 kPa (60 psi).
NOTICE
Check the tire pressure after installing the temporary spare tire.
Adjust it to the specified pressure, if necessary.
When using a compact temporary spare tire, observe the following precautions:
- Never drive faster than 80 km/h; higher speeds could damage the tire.
- Make sure to drive slowly enough for road conditions to avoid road hazards such as potholes or debris. These could cause serious damage to the compact spare tire.
- Continuous road use of the temporary spare tire may lead to a flat tire, loss of vehicle control and possibly injury.
- Do not exceed the maximum load capacity of the vehicle, indicated on the sidewall of the compact spare tire.
- Avoid driving over obstacles.
The diameter of the compact temporary spare tire is smaller than that of a normal tire, therefore reducing the ground clearance of the vehicle by approximately 25 mm (1 in). You could damage the vehicle.
- Do not use the compact temporary spare tire on another vehicle.
It has been designed specifically for your vehicle.
- The service life of the tread of the compact temporary spare tire is shorter than that of an ordinary tire. Check the condition of the compact tire regularly and replace it with another compact tire of the same size and design, mounted on the same wheel.
- The compact temporary spare tire must not be mounted on another wheel, and ordinary or winter tires and wheel rims or wheel covers should not be mounted on the compact temporary spare wheel. Doing so could damage these parts or other vehicle components.
- Do not use more than one compact temporary spare tire at a time.
- Do not tow a trailer when using a compact temporary spare tire.
Test yourself
A quick Kia Optima DL3 quiz: every answer comes with an explanation and a link to the manual page.