SRS Control Module (SRSCM)
Description and Operation
Description
The main purpose of the SRSCM (Supplemental Restraint System Control Module) is to distinguish between an event that requires deployment of the restraint system and an event that does not. The SRSCM must decide whether or not to deploy the restraint system. When it determines that pretensioners and/or airbag deployment are required, the SRSCM must supply sufficient power to the pretensioners and airbag inflators to start deployment.
The SRSCM determines that an impact may require deployment of the pretensioners and airbags based on data received from the impact sensors and other components in combination with the safing function.
The SRSCM will not be ready to detect a crash or activate the restraint devices until the signals in the SRSCM circuit stabilize.
The SRSCM may be able to activate the restraint devices within approximately 2 seconds, but full operation is guaranteed only after the check is completed.
The SRSCM must perform a diagnostic procedure and illuminate the system ready indicator when the ignition switch is in the ON position. The system must perform a continuous diagnostic procedure and provide fault notification using the warning lamp in the event a fault is detected. The Serial Diagnostic Communication Interface will be used to facilitate servicing of the restraint system control module.
Components and Component Location
Component Location
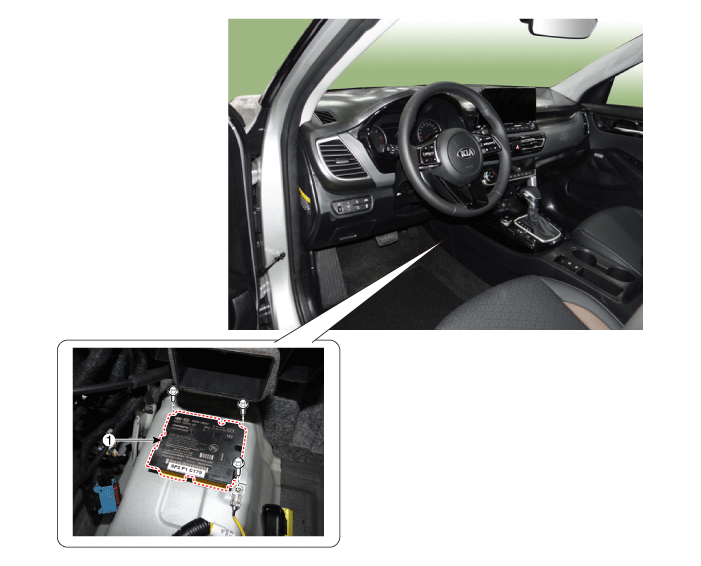
| 1. Supplemental Restraint System Control Module (SRSCM) |
Circuit Diagrams
Supplemental Restraint System Control Module (SRSCM)
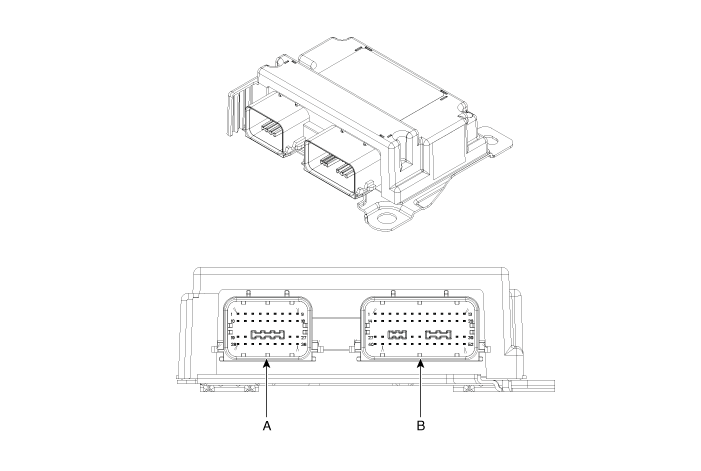
| No | Connector A | Connector B |
| 1 | Driver's No. 1 Airbag (High) | - |
| 2 | Driver Airbag No. 2 (Low) | - |
| 3 | Passenger Airbag No. 2 (Low) | - |
| 4 | Passenger Airbag No. 2 (High) | Driver's Side Airbag (Low) |
| 5 | - | Driver's Side Airbag (High) |
| 6 | - | Passenger's Side Airbag (High) |
| 7 | - | Passenger's Side Airbag (Low) |
| 8 | - | - |
| 9 | - | - |
| 10 | B+ | - |
| 11 | Fault Output | - |
| 12 | Passenger Airbag No. 1 (Low) | - |
| 13 | Passenger's No. 1 Airbag (High) | - |
| 14 | Driver's Knee Airbag (High) | - |
| 15 | Driver's Knee Airbag (Low) | Passenger's Seat Belt Buckle Switch (High) |
| 16 | Passenger's Airbag Off Indicator Lamp | Driver's Seat Belt Buckle Switch (High) |
| 17 | - | Passenger Curtain Airbag (Low) |
| 18 | - | Passenger Curtain Airbag (High) |
| 19 | Driver's No. 1 Airbag (High) | Driver Curtain Airbag (High) |
| 20 | Driver's No. 1 Airbag (Low) | Driver Curtain Airbag (Low) |
| 21 | - | Passenger Side Airbag (Low) |
| 22 | - | Passenger Side Airbag (High) |
| 23 | - | Driver Side Airbag (High) |
| 24 | - | Driver Side Airbag (Low) |
| 25 | - | - |
| 26 | C-CAN (Low) | - |
| 27 | C-CAN (High) | Driver Seat Belt Pretensioner (Low) |
| 28 | IGN 1 | Driver Seat Belt Pretensioner (High) |
| 29 | Driver's Frontal Impact Sensor (High) | - |
| 30 | Driver Front Impact Sensor (Low) | - |
| 31 | Passenger Front Impact Sensor (Low) | - |
| 32 | Passenger Front Impact Sensor (High) | Passenger Seat Belt Pretensioner (High) |
| 33 | - | Passenger Seat Belt Pretensioner (Low) |
| 34 | - | - |
| 35 | P-CAN (Low) | - |
| 36 | P-CAN (High) | - |
| 37 | - | |
| 38 | - | |
| 39 | - | |
| 40 | Ground | |
| 41 | - | |
| 42 | - | |
| 43 | Driver Pressure Side Impact Sensor (High) | |
| 44 | Driver Pressure Side Impact Sensor (Low) | |
| 45 | Passenger Side Impact Sensor (Low) | |
| 46 | Passenger Side Impact Sensor (High) | |
| 47 | Driver's Side Impact Sensor, Gravity Type (High) | |
| 48 | Driver's Side Impact Sensor, Gravity Type (Low) | |
| 49 | Passenger's Side Impact Sensor, Gravity Type (Low) | |
| 50 | Passenger's Side Impact Sensor, Gravity Type (High) | |
| 51 | - | |
| 52 | - |
Repair Procedures
Removal
Disconnect the negative battery cable.
Remove the floor console assembly.
(Refer to Body - Floor Console Assembly)
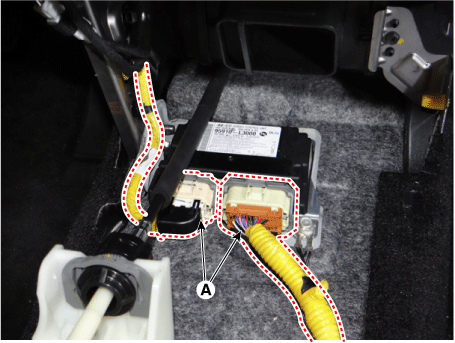
Disconnect the SRSCM connectors (A).
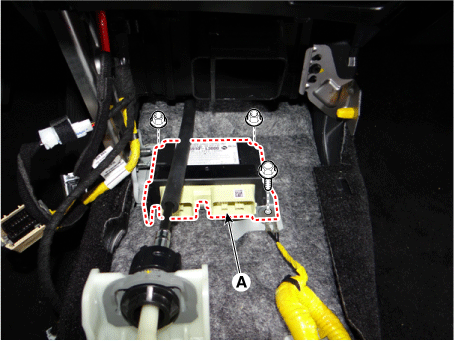
Remove the SRSCM (A) by loosening the bolt and nuts.
Tightening torque:
Bolt: 10.8–13.7 N·m
Nut: 6.9–11.8 N·m (0.7–0.8 kgf·m, 5.0–5.8 ft-lbf, 60.8–69.4 in-lbf)
Installation
Install in the reverse order of removal.
After installing the SRSCM, check that the system operates correctly:
Turn the ignition ON. The SRS indicator should illuminate for approximately six seconds, then turn off.
Variant Coding
After replacing the SRSCM with a new one, the "Variant Coding" procedure MUST be performed.
Variant Coding Procedure
■ Online Using KDS
Turn the ignition OFF and connect the KDS.
With the ignition ON and the engine OFF, select the vehicle name and the airbag system.
Select the variant coding mode.
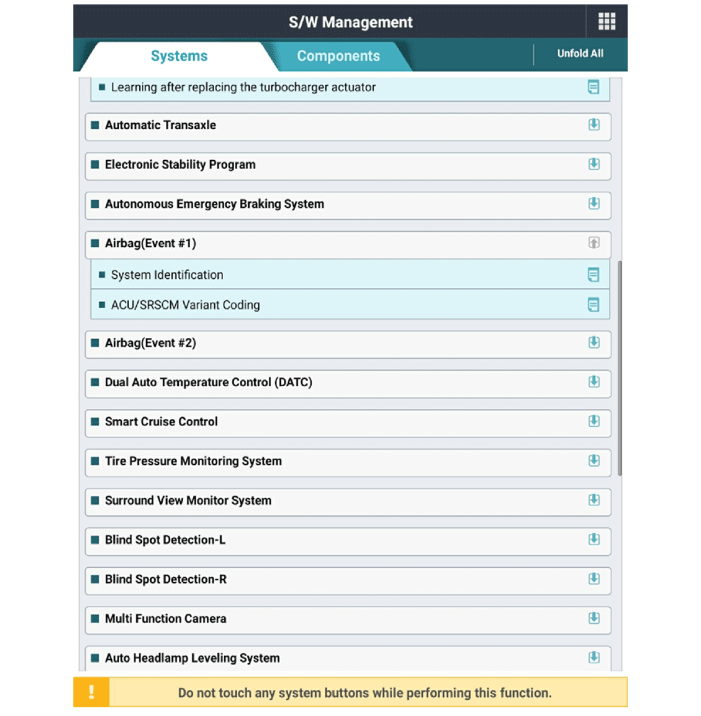
Enter the VIN.
■ Offline Mode in KDS
Confirm the ACU coding option from the KDS server after entering the VIN for the KDS server.
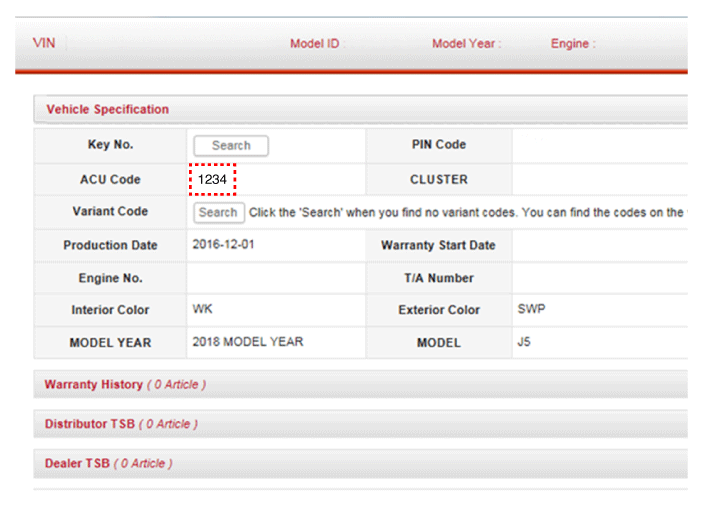
Turn the ignition OFF and connect the KDS.
With the ignition ON and the engine OFF, select the vehicle name and the airbag system.
Select the variant coding mode.
Enter the ACU coding code.
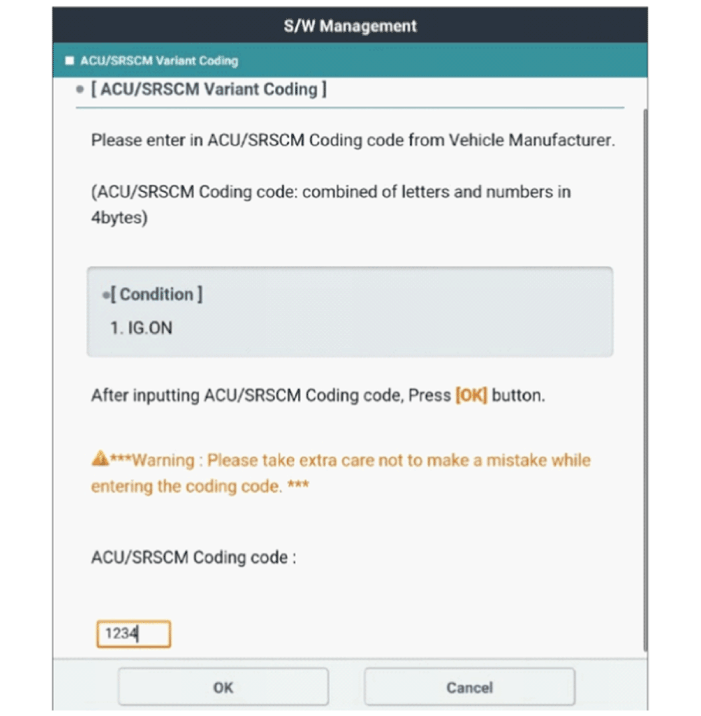
Test yourself
A quick Kia Optima DL3 quiz: every answer comes with an explanation and a link to the manual page.