Wheel replacement
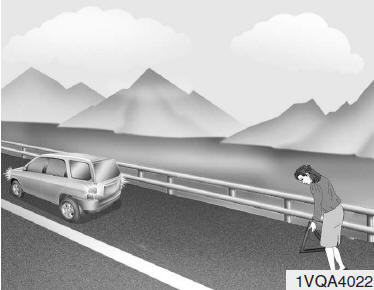
- Park on a level surface and firmly apply the parking brake.
- Move the gear selector to R (Reverse) for a manual transmission, or to P (Park) for an automatic transmission.
- Switch on the hazard warning lights.
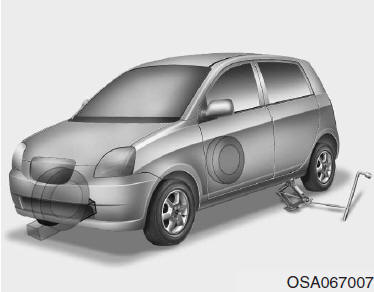
4. Remove the spare wheel, jack and jack handle, and the wheel nut wrench from the vehicle.
5. Chock the wheel diagonally opposite the one where the jack will be positioned, both front and rear.
WARNING - Wheel replacement
- To prevent the vehicle from moving while changing a wheel, always fully apply the parking brake and always chock the wheel diagonally opposite the one being replaced.
- It is recommended to chock the wheels and to make sure that no one remains on board the vehicle while it is being raised.
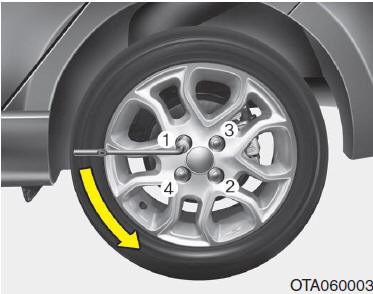
6. Loosen all the wheel nuts by one turn anticlockwise, but do not remove them until the vehicle has been raised off the ground.
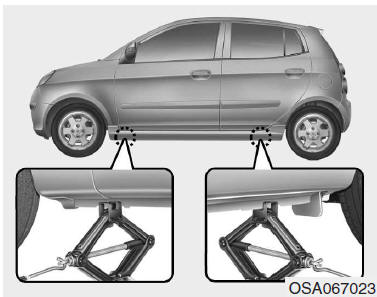
7. Position the jack at the front or rear jacking point closest to the wheel to be replaced. Place the jack at the designated points under the frame. The jacking points are plates welded to the frame with two tabs and a raised point, which must align with the jack.
WARNING - Jack positioning To reduce the risk of injury, make sure to use only the jack supplied with the vehicle and in the correct lifting position; do not use any other part of the vehicle as a support point for the jack.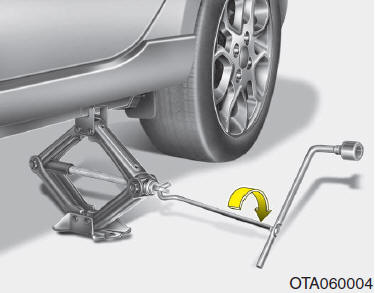
8. Insert the specific jack handle into the jack and turn it clockwise to raise the vehicle until the wheel is off the ground. The wheel must be lifted approximately 30 mm off the ground. Before removing the wheel nuts, make sure the vehicle is stable and there is no risk of it slipping or moving.
9. Loosen the wheel nuts and remove them by hand. Slide the wheel off the studs and lay it on its side so that it cannot roll. To fit the spare wheel to the hub, take the spare wheel, align the holes with the studs and slide the wheel onto the studs. If this is difficult, tilt the wheel slightly and align the upper hole of the wheel with the upper stud. Then rock it back and forth until it is fully seated on the studs.
Before fitting the wheel, make sure there is no foreign material on the hub or wheel (such as mud, tar, gravel, etc.) that could prevent the wheel from seating securely on the hub.
If necessary, remove them. If there is not perfect contact between the wheel and the hub mounting surface, the wheel nuts may loosen, resulting in loss of the wheel. Losing a wheel may cause loss of vehicle control, with possible accidents, including fatal ones.10. To refit the wheel, hold it in place on the studs, fit the nuts onto the studs and tighten them by hand. The nuts must be installed with their smaller-diameter ends facing inward. Rock the wheel to make sure it is seated correctly, then retighten the nuts by hand as far as possible.
11. Lower the vehicle to the ground by turning the wheel nut wrench anticlockwise.
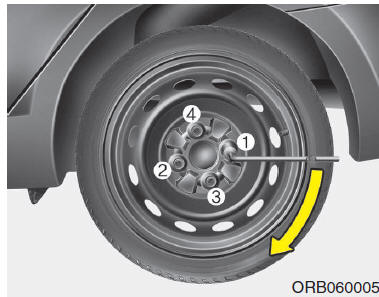
Then position the wrench as shown in the diagram and tighten the wheel nuts. Make sure the socket is fully engaged on the nut. Do not stand on the wrench handle or fit an extension to the handle. Tighten all the nuts in a crisscross sequence around the wheel circumference.
Then check each wheel nut carefully. After replacing the wheels, have the wheel nuts tightened to the specified torque by an authorised Kia dealer.
Wheel nut tightening torque: Steel and light alloy wheels: 9 - 11 kg.m If you have a pressure gauge, remove the valve cap and check the inflation pressure. If the pressure is lower than specified, drive slowly to the nearest service station and inflate the tyres to the correct pressure. If it is too high, adjust it to the correct value. Always refit the valve cap after checking or adjusting the tyre inflation pressure. Otherwise, air may leak from the tyre. If a valve cap is lost, buy a new one as soon as possible.
After replacing the wheel, always stow the deflated wheel in its place and store the jack and tools in their compartments.
WARNING The vehicle is fitted with wheel studs and nuts with metric thread.
When replacing the wheel, make sure you refit it with the same nuts that were removed or, if they are replaced, use nuts with the same metric thread and the same seat taper.
Fitting non-metric thread nuts on a metric stud, or vice versa, will not secure the wheel to the hub and will damage the stud, which must then be replaced.
Note that many wheel nuts do not have a metric thread. Check the thread type carefully before fitting non-original nuts or wheels. If in doubt, we recommend consulting an authorised Kia dealer. WARNING - Wheel studs If the studs are damaged, they may lose their ability to hold the wheel. This could lead to the wheel coming off and an accident with serious injury.To prevent the temporary spare wheel, jack, jack handle and wheel nut wrench from rattling while the vehicle is in motion, stow them correctly on board.
WARNING - Incorrect spare wheel pressure Check the tyre inflation pressures as soon as possible after fitting the spare wheel. If necessary, adjust to the specified pressure. Refer to “Wheels and tyres” in chapter 8.Important - use of the temporary spare wheel (if fitted) The vehicle is equipped with a temporary spare wheel. This temporary spare wheel takes up less space than a conventional spare wheel.
This temporary spare wheel is smaller than a conventional wheel and is designed for temporary use only.
WARNING
- When driving with the temporary spare wheel, exercise great caution. The temporary spare wheel must be replaced with a conventional wheel at the first opportunity.
- It is strongly advised not to use the vehicle with two or more temporary spare wheels fitted at the same time.
The temporary spare wheel must be inflated to 420 kPa.
NOTE After fitting the temporary spare wheel, check its pressure. If necessary, adjust it to the specified pressure.
When fitting a temporary spare wheel, observe the following precautions:
- Never exceed the speed limit of 80 km/h; higher speeds could damage the temporary spare wheel.
- Keep a speed suitable for road conditions and safe for the situation. Any road irregularities such as potholes or stones can seriously damage the temporary spare wheel.
- Prolonged use of the temporary spare wheel may damage it, with dangerous consequences for personal safety.
- Do not overload the vehicle or exceed the load capacity of the temporary spare wheel, which is shown on its sidewall.
- Avoid driving over obstacles. Because the diameter of the temporary spare wheel is smaller than that of a conventional wheel, the ground clearance of the vehicle is reduced by approximately 25 mm. The vehicle could therefore strike the obstacle and be damaged.
- If the temporary spare wheel is fitted, do not take the vehicle through an automatic car wash.
- Do not fit snow chains to the temporary spare wheel. Due to the reduced size of the wheel, the chain cannot be fitted correctly. This could damage the vehicle and cause the chain to be lost.
- Do not fit the temporary spare wheel to the front axle on snowy or icy roads.
- Do not use the temporary spare wheel on other vehicles. It is designed exclusively for this vehicle.
- The tread of a temporary spare wheel wears out faster than that of a conventional wheel. Inspect the temporary spare tyre regularly and, if it is worn, replace it with a tyre of the same type and size.
- The temporary spare tyre must not be used on any other wheel. Normal tyres, snow tyres, wheel covers or decorative rings must not be fitted to the temporary spare wheel. Otherwise, these or other vehicle components may be damaged.
- Do not use more than one temporary spare wheel at a time.
- Do not tow a trailer while the temporary spare wheel is installed.
Test yourself
A quick Kia Picanto JA quiz: every answer comes with an explanation and a link to the manual page.