Settings menu
The “Settings” menu in the Mercedes-Benz E-Class (4th generation, W212, 2009–2016) offers a wide range of options for individually adapting the vehicle. From lighting functions to comfort details, numerous parameters can be matched to personal preferences. A reset to factory settings is also quick and easy.
Introduction
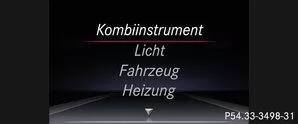
In the Settings menu, depending on your vehicle’s equipment, you have the following options:
- Changing instrument cluster settings
- Changing lighting settings
- Changing vehicle settings
- Changing heating settings
- Changing comfort settings
- Resetting settings to factory settings
Instrument cluster
Select distance unit
With the Speedometer/odometer unit function you can select whether the multifunction display shows certain readings in kilometers or miles. Using the
 or
 On the steering wheel, select the Settings menu.
Using the or
 Select the Instrument cluster submenu.
Using the confirm.
Using theorSelect the Speedometer/odometer unit function.
Using thechange the setting.
- digital speedometer in the Trip menu
- total and daily odometer
- Trip computer
- instantaneous fuel consumption and range
- navigation instructions in the Navigation menu
- CRUISE CONTROL
- SPEEDTRONIC
- DISTRONIC PLUS
- ASSYST PLUS service interval display
Switching additional speedometer on or off
Vehicles for the United Kingdom: this function is not available.This function is only available in vehicles with manual transmission.
With the Additional speedometer [mph]: or Additional speedometer [km/h]: function you can select whether the multifunction display shows the speed in mph or km/h in the status area instead of the outside temperature.With the Additional speedometer [mph]: function you can select whether the multifunction display shows the speed in mph in the status area instead of the outside temperature.
Using theorOn the steering wheel, select the Settings menu.Using theorSelect the Instrument cluster submenu.
Using theconfirm.Using theorSelect the Additional speedometer [mph]: or Additional speedometer [km/h]: function.
Using theorSelect the Additional speedometer [mph]: function.
Using thechange the setting.
Select Permanent display
Vehicles for the United Kingdom: this function is not available.You can choose whether the multifunction display always shows the outside temperature or the speed.
Using theorOn the steering wheel, select the Settings menu.Using theorSelect the Instrument cluster submenu.
Using theconfirm.Using theorSelect the function Permanent display:.Using thechange the setting.
Info

The speed is shown in the opposite unit to your speedometer, in km/h or mph.
Lighting
Set display/switch brightness
The lighting in the instrument cluster, displays and controls in the vehicle interior can be adjusted with the function Display/switch brightness:.Using theorOn the steering wheel, select the Settings menu.
Using theorSelect the submenu Lighting.
Using theconfirm.
Using theorSelect the function Display/switch brightness:.
Using theconfirm.
Using theorSet the brightness on a scale from level 1 to level 5 (bright).Using theor save the setting.
 ,
 or
 is set, the brightness control is influenced by the ambient brightness. Info
In daylight, the displays in the instrument cluster are not illuminated.
Set daytime running lights
The daytime running light function can only be set with the engine off.Using theorOn the steering wheel, select the Settings menu.
Using theorSelect the submenu Lighting.
Using theconfirm.
Using theorSelect the function Daytime running lights.
 are shown in orange in the multifunction display.
Using thechange the setting.
Switch Intelligent Light System on or off
Using theorOn the steering wheel, select the Settings menu.Using theorSelect the submenu Lighting.
Using theconfirm.Using theorSelect the function Intell. Light System.are shown in orange in the multifunction display.Using thechange the setting.
- Motorway light
- Active cornering light
- Cornering Light
- extended fog light
Note further information on the Intelligent Light System.
Set low beam for right- or left-hand traffic
This function is only available on vehicles with Intelligent Light System.This function lets you switch between symmetrical and asymmetrical low beam.
Using theorOn the steering wheel, select the Settings menu.Using theorSelect the submenu Lighting.
Using theconfirm.Using theorSelect the function Low beam setting for:.Using thechange the setting.If you set the low beam for right- or left-hand traffic, the motorway light and the extended fog light are not available. This deactivation only occurs if the right- or left-hand traffic setting is opposite to the country version of your vehicle.
You can also have the low beam for right- or left-hand traffic set at a qualified specialist workshop.
Set ambient lighting brightness
Using theorOn the steering wheel, select the Settings menu.Using theorSelect the submenu Lighting.
Using theconfirm.Using theorSelect the function Ambient brightness.Using theconfirm.
Using theorSet the brightness on a scale from Off to level 5 (bright).Using theorsave the setting.
Set ambient lighting color
Using theorOn the steering wheel, select the Settings menu.Using theorSelect the submenu Lighting.
Using theconfirm.Using theorSelect the function Ambient color.
Using theconfirm.Using theorSet the color to SOLAR, NEUTRAL or POLAR.
Using theorsave the setting.Switch surround lighting and exterior light delay on or off
Using theorOn the steering wheel, select the Settings menu.Using theorSelect the submenu Lighting.
Using theconfirm.
Using theorSelect the function Surround lighting.
Using thechange the setting.
Before leaving the vehicle, turn the key in the ignition lock to position 0.
Turn the key in the ignition lock to position 2.
When you restart the engine, the exterior light delay is switched on again.
If you switch on the surround lighting function and the light switch is set tois set, the following functions are active in darkness:
- Surround lighting: The exterior light stays on for 40 seconds after unlocking with the key. When you start the engine, surround lighting is deactivated and automatic driving lights are activated.
- Exterior light delay: The exterior light stays on for 60 seconds after the engine is switched off. If you close all doors and the trunk lid/tailgate, the exterior light turns off after 15 seconds.
- Parking lights
- Surround lighting in exterior mirrors
Switch interior light delay on or off
When you switch on the interior light delay function, the interior light stays on for 20 seconds after the key is removed from the ignition lock.Using theorOn the steering wheel, select the Settings menu.
Using theorSelect the submenu Lighting.
Using theconfirm.
Using theorSelect the function Interior light delay.
Using thechange the setting.
Vehicle
Set permanent SPEEDTRONIC
Using theorOn the steering wheel, select the Settings menu.Using theorSelect the submenu Vehicle.
Using theconfirm.Using theorSelect the function Limit (winter tires):.Using theconfirm.
Using theorSet permanent SPEEDTRONIC in steps of 10 (240 km/h to 160 km/h). The setting Off switches permanent SPEEDTRONIC off.Using theSave the entry.
Switch automatic locking on or off
Using theorOn the steering wheel, select the Settings menu.Using theorSelect the submenu Vehicle.
Using theconfirm.
Using theorSelect the function Auto. locking.Using thechange the setting.
Further information on automatic locking.
Switch locking tone confirmation on or off
When you switch on the locking tone function, an audible signal sounds when the vehicle is locked.Using theorOn the steering wheel, select the Settings menu.
Using theorSelect the submenu Vehicle.
Using theconfirm.
Using theorSelect the function Locking tone.
 are shown in orange in the multifunction display.
Using thechange the setting.
Heating
Auxiliary heater departure time
DANGERIf the exhaust tailpipe is blocked or sufficient ventilation is not possible, toxic exhaust gases, especially carbon monoxide, can enter the vehicle. This applies, for example, in enclosed spaces, or if the vehicle becomes stuck in snow. Risk of death!
Switch off the auxiliary heater in enclosed spaces without exhaust extraction, e.g. in a garage. If the vehicle is stuck in snow and you have to run the auxiliary heater, keep the exhaust tailpipe and the area around the vehicle free of snow. Open a window on the side of the vehicle facing away from the wind to ensure a sufficient supply of fresh air.WARNING
When the auxiliary heater is switched on, parts of the vehicle, e.g. the exhaust system, can become very hot.Flammable materials, e.g. leaves, grass or twigs, can ignite if they come into contact with
- hot parts of the exhaust system
- the exhaust gas itself
Make sure that while the auxiliary heater is switched on
- hot vehicle parts do not come into contact with flammable materials
- the exhaust gases can escape freely at the exhaust tailpipe
- the exhaust gases do not come into contact with flammable materials.
NOTE
Operating the auxiliary heater/ventilation places a load on the vehicle battery. Therefore, after heating or ventilating twice at the latest, drive the vehicle for a longer distance.This function is only available on vehicles with an auxiliary heater.
In the Heating submenu, you can select a stored departure time or change a departure time.The auxiliary heater preselection timer calculates the switch-on time based on the outside temperature, so that the vehicle is pre-heated at the departure time. Once the departure time is reached, the auxiliary heater continues to run for five more minutes, then switches off. The auxiliary heater adopts the temperature setting of the THERMATIC or THERMOTRONIC automatic climate control.
To switch off the auxiliary heater, use the auxiliary heater button on the center console or the remote control.Info
Switch the auxiliary heater on regularly once a month for about ten minutes.
For more information on the auxiliary heater .
Select a departure time or switch off the selected departure time
Using theorOn the steering wheel, select the Settings menu.Using theorSelect the Heating submenu.
Using theconfirm.Using theconfirm.
Using theorSelect one of the three departure times or Preselection Off (no preselected time active).Using theconfirm.Change departure time
Using theorOn the steering wheel, select the Settings menu.Using theorSelect the Heating submenu.
Using theconfirm.Using theorSelect A, B or C to change.
Using theconfirm.Using theorSelect the display to be changed: hour, minute.
Using theorSet the selected display.Using theSave the entry.Comfort
Switch entry and exit assist on or off
WARNINGWhen the entry and exit assist adjusts the steering wheel, you and other vehicle occupants, especially children, can be trapped. There is a risk of injury!
During the adjustment process of the entry and exit assist, make sure that nobody has a body part in the range of movement of the steering wheel.If someone becomes trapped,
- press a memory position button, or
- move the steering wheel adjustment switch against the direction of steering wheel movement.
Using theorOn the steering wheel, select the Settings menu.
Using theorSelect the Comfort submenu.
Using theconfirm.
Using theorSelect the Entry/Exit Assist function.
Using thechange the setting.
Switch belt adjustment on or off
Using theorOn the steering wheel, select the Settings menu.Using theorSelect the Comfort submenu.
Using theconfirm.Using theorSelect the Belt Adjustment function.Using thechange the setting.
Switch mirror fold-in on locking on or off
This function is only available if the vehicle is equipped with the electric auto fold-in feature.When you switch on the Auto Fold-In function, the exterior mirrors fold in when the vehicle is locked. When you unlock the vehicle and open the driver's or front passenger's door, the exterior mirrors fold out again.
Using theorOn the steering wheel, select the Settings menu.Using theorSelect the Comfort submenu.
Using theconfirm.Using theorSelect the Auto Fold-In function.Using thechange the setting.
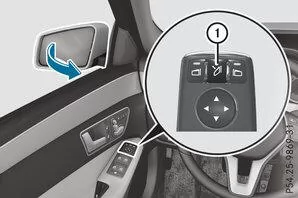
If you fold the exterior mirrors in with the button while the Auto Fold-In function is switched on, the exterior mirrors do not fold out automatically .
fold out.Reset to factory settings
Using theorOn the steering wheel, select the Settings menu.Using theorSelect the Factory Settings submenu.
Using theconfirm.Using theorSelect No or Yes.
Using theConfirm the selection.For safety reasons, not all functions are reset: the winter tyre speed limit of the permanent SPEEDTRONIC can only be set in the Vehicle submenu. If you want to reset the daytime running lamps function in the Lights submenu, you must turn the key in the ignition lock to position 1.
The Settings menu of the Mercedes E-Class W212 (model years 2009–2016) offers a wide range of individual adjustments. From ambient lighting to comfort functions and vehicle locking, everything can be controlled easily and intuitively.
With this flexibility, the E-Class meets a wide variety of driver preferences and offers a high level of comfort and personalization.
Test yourself
A quick Mercedes-Benz E-Class quiz: every answer comes with an explanation and a link to the manual page.