Front Fender
Exploded View
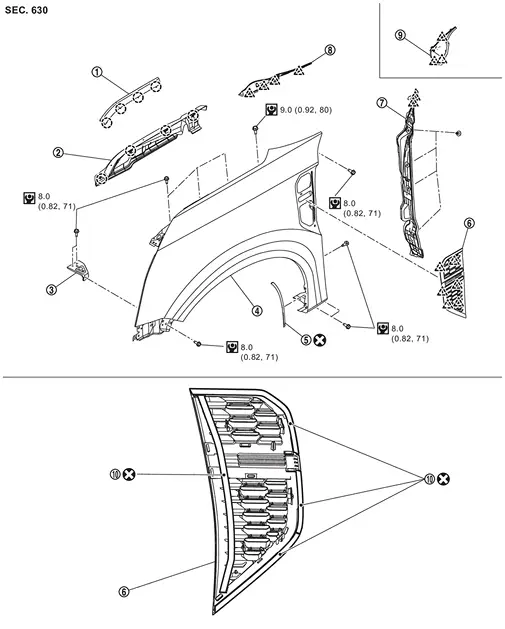
 |
Hood side seal |  |
Front fender drip cover |  |
Front fender bracket |
 |
Front fender assembly |  |
Front fender protector tape |  |
Front fender duct |
 |
Front fender baffle |  |
Fender cover LH |  |
Fender cover RH |
 |
Double-sided tape [t: 0.8 mm (0.031 in)] | ||||
 |
: Clip | ||||
 |
: Pawl | ||||
 |
: Always replace after every disassembly | ||||
 |
: N·m (kg-m, in-lb) | ||||
Front Fender
Removal and Installation
REMOVAL
Remove fender cover. Refer to Removal and Installation.
Remove front fender drip cover. Refer to Removal and Installation.
Remove front combination lamp and head lamp. Refer to Removal and Installation.
Remove front fender protector. Refer to Removal and Installation.
Remove front door assembly. Refer to Removal and Installation.
Disengage front fender baffle upper part  fixing pawls, and then remove front fender baffle upper part from front fender assembly.
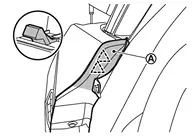
|
: Pawl |
Remove front fender baffle fixing clips, and then remove front fender baffle.
Remove front fender assembly mounting bolts, and then front fender assembly.
Remove front fender bracket mounting bolts, and then remove front fender bracket.
INSTALLATION
Note the following items, and then install in the reverse order of removal.
Fender Cover
Removal and Installation
REMOVAL
Fully open hood assembly.
Disengage fender cover fixing pawls.
LH side
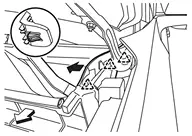
: Pawl : vehicle front RH side

: Pawl : vehicle front
Disengage fender cover fixing pawl, and then remove fender cover.
LH side
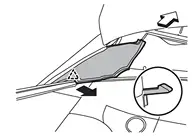
: Pawl : vehicle front RH side
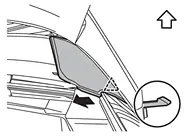
: Pawl : vehicle front
INSTALLATION
Note the following item, and then install in the reverse order of removal.
Front Fender Drip Cover
Removal and Installation
REMOVAL
Remove cowl top side seal between cowl top cover and fender drip cover. Refer to Removal and Installation.
Disengage fixing clips, and then remove front fender drip cover.

|
: Clip |
Disengage fixing clips, and then remove hood side seal.
INSTALLATION
Install in the reverse order of removal.
Front Fender Duct
Removal and Installation
REMOVAL
Apply protective tapes (A) on the part to protect it from damage.

Disengage fixing pawls and peel off double-sided tapes using a remover tool (A), and then remove front fender duct .

|
: Pawl |
Remove double-sided tape with a double-sided tapes remover from front fender duct and front fender assembly.
INSTALLATION
Note the following items, and then install in the reverse order of removal.
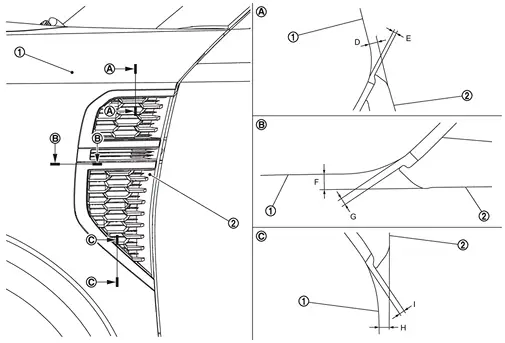
|
Front fender assembly | |
Front fender duct |
Unit: mm [in]
| Portion | Standard | |||
|---|---|---|---|---|
| Front fender assembly – Front fender duct | – |
D | Surface height | 1.0 ± 1.0 [0.039 ± 0.039] |
| E | Clearance | 0.5 ± 0.5 [0.020 ± 0.020] |
||
 – |
F | Surface height | 1.0 ± 1.0 [0.039 ± 0.039] |
|
| G | Clearance | 0.5 ± 0.5 [0.020 ± 0.020] |
||
 – |
H | Surface height | 1.0 ± 1.0 [0.039 ± 0.039] |
|
| I | Clearance | 0.5 ± 0.5 [0.020 ± 0.020] |
||
Front Fender Protector Tape
Removal and Installation
REMOVAL
Remove front fender protector tape from front fender assembly.
INSTALLATION
Note the following items, and then install in the reverse order of removal.