Heating, Ventilation, and Air Conditioning
Photo Sensor Repair Procedures
In this manual: Heating, Ventilation, and Air Conditioning
7steps
~42min
2/5difficulty
Done 0 of 7
Inspection
- Turn the ignition on.
- Connect the GDS.
- Direct intense light onto the photo sensor using a lamp, and check the change in output voltage.
- The voltage will increase with more intense light and decrease with less intense light.
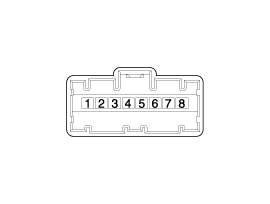
1. Auto Light Signal
2. Auto Light Ground
3. Photo Signal (Right)
4. LED Power (B+)5. LED Ground (to BCM)
6. Photo Signal (Left)
7. Photo Force
8. Auto Light Power (5 V)
Replacement
- Disconnect the negative (-) battery terminal.
- Using a flat-blade screwdriver, remove the photo sensor (A) from the center of the defroster nozzle after disconnecting the connector (B).
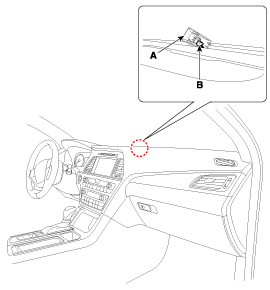
- Install in the reverse order of removal.
Test yourself
A quick Hyundai Sonata LF quiz: every answer comes with an explanation and a link to the manual page.
Was this page helpful?