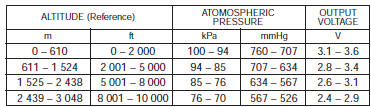
Iap sensor voltage is not within the following range.
0.5 V ≤ Sensor voltage < 4.85 VNote
note that atmospheric pressure varies depending on weather conditions as well as altitude.
Take that into consideration when inspecting voltage.
Clogged vacuum passage between throttle body and iap sensor.
Air being drawn from vacuum passage between throttle body and iap sensor.
Iap sensor circuit open or shorted to ground.
Iap sensor malfunction.
Ecm malfunction.
P0105
H
Sensor voltage is higher than specified value
Iap sensor circuit is open or shorted to vcc or ground circuit open.
Iap sensor circuit is shorted to ground or vcc circuit open.
L
Sensor voltage is lower than specified value.
Wiring diagram TroubleshootingCaution
when using the multi-circuit tester, do not strongly touch the terminal of the ecm coupler with a needle pointed tester probe to prevent terminal damage.
Note
after repairing the trouble, clear the dtc using sds tool. Refer to “use of sds diagnosis reset procedures” .
C13 (use of mode select switch)
Step
Action
Yes
No
1
Turn the ignition switch off.
Lift and support the fuel tank. Refer to “fuel tank removal and installation” in section 1g .
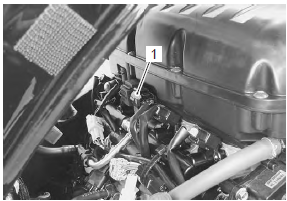
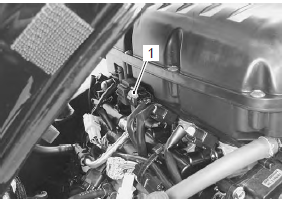
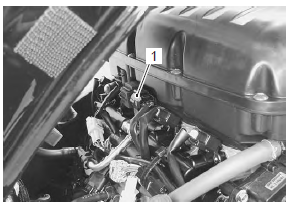
Check the iap sensor coupler (1) for loose or poor contacts.
If ok, then measure the iap sensor input voltage.
Disconnect the iap sensor coupler.
Turn the ignition switch on.
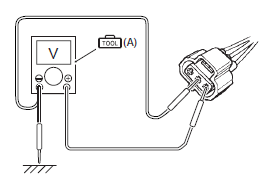
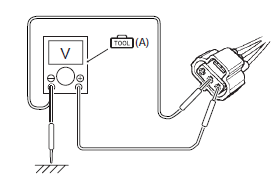
Measure the input voltage between the r wire and ground.
If ok, then measure the voltage between the r wire and b/br wire. Special tool (a): 09900–25008 (multi circuit tester set)Tester knob indication voltage ( ) Iap sensor input voltage 4.5 – 5.5 V ((+) terminal: r – (–) terminal: ground, (+) terminal: r – (–) terminal: b/br) Is the voltage ok?
Go to step 3.
Loose or poor contacts on the ecm coupler.
Open or short circuit in the r or b/br wire.
P0105-h for iap sensor (use of sds)
Step
Action
Yes
No
1
Turn the ignition switch off.
Lift and support the fuel tank. Refer to “fuel tank removal and installation” in section 1g .
Check the iap sensor coupler (1) for loose or poor contacts.
If ok, then check the iap sensor lead wire continuity.
Disconnect the iap sensor coupler.
Check the continuity between the r wire and g/b wire.
If the sound is not heard from the tester, the circuit condition is ok. Special tool (a): 09900–25008 (multi circuit tester set)Tester knob indication continuity ( )
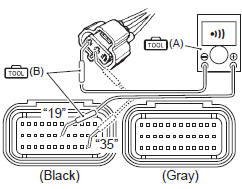
Disconnect the ecm couplers. Refer to “ecm removal and installation” in section 1c .
Insert the needle pointed probes to the lead wire coupler
Check the continuity between the g/b wire and terminal “19”.
If ok, then check the continuity between the b/br wire and terminal “35”. Special tool (a): 09900–25008 (multi circuit tester set) (b): 09900–25009 (needle-point probe set)Tester knob indication continuity test ( ) Ecm couplers (harness side) Is the continuity ok?
Go to step 3.
G/b wire shorted to vcc, or b/br wire open.
P0105-l for iap sensor (use of sds)
Step
Action
Yes
No
1
Turn the ignition switch off.
Lift and support the fuel tank. Refer to “fuel tank removal and installation” in section 1g .
Check the iap sensor coupler (1) for loose or poor contacts.
If ok, then check the iap sensor lead wire continuity.
Disconnect the iap sensor coupler.
Check the continuity between the g/b wire and ground.
Also, check the continuity between the g/b wire and b/ br wire. If the sound is not heard from the tester, the circuit condition is ok. Special tool (a): 09900–25008 (multi circuit tester set)Tester knob indication continuity ( )
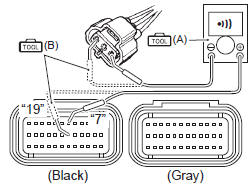
Disconnect the ecm couplers. Refer to “ecm removal and installation” in section 1c .
Insert the needle pointed probes to the lead wire coupler
Check the continuity between the r wire and terminal “7”. Also, check the continuity between the g/b wire and terminal “19”.
Measure the input voltage between the r wire and ground.
If ok, then measure the voltage between the r wire and b/br wire Special tool (a): 09900–25008 (multi circuit tester set)Tester knob indication voltage ( ) Iap sensor input voltage 4.5 – 5.5 V ((+) terminal: r – (–) terminal: ground, (+) terminal: r – (–) terminal: b/br) Is the voltage ok?
Go to step 3.
Loose or poor contacts on the ecm coupler.
Open or short circuit in the r or b/br wire.
3
Turn the ignition switch off.
Connect the ecm couplers and iap sensor coupler.
Insert the needle pointed probes to the lead wire coupler.
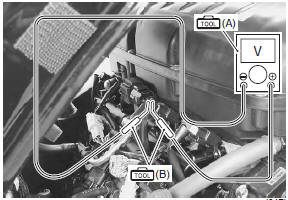
Run the engine at idle speed and measure the iap sensor output voltage between the g/b wire and b/br wire.
Special tool (a): 09900–25008 (multi circuit tester set) (b): 09900–25009 (needle-point probe set)Tester knob indication voltage ( ) Iap sensor output voltage approx. 2.7 V at idle speed ((+) terminal: g/b – (–) terminal: b/br)
Is the voltage ok?
Go to step 4.
Check the vacuum hose for crack or damage.
Open or short circuit in the g/b wire.
If vacuum hose and wire are ok, replace the iap sensor with a new one. Refer to “iap sensor removal and installation” in section 1c .
4
Turn the ignition switch off.
Remove the iap sensor. Refer to “iap sensor removal and installation” in section 1c .
Connect the vacuum pump gauge to the vacuum port of the iap sensor.
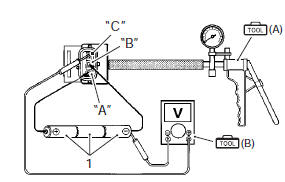
Arrange 3 new 1.5 V batteries (1) in series (check that total voltage is 4.5 – 5.0 V) and connect (–) terminal to the ground terminal “b” and (+) terminal to the vcc terminal “a”.
Check the voltage between vout terminal “c” and ground. Also, check if voltage reduces when vacuum is applied by using vacuum pump gauge.
Special tool (a): 09917–47011 (vacuum pump gauge set) (b): 09900–25008 (multi circuit tester set)Tester knob indication voltage ( )
Is the voltage ok?
G/b, r or b/br wire open or shorted to ground, or poor “19”, “7” or “35” connection.
If wire and connection are ok, intermittent trouble or faulty ecm.
Recheck each terminal and wire harness for open circuit and poor connection.
Replace the ecm with a known good one, and inspect it again. Refer to “ecm removal and installation” in section 1c .
If check result is not satisfactory, replace the iap sensor with a new one. Refer to “iap sensor removal and installation” in section 1c .
?
Test yourself
A quick Suzuki GSX-R 1000 quiz: every answer comes with an explanation and a link to the manual page.

 (a): 09900–25008 (multi
 )
 (a): 09900–25008 (multi
 )

 (a): 09900–25008 (multi
 )

 (a): 09900–25008 (multi
 (b): 09900–25009
 )
 (a): 09900–25008 (multi
 )
 (a): 09917–47011 (vacuum
 (b): 09900–25008 (multi
 )