Radio Receiver Power Source Circuit
This is the power source circuit to operate the radio and display receiver assembly.
WIRING DIAGRAM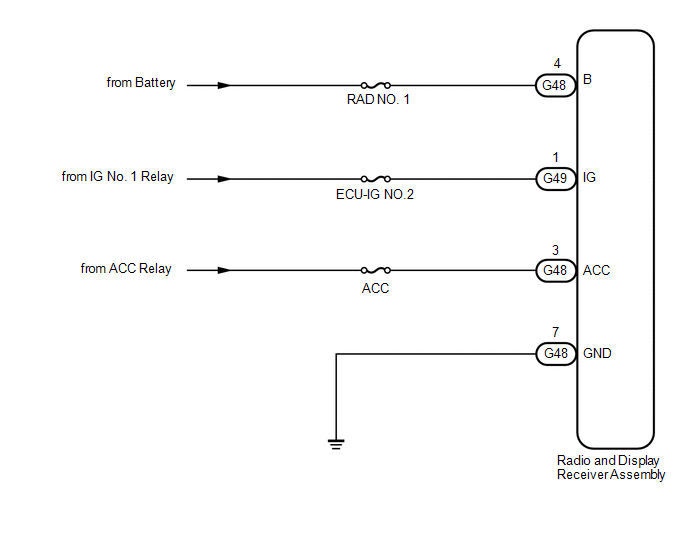
CAUTION / NOTICE / HINT
NOTICE:
Inspect the fuses for circuits related to this system before performing the following inspection procedure.
PROCEDURECHECK HARNESS AND CONNECTOR (RADIO AND DISPLAY RECEIVER ASSEMBLY - BATTERY, BODY GROUND)
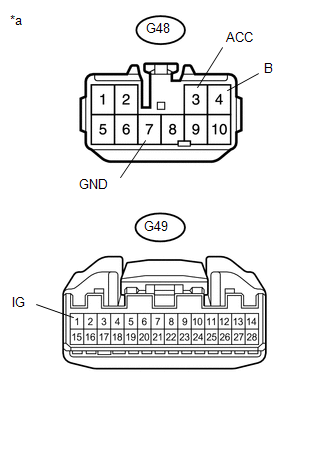
(a) Disconnect the G49 and G48 radio and display receiver assembly connectors.
(b) Measure the resistance according to the value(s) in the table below .
Standard Resistance:
Tester Connection | Condition | Specified Condition |
|---|---|---|
G48-7 (GND) - Body ground |
Always |
Below 1 Ω |
(c) Measure the voltage according to the value(s) in the table below.
Standard Voltage:
Tester Connection | Condition | Specified Condition |
|---|---|---|
G48-3 (ACC) - G48-7 (GND) |
Ignition switch ACC |
11 to 14 V |
G48-4 (B) - G48-7 (GND) |
Always |
11 to 14 V |
G49-1 (IG) - G48-7 (GND) |
Ignition switch ON |
11 to 14 V |
*a |
Front view of wire harness connector (to Radio and Display Receiver Assembly) |
| OK |  | PROCEED TO NEXT SUSPECTED AREA SHOWN IN PROBLEM SYMPTOMS TABLE |
| NG | | REPAIR OR REPLACE HARNESS OR CONNECTOR |
Test yourself
A quick Toyota 4Runner quiz: every answer comes with an explanation and a link to the manual page.