Microphone Circuit Between Microphone and Radio
DESCRIPTION
The radio receiver assembly and the map light assembly (phone microphone assembly) are connected to each other by microphone connection detection signal lines.
Through this circuit, the radio receiver assembly supplies power to the map light assembly (phone microphone assembly), and the map light assembly (phone microphone assembly) sends microphone signals to the radio receiver assembly.
WIRING DIAGRAM
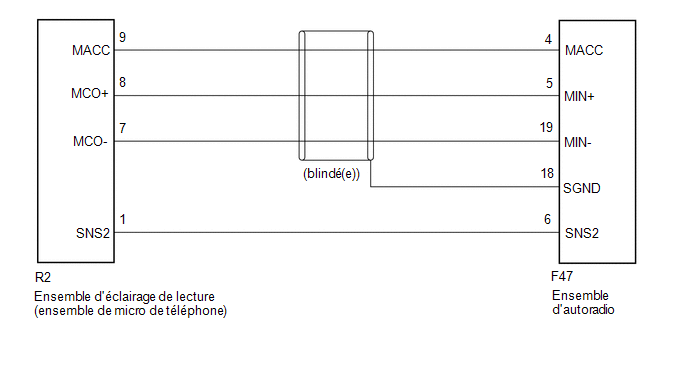
PROCEDURE
CHECK WIRE HARNESS AND CONNECTOR (RADIO RECEIVER ASSEMBLY - MAP LIGHT ASSEMBLY (PHONE MICROPHONE ASSEMBLY))
(a) Disconnect the F47 radio receiver assembly connector.
(b) Disconnect connector R2 from the map light assembly (telephone microphone assembly).
(c) Measure the resistance according to the value(s) in the table below.
Standard resistance:
Tester Connection | Condition | Specified Condition |
|---|---|---|
F47-6 (SNS2) - R2-1 (SNS2) |
Always |
Below 1 Ω |
F47-4 (MACC) - R2-9 (MACC) |
Always |
Below 1 Ω |
F47-5 (MIN+) - R2-8 (MCO+) |
Always |
Below 1 Ω |
F47-19 (MIN-) - R2-7 (MCO-) |
Always |
Below 1 Ω |
F47-6 (SNS2) or R2-1 (SNS2) - Body ground |
Always |
10 kΩ minimum |
F47-4 (MACC) or R2-9 (MACC) - Body ground |
Always |
10 kΩ minimum |
F47-5 (MIN+) or R2-8 (MCO+) - Body ground |
Always |
10 kΩ minimum |
F47-19 (MIN-) or R2-7 (MCO-) - Body ground |
Always |
10 kΩ minimum |
F47-18 (SGND) - Body ground |
Always |
10 kΩ minimum |
| NG |  |
REPAIR OR REPLACE HARNESS OR CONNECTOR |
|

CHECK RADIO RECEIVER ASSEMBLY
(a) Connect the F47 connector of the radio receiver assembly.
(b) Connect the R2 connector of the Reading Light Assembly (Telephone Microphone Assembly).
(c) Measure the voltage according to the value(s) shown in the table below. Standard voltage:
|
|
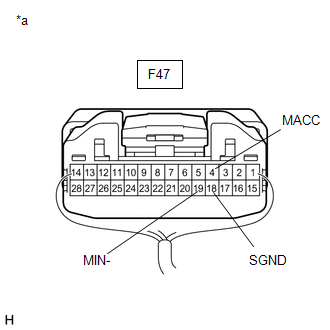
(d) Measure the resistance according to the value(s) in the table below.
Standard resistance:
Tester Connection | Condition | Specified Condition |
|---|---|---|
F47-18 (SGND) - Body ground |
Always |
Below 1 Ω |
F47-19 (MIN-) - Body ground |
Always |
Below 1 Ω |
| NG | |
REPLACE RADIO RECEIVER ASSEMBLY |
|
CHECK MAP LIGHT ASSEMBLY (TELEPHONE MICROPHONE ASSEMBLY)
(a) Remove the map light assembly (telephone microphone assembly).
Click here
(b) Measure the resistance according to the value(s) in the table below. Standard resistance:
|
|
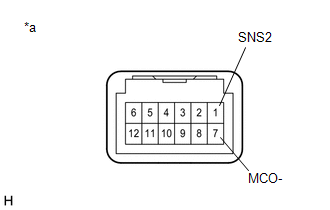
| NG | |
REPLACE MAP LIGHT ASSEMBLY (TELEPHONE MICROPHONE ASSEMBLY) |
|
CHECK MAP LIGHT ASSEMBLY (TELEPHONE MICROPHONE ASSEMBLY)
(a) Connect the R2 connector of the map light assembly (phone microphone assembly).
(b) Turn the ignition switch to ACC.
(c) Connect an oscilloscope to terminals 8 (MCO+) and 7 (MCO-) of the R2 connector of the map light assembly (phone microphone assembly). |
|
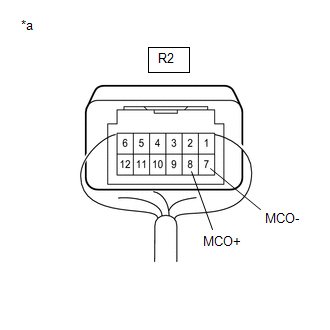
(d) Check the waveform of the map light assembly (phone microphone assembly) using the oscilloscope.
Result:
Result | Proceed to |
|---|---|
A waveform synchronized with the voice volume sent to the Reading Light Assembly (Telephone Microphone Assembly) is output. |
A |
No waveform synchronized with the voice volume sent to the Reading Light Assembly (Telephone Microphone Assembly) is output. |
B |
| A | |
GO TO APPLICABLE SYSTEM AS INDICATED IN THE PROBLEM SYMPTOMS TABLE |
| B | |
REPLACE MAP LIGHT ASSEMBLY (TELEPHONE MICROPHONE ASSEMBLY) |