Shift Cables
Removal
The transmission is operated by two cables (Fig. 11.2.1.): the selector cable and the shift cable. Both cables are removed and installed together as one assembly. To remove them, follow the procedure below:
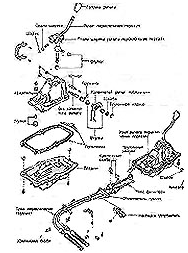
Fig. 11.2.1. Shift lever mechanism components
· Disconnect the negative battery terminal. · In the engine compartment, remove the fuse box and move it aside, taking care not to stretch the wiring.
· Remove the air cleaner assembly and intake duct.
· At the transmission ends of the cables, release the clips and remove the lock washers securing the cable ends to the transmission levers.
· Remove the two clips securing the cable outer sheaths to the transmission bracket. · On the engine compartment bulkhead, remove the mounting screws and release the bracket and cable retaining clips. Inside the cabin, remove the center console (instrument panel console trim).
· On the left side of the shift lever housing, remove the spring retainer and disconnect the selector cable end from the crank lever shaft. Remove the clips securing the outer cable sheath.
· Remove the bolts securing the shift lever housing to the pan and lift the housing to access the inner cable attached to the lower end of the lever. Disconnect the cable end inside the housing as described above for the selector cable.
· Chock the rear wheels, raise the front of the vehicle with a jack and support it on stands.
· Remove the heat shield from under the shift lever housing.
· On the front side of the shift lever housing pan, remove the nut securing the rubber grommet plate. Pull the grommet with the cables out of the pan and remove the cables from under the vehicle.
Installation: Install in the reverse order of removal.
Test yourself
A quick Toyota Carina quiz: every answer comes with an explanation and a link to the manual page.