Body Electrical
Installation
In this manual: Body Electrical
~1min read
NOTICE:
- Never use SRS parts from another vehicle. When replacing parts, replace them with new ones.
- Never reuse the seat position sensor assembly involved in a collision when the airbag has deployed.
- Never repair a sensor in order to reuse it.
1. INSTALL SEAT POSITION SENSOR ASSEMBLY
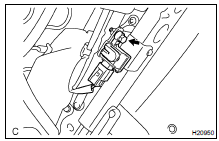
(a) Connect the connector.
(b) Install the seat position sensor assembly with a new bolt.
Part No.:
Bolt: 90119-06871 Torque: 8 N·m
NOTICE:
- Connection of the connector is done after the sensor assembly has been installed.
- Make sure that the sensor assembly is installed with the specified torque.
- If the sensor assembly has been dropped, or there are cracks, dents or other defects in the case, bracket or connector, replace the sensor assembly with a new one.
- When installing the sensor assembly, take care that the SRS wiring does not interfere with other parts and is not pinched between other parts.
- After installation, shake the sensor assembly to check that there is no looseness.
2. INSTALL FRONT SEAT ASSEMBLY (DRIVER SIDE) (BO-1 17)
3. INSPECT SRS WARNING LIGHT (DI-692 )
Test yourself
A quick Toyota Land Cruiser quiz: every answer comes with an explanation and a link to the manual page.
Was this page helpful?