Activated Charcoal Canister System
Assembly Overview - Activated Charcoal Canister System
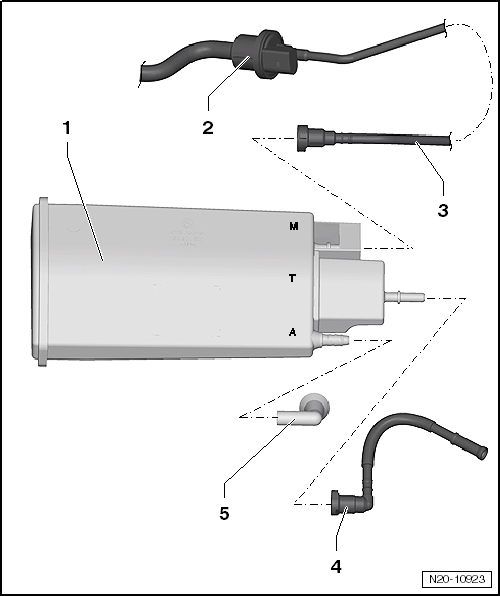
- Activated Charcoal Canister
- Installation location
- Solenoid valve 1 for activated charcoal canister -N80-
- Installation location: on intake manifold
- Valve closed with ignition switched off
- Valve is activated (pulsed) by engine control module -J623- when engine is warm
- Breather Line
- to engine
- Make sure it is seated securely
- between underbody coupling point and fuel tank
- Connecting hose
- to gravity valve on fuel tank
- Make sure it is seated securely
- Breather hose
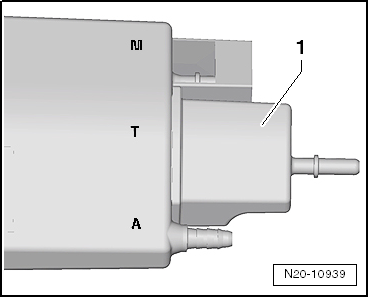
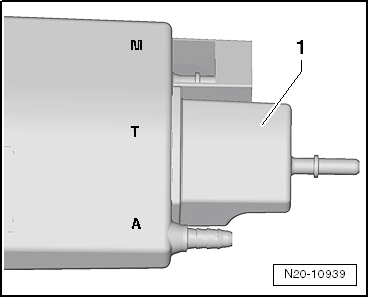
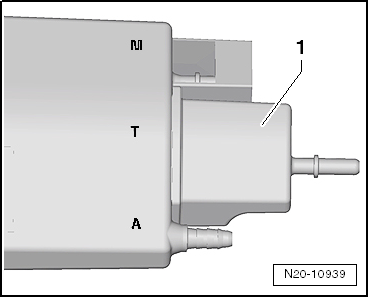
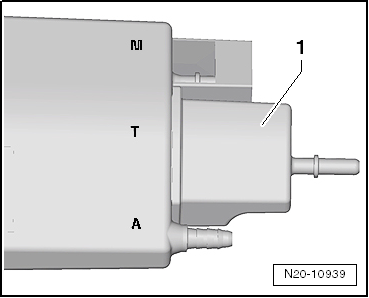
Connections on activated charcoal canister
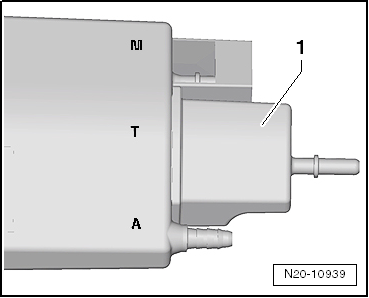
- M - connection for vent line to engine
- T - connection to gravity valve on fuel tank
- A - ventilation connection
Check fuel tank venting
Required Special Tools, Test and Measuring Equipment and Auxiliary Items
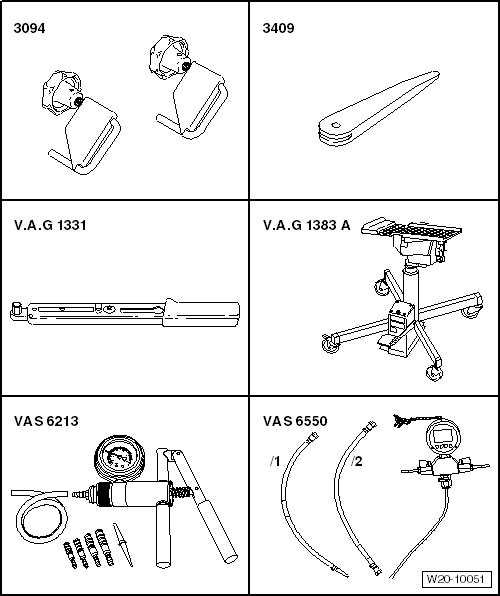
- Hose clamps up to 25 mm -3094-
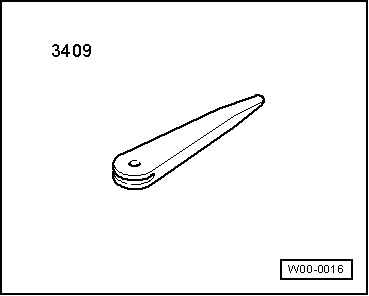
- Release Wedge -3409-
- Torque Wrench -V.A.G 1331-
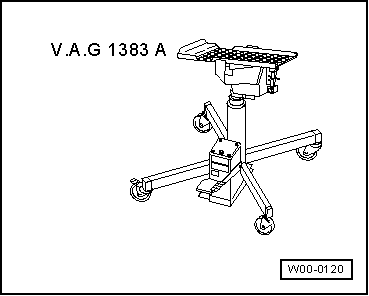
- Engine and Transmission Hoist -V.A.G 1383 A-
- Hand vacuum pump -VAS 6213-
- Pressure gauge -VAS 6550-
- Adapter set -VAS 6550-
Test conditions
- Observe safety precautions.
- Observe cleanliness rules.
- Immediately seal any lines that have been opened.
- Observe connections on activated charcoal canister.
- The ignition must be switched off.
Test procedure
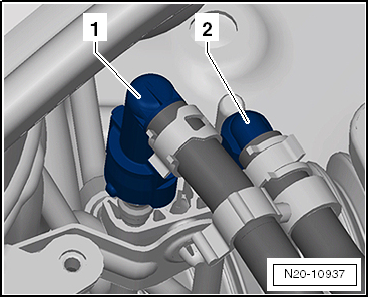
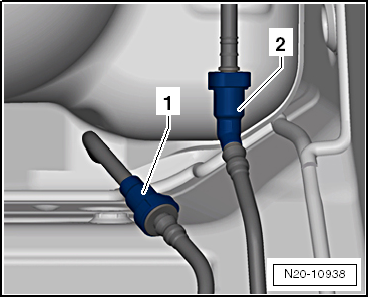
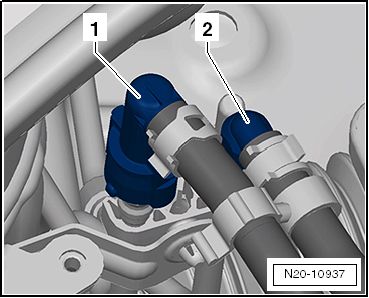
- Unlock and disconnect breather line -2- (white). Disconnect quick-connectors.
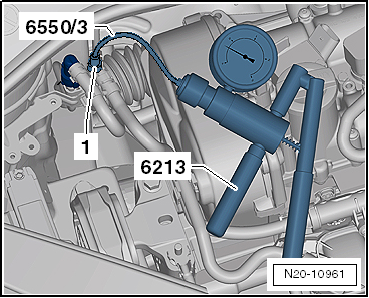
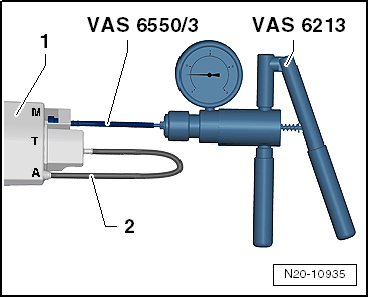
- Connect hand vacuum pump -VAS 6213- to line -1- to the charcoal canister using adapter set -VAS 6550/3-.
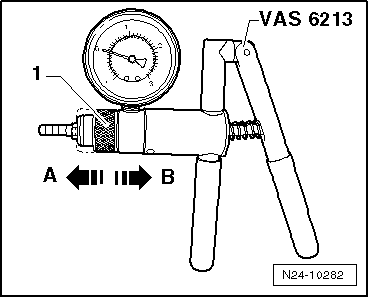
- Set slide ring -1- on hand vacuum pump -VAS 6213- to position -A- for "vacuum".
- Operate hand vacuum pump -VAS 6213- several times. No vacuum must build up.
If vacuum builds up:
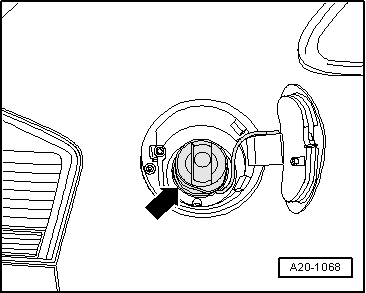
- Open the fuel filler flap.
- Remove the filler cap -arrow- from the fuel filler neck.
- Clean the area around the fuel filler neck.
- Drain fuel tank.
- Remove the fuel filler flap unit → Body Assembly Work, Exterior.
- Remove the seat bench → Body Assembly Work, Interior.
- Unclip cover -1- from the retaining clips using demolding wedge -3409- -arrows-.
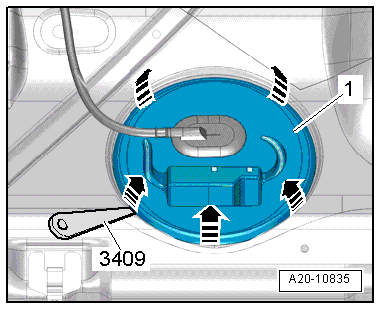
- Unlock connector -1- and disconnect it.
- Remove rear right wheel → Wheels, Tires, Wheel Alignment.
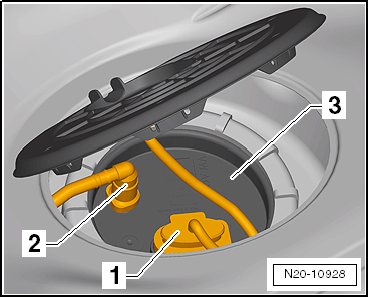
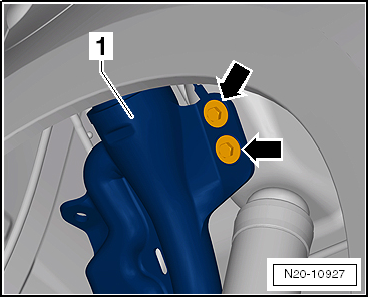
- Unscrew bolts -arrows- of filler neck -1- from the body.
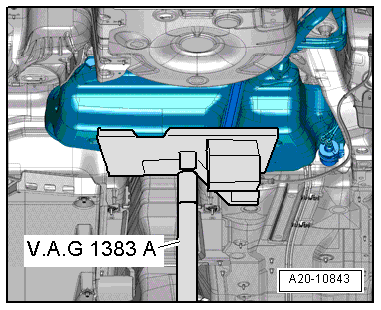
- Position engine and transmission jack -V.A.G 1383 A- under the fuel tank to support it.
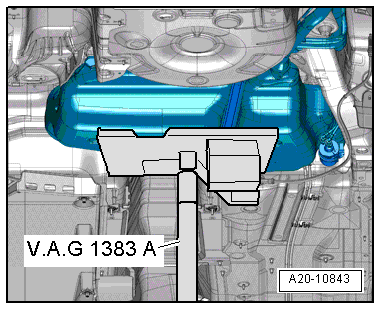
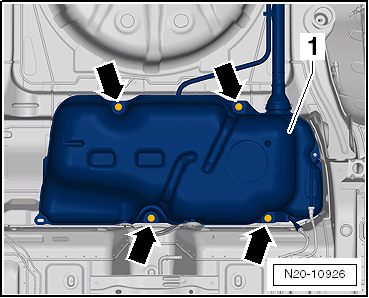
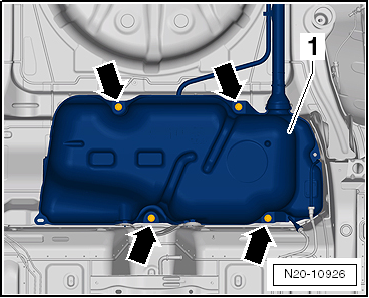
- Unscrew bolts -arrows- from fuel tank -1-.
- Lower fuel tank by 6 cm.

Caution!
Make sure there is sufficient clearance to all components!
- Check vent hose on charcoal canister for contamination, clean if necessary.
- Repeat test.
Check for leaks
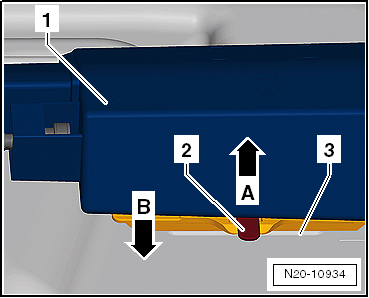
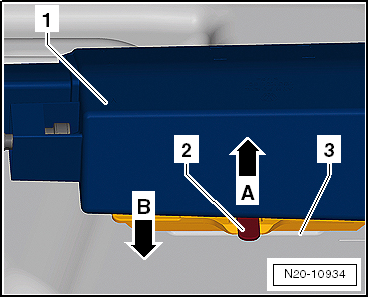
- Release charcoal canister -1- from bracket -3-.
- Unlock locking lug -2- by moving it upward in -arrow direction A-.
- Pull charcoal canister -1- out of bracket -3- in -arrow direction B-.
- Disconnect lines from connections -T- and -A-. Disconnect quick-connectors.
- Connect connections -T- and -A- with a commercially available hose -2- to seal the connections.

Note
The sealing tool -T10249/2- can also be used to seal connection -T-. Connection -A- must then be sealed by suitable means.
- Operate hand vacuum pump -VAS 6213- several times. Vacuum must build up.
If no vacuum builds up:
Check the charcoal canister system at the underbody connection point as follows:
- Open line -1- (white) at the underbody. Disconnect quick-connectors.
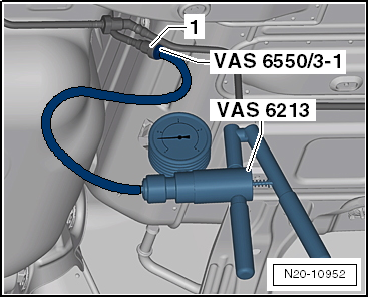
- Connect line to charcoal canister -1- to hand vacuum pump -VAS 6213-, adapter -VAS 6550/3-1- and a commercially available hose.
- Connections -A- and -T- are sealed with a commercially available hose.
- Operate hand vacuum pump -VAS 6213- several times. Vacuum must build up.
If vacuum builds up:
- Check line between the connection point in the engine compartment and the connection point at the underbody, replace if necessary.
If no vacuum builds up:
- Disconnect line from connection -M- on charcoal canister. Disconnect quick-connectors.
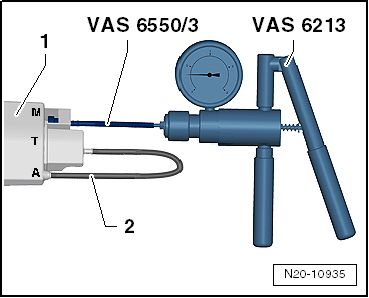
- Connect hand vacuum pump -VAS 6213- with adapter -VAS 6550/3- to connection -M- on charcoal canister -1-.
- Connect connections -T- and -A- with a commercially available hose -2- to seal the connections.
- Operate hand vacuum pump -VAS 6213- several times. Vacuum must build up.
If vacuum builds up:
- Check line between connection point -1- (white) at the underbody and connection -M- on the charcoal canister, replace if necessary.
If no vacuum builds up:
- Replace charcoal canister.
If vacuum builds up and lines are OK:
Check solenoid valve 1 for charcoal canister -N80- as follows:
- Ignition switched off.
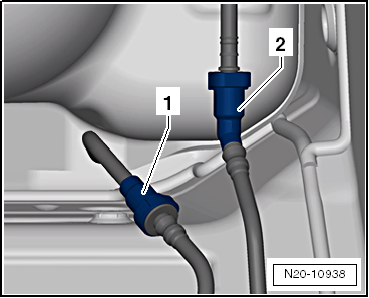
- Press locking lugs -arrows- and pull intake connector -1- off in -arrow direction-.
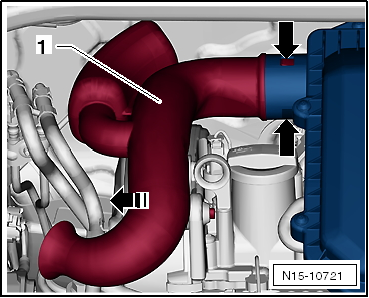
- Disconnect hose -1- from air filter housing.
- Pull air filter housing upward off the bolts at points -2- and -3-.
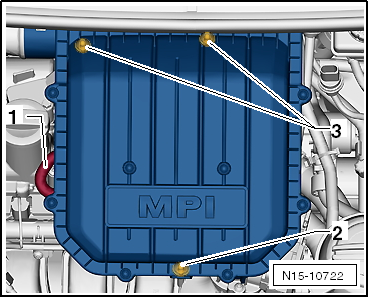
- Seal line -3- between solenoid valve 1 for charcoal canister -N80- and throttle valve control unit -J338-.
- Use hose clamps up to 25 mm -3094- for this.
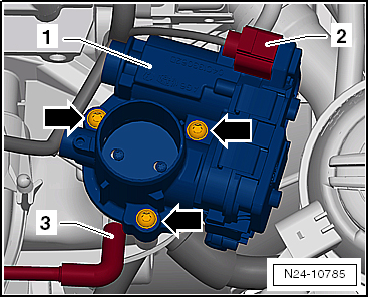
- Disconnect breather line -2- (white). Disconnect quick-connectors.
- Connect hand vacuum pump -VAS 6213- to the line to solenoid valve 1 for charcoal canister -N80- with adapter nipple -VAS 6550/3-1- and a commercially available hose.
- Operate hand vacuum pump -VAS 6213- several times. Vacuum must build up.
If no vacuum builds up:
- Check line, replace if necessary.
If vacuum builds up:
- Check line between solenoid valve 1 for charcoal canister -N80- and throttle valve control unit -J338-.
If no fault is found:
- Replace solenoid valve 1 for charcoal canister -N80-.
Installing
Installation is carried out in the reverse order. Observe the following:
- Install fuel tank.
- Make sure the fuel tank filler neck is correctly inserted into the opening in the body.
- Position fuel tank at the underbody using engine and transmission jack -V.A.G 1383 A-.
- Make sure the charcoal canister is correctly seated in the bracket on the fuel tank.
- Route breather and fuel lines without kinks.
- Make sure line connections are firmly seated.
- After installing the fuel tank, check that the supply and breather lines are still clipped to the fuel tank.
- Observe connection diagram on charcoal canister.
Removing and installing charcoal canister
Required Special Tools, Test and Measuring Equipment and Auxiliary Items
- Engine and Transmission Hoist -V.A.G 1383 A-
- Release Wedge -3409-
Removing
- Observe safety precautions.
- Observe cleanliness rules.
- Open the fuel filler flap.
- Remove the filler cap -arrow- from the fuel filler neck.
- Clean the area around the fuel filler neck.
- Drain fuel tank.
- Remove the fuel filler flap unit → Body Assembly Work, Exterior.
- Remove the seat bench → Body Assembly Work, Interior.
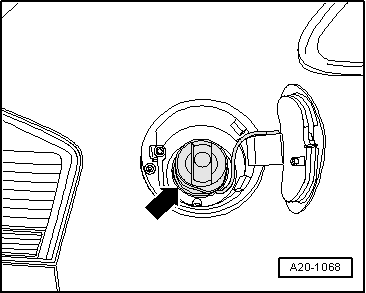
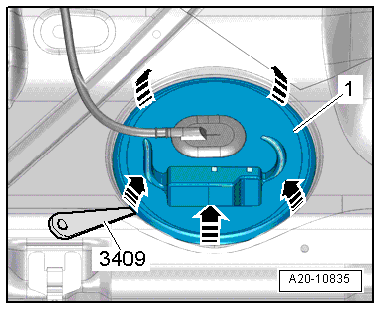
- Unclip cover -1- from the retaining clips using demolding wedge -3409- -arrows-.
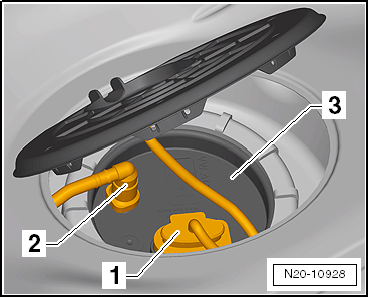
- Unlock connector -1- and disconnect it.
- Remove rear right wheel → Wheels, Tires, Wheel Alignment.
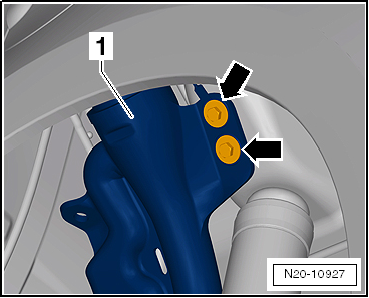
- Unscrew bolts -arrows- of filler neck -1- from the body.
- Position engine and transmission jack -V.A.G 1383 A- under the fuel tank to support it.
- Unscrew bolts -arrows- from fuel tank -1-.
- Lower fuel tank by 6 cm.

Caution!
Make sure there is sufficient clearance to all components!
- Release charcoal canister -1- from bracket -3-.
- Unlock locking lug -2- by moving it upward in -arrow direction A-.
- Pull charcoal canister -1- out of bracket -3- in -arrow direction B-.
- Unlock and disconnect lines at connections -M- and -T- on charcoal canister -1-. Disconnect quick-connectors.
Installing
Installation is carried out in the reverse order. Observe the following:
- Make sure the fuel tank filler neck is correctly inserted into the opening in the body.
- Position fuel tank at the underbody using engine and transmission jack -V.A.G 1383 A-.
- Make sure the charcoal canister is correctly seated in the bracket on the fuel tank.
- Route breather and fuel lines without kinks.
- Make sure line connections are firmly seated.
- After installing the fuel tank, check that the supply and breather lines are still clipped to the fuel tank.
- Observe connection diagram on charcoal canister.
- M - connection for vent line to engine
- T - connection to gravity valve on fuel tank
- A - ventilation connection
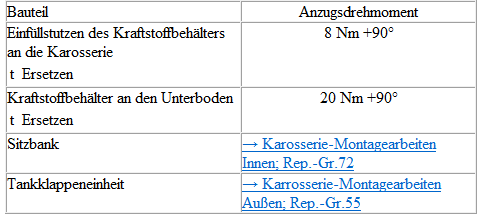
Tightening torque