Wechsel eines beschädigten Rades
Für Fahrzeuge mit Notrad
Wenn ein Reifen während der Fahrt Luft verliert, fahren Sie vorsichtig von der Straße ab.
Fahren Sie langsam am Straßenrand entlang, bis Sie eine ausreichend weit von der Fahrbahn entfernte Stelle erreichen.
Verwenden Sie den Wagenheber aus dem Werkzeugsatz Ihres Fahrzeugs.
Die Verwendung eines ungeeigneten Wagenhebers sowie die Verwendung Ihres Wagenhebers zum Anheben eines anderen Fahrzeugs kann zum Ausfall des Wagenhebers oder zur Beschädigung des Fahrzeugs führen.
Für Fahrzeuge mit Honda TRK Reifenreparatursatz
Ihr Fahrzeug hat kein Notrad, stattdessen ist es mit einem Reifenreparatursatz ausgestattet. Dieser Reparatursatz dient zur Reparatur eines beschädigten Reifens während der Fahrt.
Aufkleber am Wagenheber
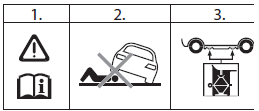
1. Siehe Betriebsanleitung.
2. Kriechen Sie nicht unter ein Fahrzeug, das nur vom Wagenheber gehalten wird.
3. Setzen Sie den Wagenheber nur an speziell verstärkten Stellen der Karosserie an.
Informationen zum Wagenheber für Ihr Fahrzeug finden Sie auf Seite 575.
Das Fahrzeug kann vom Wagenheber rutschen und Personen, die sich neben oder unter dem Fahrzeug befinden, schwer verletzen.
Beachten Sie die nachstehenden Hinweise zum Radwechsel sorgfältig. Niemand darf sich unter dem aufgebockten Fahrzeug aufhalten oder Körperteile darunter halten.
1. Das Fahrzeug auf ebenem, festem und rutschfestem Untergrund abstellen. Bei Fahrzeugen mit Schaltgetriebe den Rückwärtsgang einlegen. Bei Fahrzeugen mit Automatikgetriebe die Position P (Parken) wählen.
Die Feststellbremse anziehen.
Wenn ein Anhänger gezogen wird, diesen vom Fahrzeug abkuppeln.
2. Die Warnblinkanlage einschalten und den Zündschlüssel in die Position LOCK (0) drehen.
Alle Insassen bitten, während des Radwechsels das Fahrzeug zu verlassen.

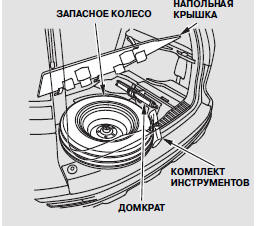
3. Die Heckklappe öffnen.
Die Abdeckung am Riemen anheben.
Die Abdeckung aus den Halterungen lösen und aus dem Gepäckraum entnehmen.
Nachdem das beschädigte Rad in die Mulde gelegt wurde, die Abdeckung ohne Gewaltanwendung wieder einsetzen. Andernfalls können die Halterungen der Abdeckung beschädigt werden.
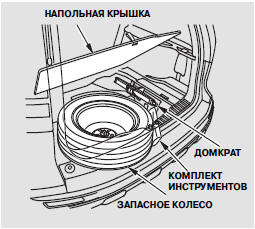
(bei einigen Fahrzeugausstattungen)
Die Heckklappe öffnen.
Die Abdeckung am Riemen anheben.
4. Remove the tool kit from the spare wheel storage compartment.
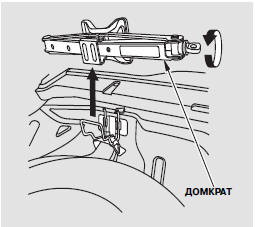
5. Remove the jack from the spare wheel storage area.
Turn the jack retaining bracket counterclockwise and lift it out.
6. Remove the wing bolt and take the spare wheel out of the compartment.
7. Place wheel chocks in front of and behind the wheel diagonally opposite the flat tire.

8. Using the wheel wrench, loosen all wheel nuts by half a turn.

9. Position the jack at the designated jacking point closest to the flat tire.
Turn the jack screw clockwise until the jack head contacts the jacking point. Make sure the body flange seats in the groove of the jack head.
Do not use the jack if it does not operate properly. Contact your dealer or a towing service.
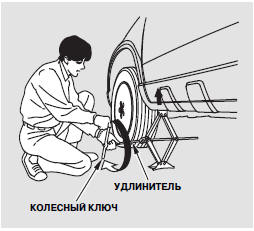
10. Turn the jack screw using the wheel wrench and extension as shown in the figure, and raise the vehicle until the flat tire is clear of the ground.
11. Remove the wheel nuts and remove the flat tire. Note that the wheel nuts may be very hot after driving. Temporarily place the removed wheel on the ground next to the vehicle with the outer side facing up.
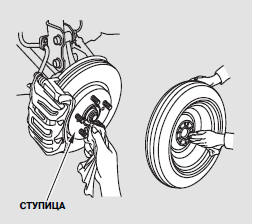
12. Before installing the spare wheel, thoroughly clean the mating surfaces of the wheel and hub with a clean cloth. Be careful, as the hub may be very hot after driving.
13. Install the spare wheel. Install the wheel nuts by hand, then tighten them evenly with the wheel wrench until the wheel is seated firmly against the hub flange. Do not fully tighten the wheel nuts while the wheel is raised.
14. Lower the vehicle and remove the jack.

15. Tighten the wheel nuts to specification in a crisscross sequence.
Have the wheel nut torque checked at the nearest service station.
Wheel nut tightening torque: 108 N·m (11 kgf·m)
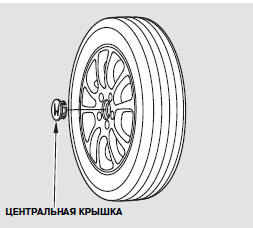
16. Before stowing the flat tire in the cargo area compartment, remove the center cap.
Place the center cap in the spare wheel compartment. Be careful not to scratch or damage it.

17. Place the flat tire in the cargo area compartment with the outer side facing down.
18. Remove the cone sleeve and retaining bolt, turn them over and install them back onto the bolt.
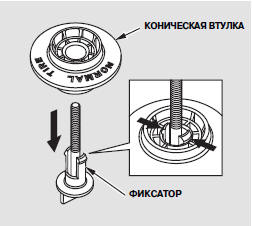
To remove the cone sleeve, squeeze the retainer tabs on the retaining bolt to release it from the cone sleeve. Then pull the bolt downward.
To install the retaining bolt on the cone sleeve, perform the procedure in the reverse order.
19. Secure the flat tire with the wing bolt.
20. Stow the jack in the holder. Turn the jack support bracket to lock it in place. Stow the tool kit and close the spare wheel compartment cover.
If tools and other items are not properly stowed, the driver and passengers may be seriously injured by these items in the event of an accident.
Before driving, stow and securely fasten the removed wheel, jack and tools.
21. Close the liftgate.
22. After replacing the compact spare wheel with a standard full-size wheel, perform the tire pressure monitoring system initialization procedure.
Testen Sie sich
Ein kurzes Quiz zum Honda CR-V: Zu jeder Antwort gibt es eine Erklärung und einen Link zur Handbuchseite.