Changing a Flat Tire
For vehicles equipped with a spare tire
If a tire goes flat while driving, carefully pull off the road.
Slowly drive along the road until you reach a location sufficiently far from the traffic lane.
Use the jack included in your vehicle's tool kit.
Attempting to use an unsuitable jack, or using your jack to lift another vehicle, may result in jack failure or damage to the vehicle.
For vehicles equipped with the Honda TRK Tire Repair Kit
Your vehicle does not have a spare tire; instead, it is equipped with a tire repair kit. This repair kit is intended for repairing a damaged tire while on the road.
Jack label
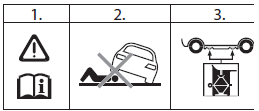
1. Refer to the Owner's Manual.
2. Do not get under a vehicle that is supported only by a jack.
3. Place the jack only at the specially reinforced locations of the body.
Information about the jack designed for your vehicle is provided on page 575.
The vehicle may slip off the jack and cause serious injury to a person who is near or under the vehicle.
Strictly observe the following wheel replacement instructions. Do not allow anyone to be under a vehicle supported by a jack, or put any part of your body under it.
1. Park the vehicle on a level surface with a firm, non-slip base. On a vehicle with a manual transmission, shift into reverse. On a vehicle with an automatic transmission, shift into P (Park).
Apply the parking brake.
If you are towing a trailer, disconnect it from the vehicle.
2. Turn on the hazard warning lights and turn the ignition key to the LOCK (0) position.
Ask all passengers to leave the vehicle while the wheel is being replaced.

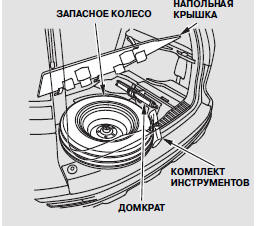
3. Open the rear liftgate.
Lift the cover by pulling the strap.
Release the cover from the retaining clips and remove it from the cargo area.
When placing the cover back over the spare wheel well after stowing the flat tire, do not force it into place. This may break the cover retaining clips.
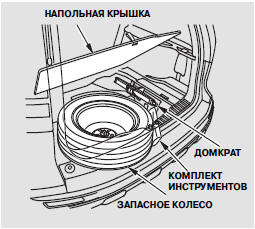
(for certain vehicle versions)
Open the rear liftgate.
Lift the cover by pulling the strap.
4. Remove the tool kit from the spare wheel well.
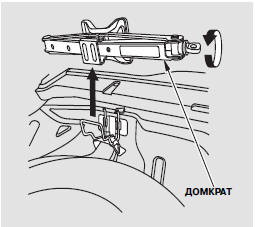
5. Remove the jack from its storage location in the spare wheel well.
Turn the jack mounting bracket counterclockwise and remove it by lifting up.
6. Loosen the wing bolt and remove the spare tire from the well.
7. Place wheel chocks in front of and behind the wheel diagonally opposite the flat tire.

8. Using the lug wrench, loosen all wheel nuts by half a turn.

9. Position the jack at the jacking point nearest to the flat tire.
Turn the jack screw clockwise until the head contacts the jacking point. Make sure the body flange engages the recess in the jack head.
Do not use the jack if it does not operate properly. Contact your dealer or a towing service.
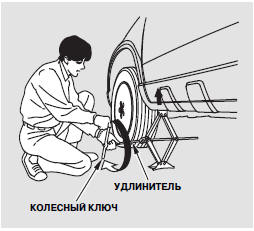
10. Turn the jack screw with the lug wrench and extension as shown in the illustration, and raise the vehicle until the flat tire is off the ground.
11. Remove the wheel nuts and remove the flat tire. Be aware that the wheel nuts may be very hot after driving. Temporarily place the removed wheel on the ground near the vehicle with the outer side facing up.
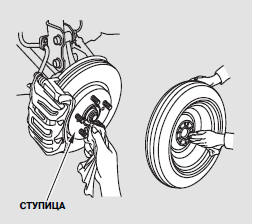
12. Before installing the spare tire, thoroughly clean the mating surfaces of the wheel disc and hub with a clean cloth. Be careful, as the hub may be very hot after driving.
13. Install the spare tire. Thread the wheel nuts on by hand, then evenly tighten them with the lug wrench until the wheel is firmly seated against the hub flange. Do not fully tighten the wheel nuts while the vehicle is raised.
14. Lower the vehicle and remove the jack.

15. Fully tighten the wheel nuts in a criss-cross sequence.
Have the wheel nut torque checked at the nearest service station.
Wheel nut torque: 108 N·m (11 kgf·m)
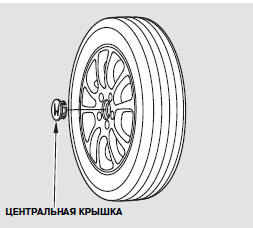
16. Before stowing the flat tire in the cargo area, remove the center cover.
Place the center cover in the spare wheel well. Take care not to scratch or damage it.

17. Place the flat tire in the spare wheel well with the outer side facing down.
18. Remove the tapered collar and stopper bolt, turn them over, and reinstall them on the bolt.
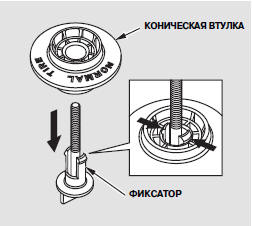
To remove the tapered collar, squeeze the retaining tabs on the stopper bolt to release it from the tapered collar. Then pull the bolt down.
To install the stopper bolt on the tapered collar, perform the procedure in reverse order.
19. Secure the flat tire with the wing bolt.
20. Place the jack in its holder. Turn the jack support bracket to secure it in place. Stow the tool kit and close the spare wheel well cover.
If tools and other items are not stowed properly, the driver and passengers may be seriously injured by these objects in the event of a collision.
Before driving, stow and securely fasten the removed wheel, jack, and tools.
21. Close the rear liftgate.
22. After replacing the temporary spare tire with a full-size tire, perform the tire pressure monitoring system initialization procedure.
Test yourself
A quick Honda CR-V quiz: every answer comes with an explanation and a link to the manual page.