Sliding/tilting sunroof
Applies to vehicles: with sliding/tilting sunroof
Description
You can open and close the sliding/tilting sunroof using the rotary control in fig. 59. The rotary control has several opening and closing positions; it only works when the ignition is switched on. Only the position (ô) of the rotary control allows the roof to be opened.
The sliding/tilting sunroof works for approximately 10 minutes after the ignition is switched off. However, opening either of the front
doors deactivates the sunroof control.
Applies to vehicles: with sliding/tilting sunroof
Opening/tilting
Wind noise is reduced in the "comfort" opening position.
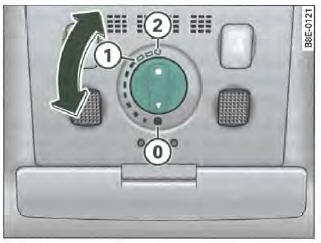
Fig. 59 Partial view of roof: sliding/tilting sunroof rotary control
Comfort position
- Move the control to position (1) => fig. 59. It engages with an audible click. The roof now opens to the comfort position. In this position, wind noise is minimal.
Opening
- Turn and hold the control in position (2) until the roof has reached the desired position. In this position, wind noise may be louder.
Tilting
- Return the rotary control to the home position
 .
- In the home position, briefly press the control so that the roof tilts up completely.
- To open the roof to an intermediate position, press and hold the control until the roof has reached the desired position.
As soon as you release the control in position (2), it returns to position (1).
The sunshade, which prevents the interior from overheating in strong sunlight, opens at the same time as the roof. You can close it manually when the roof is closed.
If you park your vehicle in the sun, we recommend pulling the sunshade out. When you park your vehicle or if sudden rain starts, make sure the tilting roof is fully closed, especially if the sunshade is pulled out.
For more information on comfort closing
Applies to vehicles: with sliding/tilting sunroof
Closing
Turn the control to position =>,
fig. 59 to close the roof.
Closing the tilted roof
- Pull the control and hold it until the tilted roof has lowered to the desired position.
- Pull the control briefly so that the tilting roof closes automatically. Pull the control briefly again to stop the tilting roof at any intermediate position.
CAUTION!
Never close the sliding/tilting roof without watching it or in an uncontrolled manner - risk of injury! For this reason, always remove the ignition key when leaving the vehicle.
Applies to vehicles with sliding/tilting roof and central locking
Comfort closing
When open, the sliding/tilting roof can be closed from the outside.
- Insert the key into the driver's door lock and hold it in the locking position, or press the lock button on the remote control, until the sliding/tilting roof is closed.
CAUTION!
Never close the sliding/tilting roof without watching it or in an uncontrolled manner - risk of injury!
Applies to vehicles: with sliding/tilting sunroof
Solar sliding/tilting roof
The solar cells in the roof supply the electrical current for operating the air conditioning in ventilation mode.
The solar roof works as described for the standard sliding/tilting roof.
The interior trim is attached to the solar roof and cannot be pulled out separately.
Applies to vehicles: with sliding/tilting sunroof
Electrical emergency closing function
The sunroof can be closed electrically in an emergency.
The sunroof is equipped with overload protection. If it cannot be closed in normal mode, it can be closed using the emergency closing function.
- Return the rotary control to the home position (o) => fig. 59.
- Pull the control and hold it until the sunroof is closed.
CAUTION!
Never close the sliding/tilting roof without watching it or in an uncontrolled manner - risk of injury! For this reason, always remove the ignition key when leaving the vehicle.
Applies to vehicles: with sliding/tilting sunroof
Mechanical emergency closing function
The sunroof can be closed manually in an emergency.
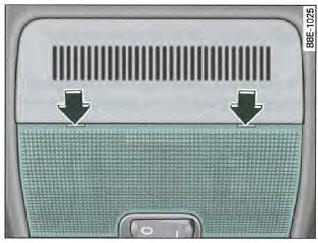
Fig. 60 Partial view of roof: screwdriver insertion point
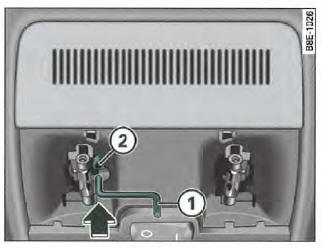
Fig. 61 Partial view of roof: crank for emergency operation
Carefully insert the flat blade of the screwdriver (included in the on-board tool kit) at the rear of the interior light lens => fig. 60.
- Pull the interior light lens downward to remove it.
- Remove the crank from the inside of the fuse box cover.
- Insert the crank (1) fully into the hexagonal socket (2).
- Hold the crank in and turn it to close the roof.
- Then reinstall the interior light lens by first engaging the plastic lugs, then pushing the lens upward.
- Have the malfunction rectified.
Note
To turn the emergency operation crank more easily, use the screwdriver handle. To do so, remove the screwdriver from the handle and push the handle onto the crank.
Test yourself
A quick Audi A4 quiz: every answer comes with an explanation and a link to the manual page.