Navigation - guidance
The “NAVIGATION” voice commands are described in section 02.
During guidance, a long press on the end of the lighting control repeats the last guidance instruction.
 Press the
NAV key.

 The list of the last 20 destinations
appears below the “Navigation” menu function.
 Press the
NAV key again or select the “Navigation” menu function and press OK to confirm.


 Select the
“Enter destination” function and press OK to confirm.


 Select the
“Enter new address” function and press OK to confirm.


 Once the country is selected,
turn the rotary knob and select the city function. Press OK to confirm.

 Select the letters of
the city one by one, pressing OK to confirm each one.

 A predefined list of cities in the selected country (by entering the first letters) is accessible from the LIST key on the virtual keyboard. The map can be moved using the 4-way selector. Its orientation can be chosen from the shortcut menu of the “Full-screen map”. Press OK, then select “Map settings” and confirm.
 Turn the rotary knob and select
OK.Press OK to confirm.

 For faster entry,
you can enter the postcode directly after selecting the “Postcode” function.
Use the virtual keyboard to type the letters and numbers.
 Repeat steps 5 to 7
for the “Street” and “Number” functions.

 Select the “Add to address book” function to save the entered address in a contact record. Press OK to confirm the selection.
To delete a destination: from steps 1 to 3, select “From last destinations”.
A long press on one of the destinations displays a list of actions, from which you can choose:

 Then select “Start
guidance” and press OK to confirm.


 Select the guidance criterion
: “Fastest”, “Shortest” or “Optimised time / distance” and press OK to confirm.

 Select the route with the
colour matching the chosen route, press OK to confirm and start guidance.

 A destination can also be chosen “From address book” or “From last destinations”, by selecting an intersection, a city centre, geographic coordinates, or directly on the “Map”.


ASSIGNING AN ADDRESS AND NAVIGATING TO “MY HOME” To be assigned to “My home”, an address must first be saved in the address book, for example via “Enter destination” / “Enter new address” then “Add to address book”.
1.  Press the
NAV key twice to display the «Navigation» menu


 Select «Enter destination»
and press OK. Then select «From address book» and press OK.


 Select the home entry
and press OK. Then select «Edit entry» and press OK.


 Select «Assign to «my
home»» and press OK to save.


 To start guidance to «My
home», press NAV twice to display the «Navigation» menu, select «Enter destination» and press OK.
1.  Press the NAV key.

2.  Press
the NAV key again or select the «Navigation» menu function and press OK to confirm.


3.  Select the «Guidance
options» function and press OK to confirm.


4.  Select the «Guidance
criteria» function and press OK to confirm. This function is used to change the guidance criteria.


5.  Select the «Traffic
consideration» function.
This function gives access to the options «No detour», «With confirmation» and «Automatic».


6.  Select the «Exclusion
criteria» function. This function gives access to the «Exclude» options (motorways, tolls, ferries, tunnels).


7.  Turn the rotary control and select
the «Recalculate route» function to take the chosen guidance options into account. Press OK to confirm.


ADDING A STOP 1.
 Press the NAV key.

2.  Press
the NAV key again or select the «Navigation» menu function and press OK to confirm.


3.  Select the «Waypoints» function
and press OK to confirm.


4.  Select the «Add
waypoint» function (5 waypoints maximum) and press OK to confirm.


5.  Enter a new
address, for example.


6.  Once the new address has been entered,
select «Start guidance» and press OK to confirm.


7.  Position the waypoint in the list
and press OK to confirm.
 Repeat steps 1 to 7 as many
times as necessary, then select «Recalculate route» and press OK to confirm.
8. Repeat steps 1 to 7 as many times as necessary, then select «Recalculate route» and press OK to confirm.
 To modify stops,
repeat steps 1 to 3 and select “Optimise route” (select a stop, delete it or move it in the list using the rotary knob to change the order, confirm its new position and finish with “Recalculate route”). SEARCHING FOR POINTS OF INTEREST (POI) Points of interest (POI) show all service locations nearby (hotels, various shops, airports...).
1.  Press the NAV key.

2.  Press the
NAV key again or select the «Navigation» menu function and press OK to confirm.


3.  Select the «Search
for points of interest» function and press OK to confirm.


4.  Select the «Nearby» function
to search for POIs around the vehicle.


5.  Select the «Near
destination» function to search for POIs near the route's end point.


6 Select the «In a
city» function to search for POIs in the desired city. Select the country, then enter the city name using the virtual keyboard.


 A list of cities in the selected country is accessible from the LIST key on the virtual keyboard.
7.  Select the «In
a country» function to search for POIs in the desired country.


8.  Select the «Along
the route» function to search for POIs near the route.


CITROËN SEND-TO-CAR with Find your destinations on Google Maps, then let CITROËN guide you. REGISTRATION AND ACTIVATION ! This service only works with a SIM card from a French, German or Italian operator. ! The SIM card must be inserted in the holder located in the glove box. The system does not work with a Bluetooth connection. ! SIM cards whose number has been transferred to another operator are not compatible with this service.
- To access the registration site, go to www.citroen.fr then activate the account with the registration confirmation e-mail.
- Register the vehicle and choose the identifier, which will be used to send POIs from Google Maps.
- Activate the service on your NaviDrive 3D according to the user guide downloaded from the website.
The Google Maps menu may take a few minutes to appear.
! For activation, the SIM card used must be the one declared on the website during registration.
Once activation is complete, you can change SIM card or operator. USE- Search for a POI on http://maps.google.fr. Select it and click «send».
Select «vehicle» and «CITROËN», then enter the chosen identifier. Click «send».
! Only Google Maps results marked with a red icon can be sent to the NaviDrive 3D system.
The “Notes” field is not sent. Press this key then
select Google Maps and press OK to confirm.An automatic call is placed to a voicemail system to receive the POI.
- Press «ADDR BOOK» and select «My addresses» to display the list of received POIs.
You can then start guidance, call the POI or view it on the map.
 This icon appears when several
POIs are grouped in the same area. Zoom in on this icon to see the POIs in detail.
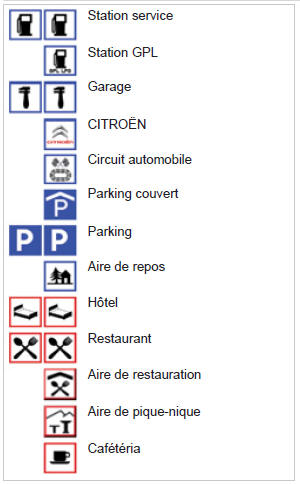
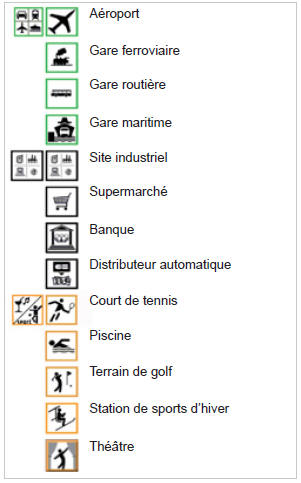
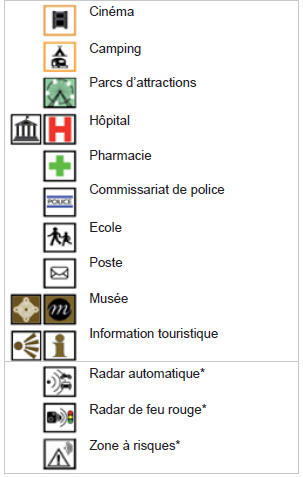
* Depending on country availability.
UPDATING POI HAZARD ZONES ! The detailed procedure for updating POI Hazard Zones is available from the CITROËN network. SETTING THE AUDIO DELIVERY OF INSTRUCTIONS1.  When navigation is displayed
on screen, press OK then select or deselect «Voice message» to enable or disable the voice guidance prompts.
Use the volume key to adjust the level.

! The volume of POI Hazard Zone alerts can only be adjusted when this type of alert is being played. POI AND HAZARD ZONE SETTINGS
1.  Press the NAV key.

2.  Press the
NAV key again or select the «Navigation» menu function and press OK to confirm.


3.  Select the «Settings» function
and press OK to confirm.


4.  Select the «Points
of interest on map» function to select the POIs displayed on the map by default.


5.  Select «Set up risk
zones» to access the «Display on map», «Visual alert on approach» and «Audible alert on approach» functions.


Test yourself
A quick Citroen C5 quiz: every answer comes with an explanation and a link to the manual page.