For circuit and connector information, refer to Wiring Diagrams Cell 46.
Normal Operation and Fault Symptoms
The RCM continuously monitors the driver air bag second stage circuits for the following faults:
Resistance Out of Range
Unexpected Voltage
Short to Ground
Faulty Driver Airbag
When a fault is detected, the RCM stores DTC B0002:11, B0002:12, B0002:13 or B0002:1A and sends a message to the IPC to illuminate the airbag warning indicator.
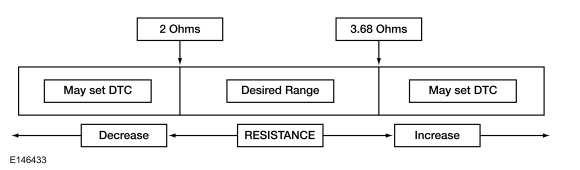
The RCM analyzes the deployment loop resistance to determine if a malfunction is present. The value displayed in the PID is the deployment loop resistance measured by the RCM. If the displayed value is below or above the required range (refer to the chart below), the RCM may set a DTC. As the deployment loop resistance moves further outside the desired range, the likelihood of a DTC increases. Small fluctuations in resistance may occur due to the effect of road vibrations on the terminal fitting. Crimps and terminals may be affected by stress and movement of the seat belt and may cause an increase in resistance due to wire tension. These variables may result in an intermittent fault. For this reason, the test requires the PID value to be within the desired range before the fault is considered repaired, regardless of whether the module reports the DTC on demand at the time of diagnosis. Following this direction helps ensure that minor resistance changes do not cause repeat concerns. This test uses a process of elimination to diagnose each part of the deployment circuit, including:
Wiring
Clockspring
Driver Airbag
Connections
RCM
DTC Fault Trigger Conditions
Trouble Code
Description
Fault Trigger Conditions
B0002:11
Driver Frontal Stage 2 Deployment Control: short to ground
The fault is indicated when the RCM detects a short to ground in any of the driver air bag second stage circuits for more than 6 seconds.
B0002:12
Driver Frontal Stage 2 Deployment Control: Short to Battery
The fault is indicated when the RCM detects a short to battery voltage in any of the driver air bag second stage circuits for more than 6 seconds.
B0002:13
Driver Frontal Stage 2 Deployment Control: open circuit
The fault is indicated when the RCM measures resistance across the driver airbag second-stage circuits above the required range for more than 6 seconds.
The fault is indicated when the RCM measures resistance across the driver airbag second-stage circuits below the required range for more than 6 seconds.
Possible Sources
Wiring, Terminals or Connectors
Clockspring
Driver Airbag
RCM
Visual Inspection and Preliminary Diagnosis
Inspect the wiring harness for damage.
Inspect the connectors for loose or damaged terminals.
PINPOINT TEST A: B0002:11, B0002:12, B0002:13 AND B0002:1A
WARNING: Do not touch, move or alter the original horizontal mounting position of the Restraints Control Module (RCM) while the RCM is connected and the ignition is ON. Failure to follow this instruction may result in accidental deployment of the airbag and cause serious injury or death.
NOTE: Most concerns are related to connector and/or wiring issues. Perform a thorough inspection and check before proceeding to the Pinpoint Test.
NOTE: Only disconnect or reconnect SRS components when instructed to do so in the Pinpoint Test step. Failure to follow this instruction may result in an incorrect SRS diagnosis.
NOTE: Always verify that the correct SRS component is being installed. Parts released for other vehicles may not be compatible, even if they appear physically similar. Check the part number listed in the Ford parts catalog to confirm the correct component is being installed. If an incorrect SRS component is installed, diagnostic trouble codes (DTCs) may be set.
NOTE: Before returning the vehicle to the customer, the SRS must be fully functional and operating correctly.
A1 REMOVE RCM (RESTRAINTS CONTROL MODULE) DIAGNOSTIC TROUBLE CODES (DTCS)
WARNING: Before starting any service procedure in this section, refer to the Safety Warnings in Section 100-00 General Information. Failure to follow this instruction may result in serious personal injury. REFER TO: Pyrotechnic Device Handling Precautions (100-00 General Information, Description and Operation).
The ignition is on.
Using the diagnostic scanner, perform the RCM self-test.
Was DTC B0002:11, B0002:12, B0002:13 or B0002:1A retrieved on demand during the self-test?
Yes
This fault cannot be cleared until it is repaired and the DTC is no longer retrieved on demand during the self-test. For DTC B0002:13 or B0002:1A, GO to A2. For DTC B0002:11, GO to A11. For DTC B0002:12, GO to A14.
No
This is an intermittent fault if it is present only as a CMDTC. For DTC B0002:13 or B0002:1A, GO to A19. For DTC B0002:11, GO to A20. For DTC B0002:12, GO to A21.
A2 CHECK THE DRIVER AIR BAG STAGE 2 DEPLOYMENT CONTROL RESISTANCE PID (PARAMETER IDENTIFICATION)
Using the diagnostic scan tool, view the RCM parameter identification (PID) data.
Monitor and record the resistance value shown by the DEPLOY_01_R PID.
Is the PID value between 2 and 3.68 Ohms?
Yes
GO to A18
No
GO to A3
A3 CHECK THE DRIVER AIR BAG STAGE 2 DEPLOYMENT CONTROL RESISTANCE PID (PARAMETER IDENTIFICATION) WHILE PERFORMING A HARNESS CHECK
Remove the steering column shrouds to access the clockspring connectors. REFER TO: Steering Column Shrouds (501-05 Interior Trim and Ornamentation, Removal and Installation).
While monitoring the DEPLOY_01_R PID, check the driver air bag circuits harness and accessible connectors (including any inline connectors) by wiggling and flexing the harness, connectors, tilting and rotating the steering wheel frequently. Record the resistance value indicated by the PID.
Is the PID value between 2 and 3.68 Ohms during the wiring harness check?
Yes
Disarm the SRS. REFER TO: Disabling and Enabling the Supplemental Restraint System (SRS) (501-20B Supplemental Restraint System, General Procedures). REPAIR the connector, terminals or harness, or INSTALL a new clockspring if necessary. REFER TO: Clockspring (501-20B Supplemental Restraint System, Removal and Installation). For wiring diagrams and connector information, refer to Wiring Diagrams, cell 5. GO to A23.
No
If the PID value is less than 2 ohms, GO to A4. If the PID value is greater than 3.68 ohms, GO to A7.
A4 CHECK THE DRIVER AIR BAG STAGE 2 DEPLOYMENT CONTROL DTC (DIAGNOSTIC TROUBLE CODE) FOR A CHANGE IN FAULT STATUS (LOW RESISTANCE INDICATED)
Ignition OFF.
De-power the SRS. REFER TO: Supplemental Restraint System (SRS) Disabling and Enabling (501-20B Supplemental Restraint System, General Procedures).
Remove the driver air bag. REFER to: Driver Air Bag (501-20B Supplemental Restraint System, Removal and Installation).
Re-enable the SRS. Do not confirm the SRS at this time. REFER TO: Disabling and Enabling the Supplemental Restraint System (SRS) (501-20B Supplemental Restraint System, General Procedures).
The ignition is on.
Using the diagnostic scanner, perform the RCM self-test.
DIAGNOSTIC TIP: When viewing Diagnostic Trouble Codes (DTCs) with the driver air bag disconnected, an open circuit fault is typically retrieved in steps 1 and 2.
Did the on-demand DTC change from B0002:1A to B0002:13?
Yes
GO to A16
No
GO to A5
A5 CHECK THE DRIVER AIR BAG STAGE 2 DEPLOYMENT CONTROL DTC (DIAGNOSTIC TROUBLE CODE) FOR A CHANGE IN FAULT STATUS (LOW RESISTANCE INDICATED) (CLOCKSPRING DISCONNECTED)
Ignition OFF.
De-power the SRS. REFER TO: Supplemental Restraint System (SRS) Disabling and Enabling (501-20B Supplemental Restraint System, General Procedures).
Disconnect SCCM C218A.
NOTE: The clockspring connector is called the SCCM connector. The clockspring is serviced separately from the SCCM. Remove the steering column shrouds to access the clockspring connectors. REFER TO: Steering Column Shrouds (501-05 Interior Trim and Ornamentation, Removal and Installation).
Re-enable the SRS. Do not confirm the SRS at this time. REFER TO: Disabling and Enabling the Supplemental Restraint System (SRS) (501-20B Supplemental Restraint System, General Procedures).
The ignition is on.
Using the diagnostic scanner, perform the RCM self-test.
DIAGNOSTIC TIP: When viewing Diagnostic Trouble Codes (DTCs) with the driver air bag / clockspring disconnected, an open circuit fault is typically retrieved in steps 1 and 2.
Did the on-demand DTC change from B0002:1A to B0002:13?
Yes
GO to A17
No
GO to A6
A6 CHECK FOR A SHORT BETWEEN THE DRIVER AIR BAG STAGE 2 CIRCUITS
Ignition OFF.
De-power the SRS. REFER TO: Supplemental Restraint System (SRS) Disabling and Enabling (501-20B Supplemental Restraint System, General Procedures).
Disconnect RCM C310A and C310B.
Action: Click to display the connectors
Positive lead
Measurement/Action
Negative lead
C218A-9
C218A-10
Is the resistance greater than 10000 Ohms?
Yes
GO to A18
No
REPAIR the circuits. For circuit and connector information, refer to Wiring Diagrams, Cell 5. GO to A23
A7 CHECK THE DRIVER AIR BAG STAGE 2 CIRCUITS FOR AN OPEN
Ignition OFF.
De-power the SRS. REFER TO: Supplemental Restraint System (SRS) Disabling and Enabling (501-20B Supplemental Restraint System, General Procedures).
Remove the driver air bag. REFER to: Driver Air Bag (501-20B Supplemental Restraint System, Removal and Installation).
Disconnect RCM C310A and C310B.
Action: Click to display the connectors
Positive lead
Measurement/Action
Negative lead
C310A-22
C218A-9
C310A-21
C218A-10
Is the resistance less than 1 Ohm?
Yes
GO to A9
No
GO to A8
A8 CHECK THE DRIVER AIR BAG STAGE 2 CIRCUITS FOR AN OPEN (CLOCKSPRING DISCONNECTED)
Disconnect SCCM C218A.
NOTE: The clockspring connector is called the SCCM connector. The clockspring is serviced separately from the SCCM. Remove the steering column shrouds to access the clockspring connectors. REFER TO: Steering Column Shrouds (501-05 Interior Trim and Ornamentation, Removal and Installation).
Action: Click to display the connectors
Positive lead
Measurement/Action
Negative lead
C310A-22
C218A-9
C310A-21
C218A-10
Is the resistance less than 0.5 Ohms?
Yes
GO to A17
No
REPAIR the circuit(s). For circuit and connector information, refer to Wiring Diagrams, Cell 5. GO to A23
A9 CHECK THE DRIVER AIR BAG DEPLOYMENT CONTROL DTC (DIAGNOSTIC TROUBLE CODE) FOR A CHANGE IN FAULT STATUS (OPEN INDICATED)
Connect RCM C310A and C310B.
Connect a fused jumper wire: Click to display connectors
Lead 1
Measurement/Action
Lead 2
C218A-9
C218A-10
Re-enable the SRS. Do not confirm the SRS at this time. REFER TO: Disabling and Enabling the Supplemental Restraint System (SRS) (501-20B Supplemental Restraint System, General Procedures).
The ignition is on.
Using the diagnostic scanner, perform the RCM self-test.
DIAGNOSTIC TIP: When viewing Diagnostic Trouble Codes (DTCs) with the driver air bag stage 2 circuits shorted together, a low resistance fault is typically retrieved in step 2. Step 1 indicates an open circuit because the driver air bag is disconnected.
Was the DTC B0002:1A retrieved on-demand during the self-test?
Yes
REMOVE the fuse link and GO to A16.
No
REMOVE the fuse link and GO to A10.
A10 CHECK THE DRIVER AIR BAG DEPLOYMENT CONTROL DTC (DIAGNOSTIC TROUBLE CODE) FOR A CHANGE IN FAULT STATUS (OPEN INDICATED)
Ignition OFF.
De-power the SRS. REFER TO: Supplemental Restraint System (SRS) Disabling and Enabling (501-20B Supplemental Restraint System, General Procedures).
Disconnect SCCM C218A.
NOTE: The clockspring connector is called the SCCM connector. The clockspring is serviced separately from the SCCM. Remove the steering column shrouds to access the clockspring connectors. REFER TO: Steering Column Shrouds (501-05 Interior Trim and Ornamentation, Removal and Installation).
Connect a fused jumper wire: Click to display connectors
Lead 1
Measurement/Action
Lead 2
C218A-9
C218A-10
Re-enable the SRS. Do not confirm the SRS at this time. REFER TO: Disabling and Enabling the Supplemental Restraint System (SRS) (501-20B Supplemental Restraint System, General Procedures).
The ignition is on.
Using the diagnostic scanner, perform the RCM self-test.
DIAGNOSTIC TIP: When viewing Diagnostic Trouble Codes (DTCs) with the driver air bag stage 2 circuits shorted together, a low resistance fault is typically retrieved in step 2. Step 1 indicates an open circuit because the driver air bag is disconnected.
Was the DTC B0002:1A retrieved on-demand during the self-test?
Yes
REMOVE the fusible link and GO to A17.
No
REMOVE the fusible link and GO to A18.
A11 CHECK THE DIAGNOSTIC TROUBLE CODE (DTC) FAULT STATUS, FRONT DRIVER SIDE. TO CHANGE THE FAULT STATUS (SHORT TO GROUND INDICATED)
Ignition OFF.
De-power the SRS. REFER TO: Supplemental Restraint System (SRS) Disabling and Enabling (501-20B Supplemental Restraint System, General Procedures).
Remove the driver air bag. REFER to: Driver Air Bag (501-20B Supplemental Restraint System, Removal and Installation).
Re-enable the SRS. Do not confirm the SRS at this time. REFER TO: Disabling and Enabling the Supplemental Restraint System (SRS) (501-20B Supplemental Restraint System, General Procedures).
The ignition is on.
Using the diagnostic scanner, perform the RCM self-test.
DIAGNOSTIC TIP: When viewing Diagnostic Trouble Codes (DTCs) with the driver air bag disconnected, an open circuit fault is typically retrieved in steps 1 and 2.
Did the on-demand DTC change from B0002:11 to B0002:13?
Yes
GO to A16
No
GO to A12
A12 CHECK THE DTC FOR DRIVER FRONT STAGE 2 DEPLOYMENT CONTROL (DIAGNOSTIC TROUBLE CODE) TO CHANGE THE FAULT STATUS (SHORT TO GROUND INDICATED) (CLOCKSPRING DISCONNECTED)
Ignition OFF.
Disconnect SCCM C218A.
NOTE: The clockspring connector is called the SCCM connector. The clockspring is serviced separately from the SCCM. Remove the steering column shrouds to access the clockspring connectors. REFER TO: Steering Column Shrouds (501-05 Interior Trim and Ornamentation, Removal and Installation).
The ignition is on.
Using the diagnostic scanner, perform the RCM self-test.
DIAGNOSTIC TIP: When viewing Diagnostic Trouble Codes (DTCs) with the clockspring disconnected, an open circuit fault is typically retrieved in steps 1 and 2.
Did the on-demand DTC change from B0002:11 to B0002:13?
Yes
GO to A17
No
GO to A13
A13 CHECK THE DRIVER AIRBAG CIRCUITS, STAGE 2, FOR A SHORT TO GROUND
Ignition OFF.
De-power the SRS. REFER TO: Supplemental Restraint System (SRS) Disabling and Enabling (501-20B Supplemental Restraint System, General Procedures).
Disconnect RCM C310A and C310B.
Action: Click to display the connectors
Positive lead
Measurement/Action
Negative lead
C218A-9
Ground
C218A-10
Ground
Is the resistance greater than 10000 ohms?
Yes
GO to A18
No
REPAIR the circuit(s). For circuit and connector information, refer to Wiring Diagrams, Cell 5. GO to A23
A14 CHECK THE DTC FOR DRIVER FRONT STAGE 2 DEPLOYMENT CONTROL (DIAGNOSTIC TROUBLE CODE) WHEN CHANGING THE FAULT STATUS (SHORT TO BATTERY INDICATED) (CLOCKSPRING DISCONNECTED)
Ignition OFF.
De-power the SRS. REFER TO: Supplemental Restraint System (SRS) Disabling and Enabling (501-20B Supplemental Restraint System, General Procedures).
Remove the driver air bag. REFER to: Driver Air Bag (501-20B Supplemental Restraint System, Removal and Installation).
Disconnect SCCM C218A.
NOTE: The clockspring connector is called the SCCM connector. The clockspring is serviced separately from the SCCM. Remove the steering column shrouds to access the clockspring connectors. REFER TO: Steering Column Shrouds (501-05 Interior Trim and Ornamentation, Removal and Installation).
Re-enable the SRS. Do not confirm the SRS at this time. REFER TO: Disabling and Enabling the Supplemental Restraint System (SRS) (501-20B Supplemental Restraint System, General Procedures).
The ignition is on.
Using the diagnostic scanner, perform the RCM self-test.
DIAGNOSTIC TIP: When viewing Diagnostic Trouble Codes (DTCs) with the clockspring disconnected, an open circuit fault is typically retrieved in steps 1 and 2.
Did the on-demand DTC change from B0002:12 to B0002:13?
Yes
GO to A17
No
GO to A15
A15 CHECK THE DRIVER AIRBAG CIRCUITS, STAGE 2, FOR A SHORT TO VOLTAGE
Ignition OFF.
De-power the SRS. Refer to: Supplemental Restraint System (SRS) Disabling and Enabling (501-20B Supplemental Restraint System, General Procedures). .
Disconnect RCM C310A and C310B.
Re-enable the SRS. Do not confirm the SRS at this time. REFER TO: Disabling and Enabling the Supplemental Restraint System (SRS) (501-20B Supplemental Restraint System, General Procedures).
The ignition is on.
Action: Click to display the connectors
Positive lead
Measurement/Action
Negative lead
C218A-9
Ground
C218A-10
Ground
Is there voltage present?
Yes
REPAIR the circuit(s). For circuit and connector information, refer to Wiring Diagrams, Cell 5. GO to A23
No
GO to A18
A16 CONFIRM THE DRIVER AIRBAG FAULT
Ignition OFF.
De-power the SRS. REFER TO: Supplemental Restraint System (SRS) Disabling and Enabling (501-20B Supplemental Restraint System, General Procedures).
Before reconnecting any previously disconnected SRS component:
inspect the connector(s) (including any integral connectors) for pushed-out, loose or spread terminals, and loose or chafed wire connections at the terminals.
inspect the wiring harness for damage, pinching, or cut or pierced wires.
check the RCM C310A and C310B connector position assurance (CPA) lever/latch for proper operation.
repair any problems found. Refer to Wiring Diagrams Cell 5 for schematic and connector information.
Install the driver air bag. Refer to: Driver Air Bag (501-20B Supplemental Restraint System, Removal and Installation).
Re-enable the SRS. Do not confirm the SRS at this time. REFER TO: Disabling and Enabling the Supplemental Restraint System (SRS) (501-20B Supplemental Restraint System, General Procedures).
The ignition is on.
Using the diagnostic scanner, perform the RCM self-test.
Was the original DTC retrieved on demand during the self-test?
Yes
INSTALL a new driver airbag. REFER TO: Driver Airbag (501-20B Supplemental Restraint System, Removal and Installation). GO to A23
No
During the diagnostic process, the fault condition became intermittent. Do not install any new SRS components at this time. Install SRS components only if directed by the pinpoint test. For DTC B0002:13 or B0002:1A, GO to A19. For DTC B0002:11, GO to A20. For DTC B0002:12, GO to A21.
A17 CONFIRM THE CLOCKSPRING FAULT
Ignition OFF.
De-power the SRS. REFER TO: Supplemental Restraint System (SRS) Disabling and Enabling (501-20B Supplemental Restraint System, General Procedures).
Before reconnecting any previously disconnected SRS component:
inspect the connector(s) (including any integral connectors) for pushed-out, loose or spread terminals, and loose or chafed wire connections at the terminals.
inspect the wiring harness for damage, pinching, or cut or pierced wires.
check the RCM C310A and C310B connector position assurance (CPA) lever/latch for proper operation.
repair any problems found. Refer to Wiring Diagrams Cell 5 for schematic and connector information.
Connect SCCM C218A.
Install the driver air bag. Refer to: Driver Air Bag (501-20B Supplemental Restraint System, Removal and Installation).
Re-enable the SRS. Do not confirm the SRS at this time. REFER TO: Disabling and Enabling the Supplemental Restraint System (SRS) (501-20B Supplemental Restraint System, General Procedures).
The ignition is on.
Using the diagnostic scanner, perform the RCM self-test.
Was the original DTC retrieved on demand during the self-test?
Yes
Install a new clockspring. Refer to: Driver Air Bag (501-20B Supplemental Restraint System, Removal and Installation). GO to A23.
No
During the diagnostic process, the fault condition became intermittent. Do not install any new SRS components at this time. Install SRS components only if directed by the pinpoint test. For DTC B0002:13 or B0002:1A, GO to A19. For DTC B0002:11, GO to A20. For DTC B0002:12, GO to A21.
A18 CONFIRM RCM (RESTRAINTS CONTROL MODULE) FAULT
Ignition OFF.
De-power the SRS. REFER TO: Supplemental Restraint System (SRS) Disabling and Enabling (501-20B Supplemental Restraint System, General Procedures).
Before reconnecting any previously disconnected SRS component:
inspect the connector(s) (including any integral connectors) for pushed-out, loose or spread terminals, and loose or chafed wire connections at the terminals.
inspect the wiring harness for damage, pinching, or cut or pierced wires.
check the RCM C310A and C310B connector position assurance (CPA) lever/latch for proper operation.
repair any problems found. Refer to Wiring Diagrams Cell 5 for schematic and connector information.
If previously removed, install the driver airbag. REFER TO: Driver Airbag (501-20B Supplemental Restraint System, Removal and Installation).
Connect SCCM C218A (if previously disconnected).
Connect RCM C310A and C310B.
Re-enable the SRS. Do not confirm the SRS at this time. REFER TO: Disabling and Enabling the Supplemental Restraint System (SRS) (501-20B Supplemental Restraint System, General Procedures).
The ignition is on.
Using the diagnostic scanner, perform the RCM self-test.
Was the original DTC retrieved on demand during the self-test?
Yes
CHECK OASIS for any applicable Technical Service Bulletins (TSBs). If a TSB exists for this condition, STOP this test and FOLLOW the TSB instructions. If no TSB applies to this condition, INSTALL a new RCM. Refer to: Restraints Control Module (RCM) (501-20B Supplemental Restraint System, Removal and Installation). GO to A23.
No
During the diagnostic process, the fault condition became intermittent. Do not install any new SRS components at this time. Install SRS components only if directed by the pinpoint test. For DTC B0002:13 or B0002:1A, GO to A19. For DTC B0002:11, GO to A20. For DTC B0002:12, GO to A21.
A19 CHECK THE DRIVER FRONT STAGE 2 DEPLOYMENT RESISTANCE (DEPLOY_01_R) PID (PARAMETER IDENTIFICATION) FOR AN INTERMITTENT LOW RESISTANCE OR OPEN CIRCUIT FAULT
Using the diagnostic scan tool, view the RCM parameter identification (PID) data.
Remove the steering column shrouds to access the clockspring connectors. REFER TO: Steering Column Shrouds (501-05 Interior Trim and Ornamentation, Removal and Installation).
While monitoring the DEPLOY_01_R PID, attempt to recreate the fault by wiggling the connectors (including any inline connectors) and flexing the harness, tilting and rotating the steering wheel frequently. Record the resistance value indicated by the PID.
Is the PID value between 2 and 3.68 Ohms?
Yes
The fault is not present and cannot be recreated at this time. Do not install any new SRS components at this time. Install SRS components only if directed by the pinpoint test. GO to A22.
No
If the driver airbag PID shows an incorrect resistance only when turning the steering wheel, INSTALL a new clockspring. REFER TO: Clockspring (501-20B Supplemental Restraint System, Removal and Installation). For all other faults, DISARM the SRS and REPAIR as necessary. For wiring diagrams and connectors, refer to Wiring Diagrams, Cell 5. GO to A23
A20 CHECK THE DRIVER STAGE 2 DEPLOYMENT CONTROL FORWARD CIRCUITS FOR A CONTINUOUS SHORT TO GROUND
Remove the steering column shrouds to access the clockspring connectors. REFER TO: Steering Column Shrouds (501-05 Interior Trim and Ornamentation, Removal and Installation).
The ignition is on.
Attempt to recreate the fault by wiggling the connectors (including any inline connectors) and flexing the wiring harness, tilting and turning the steering wheel frequently.
Using the diagnostic scanner, perform the RCM self-test.
Was DTC B0002:11 retrieved on demand during the self-test?
Yes
DISARM the SRS and REPAIR as necessary. For wiring diagrams and connectors, refer to Wiring Diagrams, Cell 5. GO to A23
No
The fault is not present and cannot be recreated at this time. Do not install any new SRS components at this time. Install SRS components only if directed by the pinpoint test. GO to A22.
A21 CHECK THE DRIVER STAGE 2 DEPLOYMENT CONTROL FORWARD CIRCUITS FOR A CONTINUOUS SHORT TO BATTERY
Ignition OFF.
De-power the SRS. REFER TO: Supplemental Restraint System (SRS) Disabling and Enabling (501-20B Supplemental Restraint System, General Procedures).
Remove the driver air bag. REFER to: Driver Air Bag (501-20B Supplemental Restraint System, Removal and Installation).
Re-enable the SRS. Do not confirm the SRS at this time. REFER TO: Disabling and Enabling the Supplemental Restraint System (SRS) (501-20B Supplemental Restraint System, General Procedures).
Remove the steering column shrouds to access the clockspring connectors. REFER TO: Steering Column Shrouds (501-05 Interior Trim and Ornamentation, Removal and Installation).
The ignition is on.
Attempt to recreate the fault by wiggling the connectors (including any inline connectors) and flexing the wiring harness, tilting and turning the steering wheel frequently.
Using the diagnostic scanner, perform the RCM self-test.
Was DTC B0002:12 retrieved on demand during the self-test?
Yes
DISARM the SRS and REPAIR as necessary. For wiring diagrams and connectors, refer to Wiring Diagrams, Cell 5. GO to A23
No
The fault is not present and cannot be recreated at this time. Do not install any new SRS components at this time. Install SRS components only if directed by the pinpoint test. GO to A22.
A22 CHECK THE WIRING HARNESS AND CONNECTORS
Ignition OFF.
De-power the SRS. REFER TO: Supplemental Restraint System (SRS) Disabling and Enabling (501-20B Supplemental Restraint System, General Procedures).
Remove the driver air bag. REFER TO: Driver Air Bag (501-20B Supplemental Restraint System, Removal and Installation).
Inspect the connector(s) (including any inline connectors) for corrosion, loose or spread terminals, and loose or worn wire-to-terminal connections.
Inspect the wiring harness for damage, pinching, cuts or punctures in the wires.
Inspect the RCM C310A and C310B connector position assurance (CPA) lever/latch for proper operation.
Were any concerns found?
Yes
REPAIR as necessary. For wiring diagrams and connectors, refer to Wiring Diagrams, Cell 5. GO to A23
No
The fault is not present and cannot be recreated at this time. Do not install any new SRS components at this time. Install SRS components only if instructed to do so in the Pinpoint Test. GO to A23.
A23 CHECK THE SUPPLEMENTAL RESTRAINT SYSTEM (SRS) DIAGNOSTIC TROUBLE CODES (DTCS)
Ignition OFF.
Reconnect all SRS components (if previously disconnected).
If previously instructed to disable the SRS, re-enable the SRS. Do not confirm the SRS at this time. Refer to: Supplemental Restraint System (SRS) Disabling and Enabling (501-20B Supplemental Restraint System, General Procedures).
The ignition is on.
NOTE: When Restraints is selected in the Self Test menu, DTCs are retrieved from the RCM, OCSM and, if equipped, BECMB. Using the diagnostic scan tool, perform the Restraints Self-Test.
Are any RCM, OCSM and/or BECMB diagnostic trouble codes (DTCs) retrieved on demand during the self-test?
Yes
Do not clear any Diagnostic Trouble Codes (DTCs) until all DTCs have been resolved. REFER TO: Supplemental Restraint System (SRS) (501-20B Supplemental Restraint System, Diagnosis and Testing).
No
Repair is complete. RETURN the vehicle to the customer.
?
Test yourself
A quick Ford Fusion quiz: every answer comes with an explanation and a link to the manual page.
 WARNING: Do not touch, move or alter the original horizontal mounting position of the Restraints Control Module (RCM) while the RCM is connected and the ignition is ON. Failure to follow this instruction may result in accidental deployment of the airbag and cause serious injury or death.
 WARNING: Before starting any service procedure in this section, refer to the Safety Warnings in Section 100-00 General Information. Failure to follow this instruction may result in serious personal injury.


