Crankshaft - Assembly
1. Install the upper main bearing inserts into the crankshaft bearing bores in the cylinder block.
Be careful when installing the main bearing inserts removed during disassembly. Position them according to the alignment marks made before removal.
2. Install the crankshaft. Apply engine oil to the crankshaft main journals.
3. Install the lower main bearing inserts and main bearing caps. Tighten the main bearing cap bolts to the specified torque in the following order: center main bearing cap, No. 2 bearing cap, No. 4 bearing cap, front bearing cap, and rear bearing cap. Tighten the bolts gradually in two or three steps, then tighten to the specified torque. When installing the caps, make sure the arrows on the caps point toward the crankshaft pulley and the cap numbers match the cylinder numbers.
Tightening torque, main bearing cap bolts:
27 - 33 N·m + (60 - 65°) Connecting rod cap bolts:
50 - 53 N·m
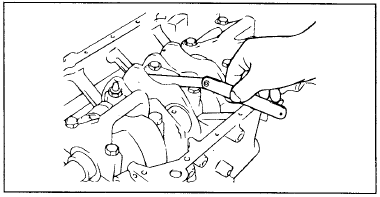
4. Check again that the crankshaft rotates smoothly and that the crankshaft end play (clearance between the center main bearing thrust half-washer and the corresponding crankshaft web) is within the specified value.
Standard value:
Crankshaft end play: 0.06 - 0.26 mm Connecting rod big end side clearance: 0.10 - 0.25 mm
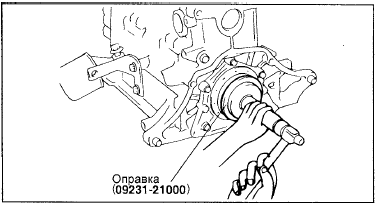
5. Using the special tool (rear oil seal installer 09231-2100), install the rear crankshaft oil seal into the seal housing as shown in the illustration. Be careful to position the installer correctly so as not to damage or deform the seal during installation.
6. Install the cylinder block rear plate and tighten its mounting bolts.
7. Install the connecting rod caps.
8. Install the flywheel, oil pump housing, oil pan, and timing belt. Refer to the relevant sections for installation procedures.
Test yourself
A quick Hyundai Elantra CN7 quiz: every answer comes with an explanation and a link to the manual page.