KIBS Troubleshooting Outline
When an abnormality in the system occurs, the ABS indicator light (LED) and KIBS indicator light (LED) light up and the KIBS warning symbol are displayed on the LCD (Liquid Crystal Display) to alert the rider. In addition, the nature of the fault is stored in the memory of the KIBS hydraulic unit and FI ECU, and when in the self-diagnosis mode, the service code [A] is displayed on the LCD by the “b” and the number of two digits. When repair has been done, the both warning indicator lights (LED) and KIBS warning symbol go off and service codes are not displayed. But the service codes stored in memory of the KIBS hydraulic unit ECU and FI ECU are not erased to preserve the problem history.
When, due to a malfunction, the ABS and KIBS indicator lights (LED) remain lit, get a thorough understanding of the background before starting the repair work. Ask the rider about the conditions [B] under which the problem occurred and try to determine the cause [C]. Do not rely solely on the KIBS and DFI self-diagnosis function, use common sense; check the brakes for proper braking power, and brake fluid level, search for leaks, etc.
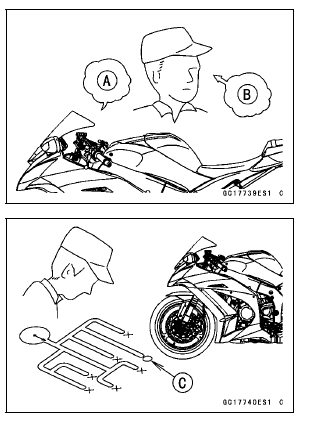
Even when the KIBS and DFI are operating normally, the ABS indicator light (LED) and KIBS indicator light (LED) may light up and the KIBS warning symbol are displayed on the LCD under the conditions listed below. Turn the ignition switch to OFF to go off the indicator light and the KIBS warning symbol.
- After continuous riding on a rough road.
- When the engine is started with the stand raised and the transmission engaged, and the rear wheel turns.
- When accelerating so abruptly that the front wheel leaves the ground.
- When the KIBS has been subjected to strong electrical interference.
- When tire pressure is abnormal. Adjust tire pressure.
- When a tire different in size from the standard size is being used. Replace with standard size.
- When the wheel is deformed. Replace the wheel.
Much of the KIBS troubleshooting work consists of confirming continuity of the wiring. The KIBS parts are assembled and adjusted by the manufacturer, so there is no need to disassemble or repair them. Replace the KIBS hydraulic unit.
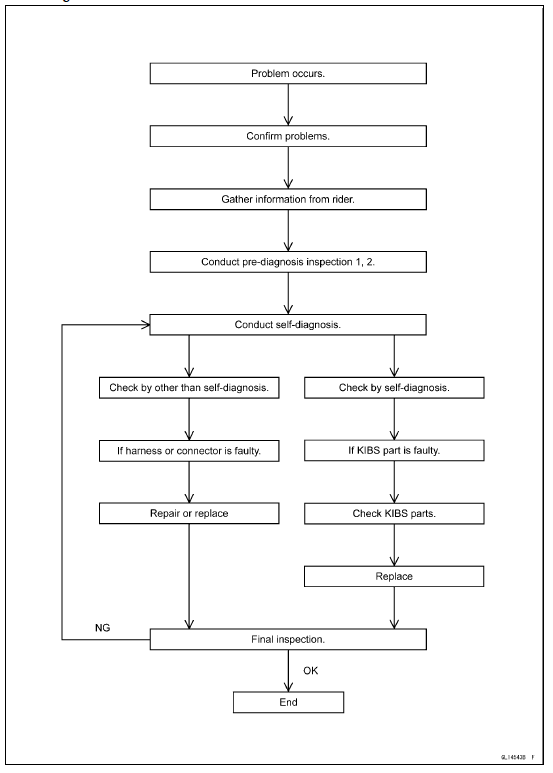
The basic troubleshooting procedures are listed below.
- Carry out pre-diagnosis inspections as a preliminary inspection.
- Determine the fault using the self-diagnosis function.
- Check wiring and connections from the KIBS hydraulic unit connector to the suspected faulty KIBS part, using the hand tester.
Special Tool - Hand Tester: 57001-1394
- Visually inspect the wiring for signs of burning or fraying.
If any wiring is poor, replace the damaged wiring.
- Pull each connector apart and inspect it for corrosion, dirt and damage
If the connector is corroded or dirty, clean it carefully. If it is damaged, replace it.
- Check the wiring for continuity.
Use the wiring diagram to find the ends of the lead which is suspected of being a problem.
Connect the hand tester between the ends of the leads.
Special Tool - Hand Tester: 57001-1394
Set the tester to the × 1 Ω range, and read the tester.

If the tester does not read 0 Ω, the lead is defective. Replace the main harness [A] if necessary.
- Narrow down suspicious parts and close in on the faulty KIBS part by repeating the continuity tests.
If no abnormality is found in the wiring or connectors, the KIBS parts are the next likely suspects. Check each part one by one.
If an abnormality is found, replace the affected KIBS part.
KIBS Diagnosis Flow Chart
Test yourself
A quick Kawasaki Ninja ZX-10R quiz: every answer comes with an explanation and a link to the manual page.