Replacing bulbs
Replacing bulbs on the Kia Opirus should be done with the utmost care, as many components are difficult to access or require specialist knowledge. This chapter contains precise instructions for front headlights, rear lights and interior lighting, including safety warnings for halogen and xenon lamps. The numerous illustrations and step-by-step descriptions make replacement easier. Regularly checking your lighting and replacing it when necessary ensures visibility and road safety, especially at night and in poor weather.
CAUTION - Working on the lighting systemBefore starting work on the vehicle lighting, firmly apply the parking brake and make sure the ignition key is turned to the "LOCK" position to prevent sudden vehicle movement.
Vehicle movement could result in burned fingers or an electric shock.
Use only bulbs with the specified power rating (wattage).
CAUTIONIf you do not have the special tools, specified bulbs and sufficient experience, have the work carried out by a professional. In many cases, replacing bulbs on your vehicle is not easy, as other components must first be removed to gain access to the bulbs. This applies in particular to the lights in the front bumper. The bumper must be removed and reinstalled to replace the installed bulbs, which could damage the vehicle.
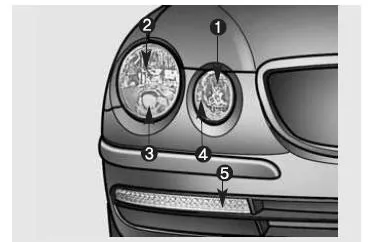
- Headlight (high beam)
- Headlight (low beam)
- Fog Lights
- Parking lights
- Turn signal light
Replacing headlight bulbs
NOTE
After heavy rain or after washing the vehicle, the lenses of the headlights and rear lights may be fogged up.
This is caused by a temperature difference between the outside air and the temperature inside the lamp.
This is comparable to the fogging of the inside of windows in rainy weather and should therefore by no means be regarded as a fault. If water should enter a lamp, have your vehicle checked by an authorised KIA dealer.
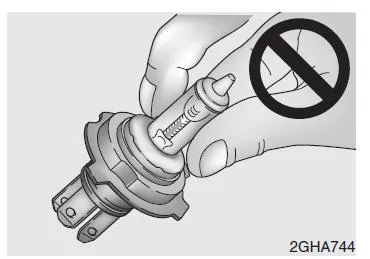
- Halogen bulbs are filled with pressurised gas, which will throw glass fragments into the surroundings if the glass envelope breaks.
- Always handle halogen bulbs carefully so that the glass envelope cannot be damaged. Do not allow any liquids to come into contact with a halogen bulb that is switched on. Never touch the glass envelope with bare fingers. A residual layer of grease can cause the bulb to burst when it is switched on. Only switch on a halogen bulb when it is installed.
- If a bulb is damaged or has burned out, replace it as soon as possible and dispose of the defective bulb properly.
- Wear safety glasses when replacing a bulb and allow the bulb to cool down before removing it.
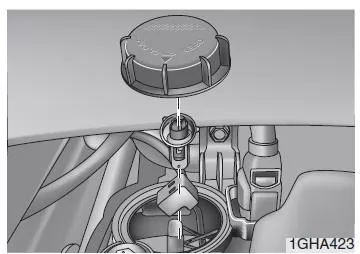
1. Open the hood.
2. Remove the headlight cover by turning it counterclockwise.
3. Disconnect the connector from the halogen bulb.
4. Release the halogen bulb retaining clip by pressing the end inward, then lift it.
5. Remove the halogen bulb from the headlight.
6. Install a new halogen bulb in the headlight and secure it by aligning the retaining clip with the groove on the bulb and letting it snap into its original position.
7. Connect the connector to the bulb.
8. Install the headlight cover by turning it clockwise.
Replacing bulbs: Headlight gas discharge lamps*, parking lights, front fog lights and front turn signal lights
If the above lights are not working, have your vehicle checked by an authorised KIA dealer and repaired if necessary.
CAUTION - Gas discharge lamps (low beam)*Do not attempt to replace or test gas discharge lamps (xenon lights). There is a risk of a severe electric shock. If the gas discharge lamp (low beam/xenon light) does not work, have the lamp checked and, if necessary, repaired by an authorized KIA dealer.
* HID: High-Intensity Discharge headlamp

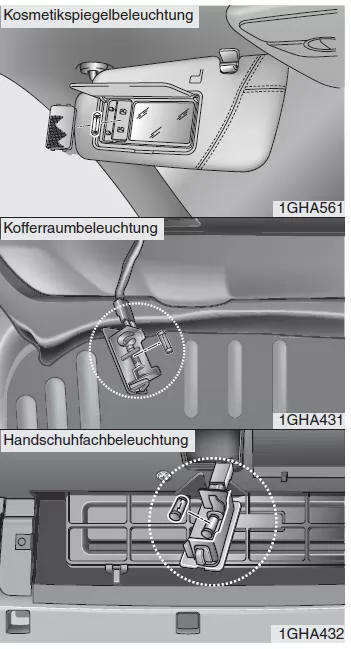
Replacing the Interior Lamp Bulbs
1. Carefully pry the interior lamp lens out of the lamp housing with a flat-blade screwdriver.
WARNINGBefore starting work on the interior lamps, make sure the lamp is switched off to avoid burning your fingers and receiving an electric shock.
2. Remove the bulb by pulling it straight out of the socket.
3. Insert a new bulb into the socket.
4. Align the lens with the retaining tabs of the lamp housing and press it lightly until it snaps into place.
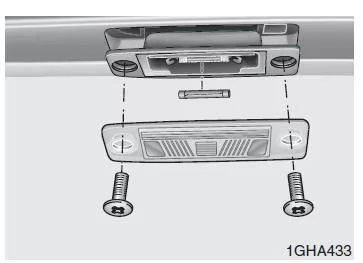
License Plate Lamp
1. Loosen the lens screws with a Phillips screwdriver.
2. Remove the lens.
3. Pull the bulb straight out of its socket.
4. Insert a new bulb.
5. Carefully reinstall the lens with the screws removed earlier.

Replacing the Door Lamp and Footwell Lamp Bulbs
If the above lamps do not work, have your vehicle checked and, if necessary, repaired by an authorized KIA dealer.
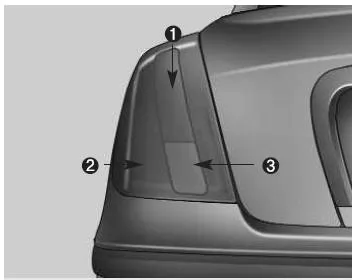
- Rear Turn Signal Lamp
- Brake and Tail Lamp
- Back-Up Lamp
Replacing the Rear Combination Lamp Bulbs
1. Open the trunk lid.
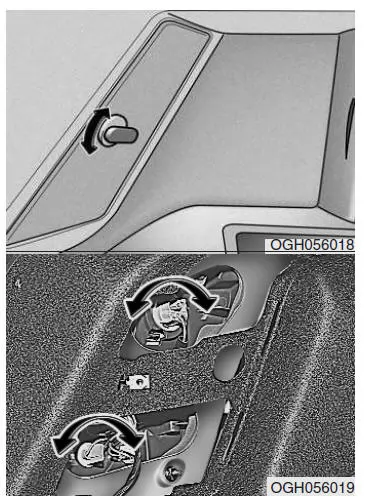
2. Loosen the trunk access cover by turning the plastic screw counterclockwise, then remove the cover.
3. Remove the bulb holder from the lamp housing by turning it counterclockwise until the retaining tabs of the holder align with the cutouts in the lamp housing.
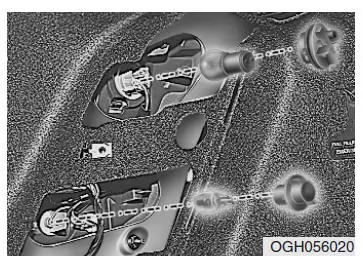
4. Release the bulb from the holder by pressing it in and turning it until the retaining tabs of the bulb align with the cutouts in the bulb holder. Then pull the bulb out of its holder.
5. Insert a new bulb and turn it until it locks into place.
6. Reinstall the bulb holder in the lamp housing by first aligning the retaining tabs of the holder with the cutouts in the lamp housing.
Push the holder into the lamp housing and turn it clockwise.
7. Reinstall the trunk access cover and secure it with the plastic screw.
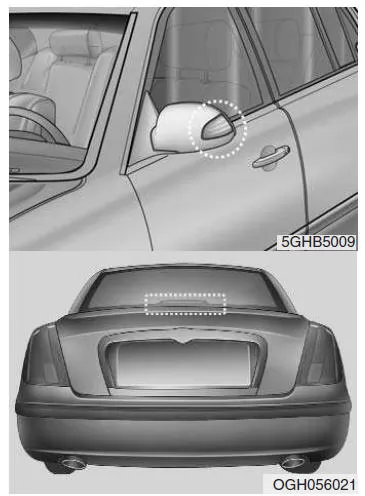
Replacing the Side Turn Signal and Third Brake Lamp Bulbs
If the above lamps do not work, have your vehicle checked and, if necessary, repaired by an authorized KIA dealer.
Replacing bulbs on the Kia Opirus 2003–2011 requires care and the use of genuine parts to avoid damage to the electrical system and lighting system. Safety precautions protect against injury and damage to the vehicle.
Proper work is especially important with halogen and xenon lamps to ensure lamp function and vehicle safety. This keeps the Kia Opirus a reliable companion at night as well.
Replacing defective lamps promptly helps maintain visibility and therefore safety in road traffic.
Test yourself
A quick Kia Opirus quiz: every answer comes with an explanation and a link to the manual page.