Wheel Replacement
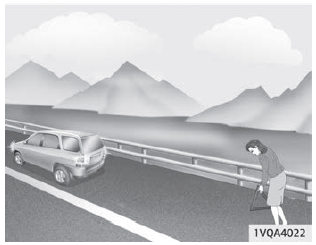
1. Stellen Sie das Fahrzeug auf ebenem Untergrund ab und betätigen Sie kräftig die Feststellbremse.
2. Legen Sie bei einem Schaltgetriebe den Rückwärtsgang (R) ein bzw. stellen Sie bei einem Automatikoder Doppelkupplungsgetriebe den Wählhebel in die Parkstufe (P).
3. Schalten Sie die Warnblinker ein.
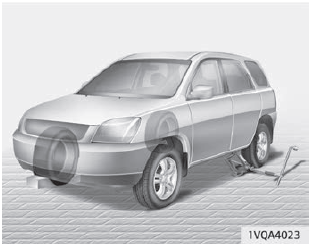
4. Remove the wheel wrench, jack, jack handle and spare tire from the vehicle.
5. Block the front or rear wheel diagonally opposite the wheel being changed.
WARNING
Tire Change
- To prevent the vehicle from moving while it is being lifted, firmly apply the parking brake and block the wheel diagonally opposite the wheel being changed.
- We recommend that all wheels of the vehicle be blocked and that no one be inside the vehicle while it is being lifted with the jack.
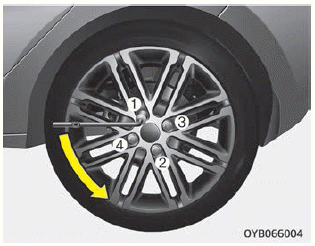
6. Loosen all wheel nuts one turn counterclockwise. Do not remove the wheel nuts until the wheel has been lifted so that it no longer touches the ground.
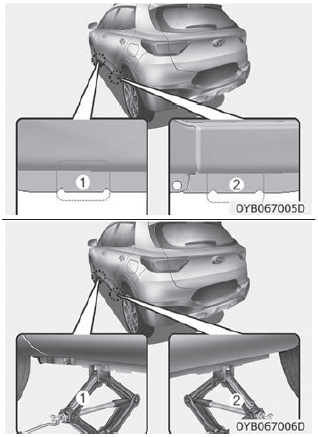
7. Place the jack under the front (1) or rear (2) jacking point next to the wheel being changed. Place the jack under the corresponding jacking point on the vehicle. The jacking points are metal plates with two notches and a protruding central guide point that fits into a notch on the jack head.
WARNING
Aufnahmepunkte für Wagenheber
To reduce the risk of injury, use only the supplied jack and the designated jacking points to lift the vehicle. Never lift the vehicle at any other point.
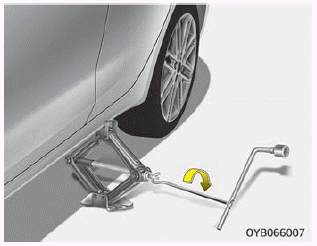
8. Insert the jack handle into the jack and turn it clockwise until the wheel no longer touches the ground. This distance is approx. 30 mm. Before loosening the wheel nuts, make sure the vehicle is stable on the jack and cannot move.
9. Loosen the wheel nuts and turn them off the wheel studs by hand. Lift the wheel off the wheel studs and place it on its side so that it cannot roll away. To install the spare tire on the vehicle, take the spare tire and hold it so that the holes in the wheel align with the wheel studs, then slide the wheel onto the wheel studs.
If difficulties occur, tilt the wheel slightly and first slide it onto the upper wheel studs. Then tilt the wheel slightly back and forth until it can be slid onto the remaining wheel studs.
WARNING
Wheels may have sharp edges. Handle them carefully to avoid serious injury. Before installing the wheel, make sure there is no foreign matter (e.g., mud, tar, small stones, etc.) on the wheel hub and rim. Foreign matter may prevent the rim from seating fully against the wheel hub.
Remove any foreign matter adhering to the surfaces. If the rim does not seat fully against the mounting surface of the wheel hub, the wheel nuts and thus the wheel may come loose from the vehicle. Loss of a wheel may cause you to lose control of the vehicle, which could result in serious injury or death.
10. To install the wheel, slide it onto the wheel studs and first tighten the wheel nuts by hand. Rock the wheel to make sure it seats fully. Then tighten the wheel nuts as firmly as possible by hand.
11. Lassen Sie das Fahrzeug ab, indem Sie die Wagenheberkurbel entgegen dem Uhrzeigersinn drehen.
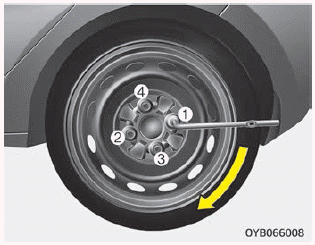
Now tighten the wheel nuts in the sequence shown in the illustration with the wheel wrench. Make sure the wheel wrench is fully engaged on the wheel nut. Do not stand on the wheel wrench handle and do not use a pipe or other tool to extend the wrench. Tighten all wheel nuts evenly. Then check all wheel nuts again for tightness. Have the system checked by an authorized workshop after a wheel change. Kia recommends a visit to a Kia dealer/service partner.
Anzugsmoment für Radmuttern:
Steel wheels and aluminum wheels: 11~13 kgf·m
If you have a tire pressure gauge, remove the valve cap and check the tire pressure. If the tire pressure is lower than the specified value, drive slowly to the nearest gas station/workshop and correct the tire pressure. If the tire pressure is too high, release air until the correct value is reached. Always reinstall the valve caps after checking or correcting the tire pressure. If the valve cap is not reinstalled, air may leak from the tire. If a valve cap is lost, buy a new one and install it as soon as possible.
Befestigen Sie nach einem Radwechsel das defecte Rad an der vorgesehenen Stelle und verstauen Sie den Wagenheber und das Werkzeug ordnungsgemäß in den entsprechenden Staufächern.
- After installing the spare tire, check the tire pressure as soon as possible. Adjust the tire pressure to the recommended value.
- Check the wheel nuts after changing a wheel and after driving 50 km, and tighten them if necessary. After 1,000 km of driving, check the wheel nuts again.
WARNING
The wheel studs and wheel nuts of your vehicle have metric threads. When installing a wheel, make sure that the same wheel nuts are used that were removed previously, or, when replacing wheel nuts, use nuts with metric threads and the same design. If nuts with inch threads are installed on metric studs (or vice versa), the wheel will not be secured adequately and the threads of the wheel studs will be damaged, so the wheel studs must be replaced.
Please note that most wheel nuts do not have metric threads. Make sure that wheel nuts you purchase as accessories have metric threads and match the design of the original nuts before you install them. If you are unsure, contact a qualified workshop. Kia recommends that you contact a Kia dealer/service partner.
WARNING
Wheel bolts
Wenn Radbolzen beschädigt sind, besteht die Gefahr, dass die Räder nicht sicher befestigt werden können. Räder könnten sich während der Fahrt lösen und zu einem Unfall mit schweren Verletzungen führen.
Verstauen Sie Wagenheber, Wagenheberkurbel, Radmutternschlüssel und Ersatzrad sorgfältig, um Klappergeräusche während der Fahrt zu vermeiden.
WARNING
Falscher Reifendruck im Ersatzrad
After installing the spare wheel, check the tire pressure and correct it to the specified value as soon as possible. Adjust the tire pressure to the specified value if necessary. Refer to 'Tires and Wheels' on page 9-06.
Wichtig - Verwendung des Notrads (ausstattungsabhängig)
Your vehicle is equipped with a temporary spare tire. It does not require more storage space than a full-size spare tire. The temporary spare tire is smaller than a standard tire and is intended for temporary use only.
WARNING
- Drive carefully when the temporary spare tire is installed. Replace the temporary spare with a full-size wheel with a standard rim and tire at the first opportunity.
- Do not install more than one temporary spare tire on the vehicle at the same time.
WARNING
The temporary spare tire is intended for emergency use only. Do not drive faster than 80 km/h. Have the original wheel repaired or replaced as soon as possible to avoid damage to the temporary spare tire, which could result in injury or death.
The temporary spare tire must be inflated to a tire pressure of 420 kPa.
WARNING
Check the tire pressure after installing the temporary spare tire on the vehicle. Correct the tire pressure to the specified value if necessary.
Beachten Sie bei der Verwendung eines Notrads folgende Vorsichtsmaßnahmen:
- Under no circumstances drive faster than 80 km/h, as higher speed may damage the temporary spare tire.
- Drive slowly enough to identify all hazards. Potholes and objects on the road could seriously damage the temporary spare tire.
- Continuous driving with the temporary spare tire installed may cause tire malfunction, loss of vehicle control, and resulting accident.
- Do not exceed the maximum permissible load of your vehicle or the maximum permissible load of the temporary spare tire. The maximum permissible tire load is marked on the sidewall of the temporary spare tire.
- Avoid driving over obstacles. The diameter of the temporary spare tire is smaller than the diameter of a standard wheel, so the ground clearance of your vehicle is reduced by approx. 2.5 cm. Driving over obstacles may damage the vehicle.
- Do not drive through an automatic car wash with the temporary spare tire installed.
- Do not fit snow chains to a temporary spare tire. Because the temporary spare tire is smaller than a standard tire, the snow chain will not fit properly. This may damage the vehicle, and the chain may come loose from the tire.
- Do not install the temporary spare tire on the front axle if the vehicle is to be driven on snow or ice.
- Never install the temporary spare tire on another vehicle, as the wheel is designed specifically for your vehicle.
- The tread life of the temporary spare tire is shorter than that of a standard tire. Therefore, check your temporary spare tire regularly and replace a worn temporary spare tire with a tire of the same size and type mounted on the same rim.
- A temporary spare tire must not be mounted on another rim, and standard tires, winter tires or wheel covers must not be mounted on the temporary spare rim. If this is attempted, the said items and vehicle components may be damaged.
- Never use more than one temporary spare tire at the same time.
- Solange ein Notrad angebaut ist, darf kein Anhänger gezogen werden.
Test yourself
A quick Kia Stonic quiz: every answer comes with an explanation and a link to the manual page.