Heater & A/C Control Unit (FATC)
Components and Component Location
Components
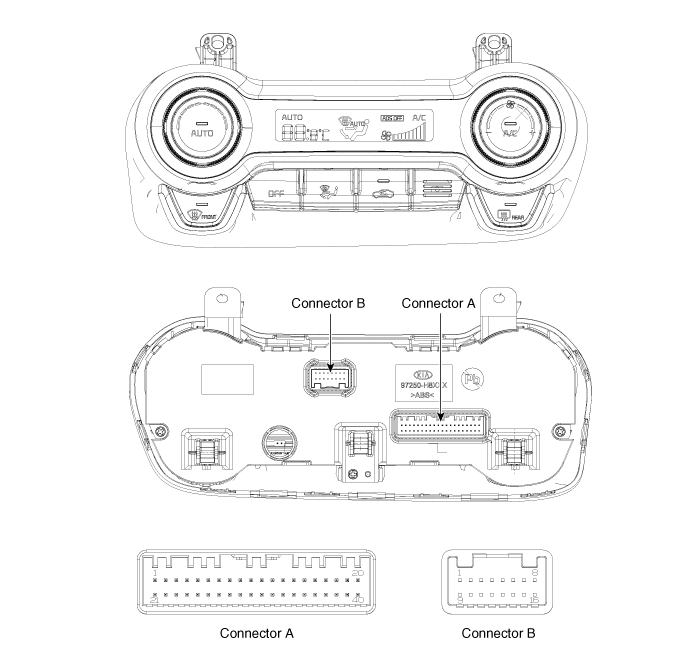
Connector Terminal Function
| No. | Connector A | Connector B |
| 1 | Battery | ⁻ |
| 2 | ISG battery (+) | ⁻ |
| 3 | Illumination (+) | ⁻ |
| 4 | Sensor (REF) (+) | Defrost Actuator Feedback |
| 5 | Mode Control Actuator Feedback | Defrost Actuator (Open) |
| 6 | Temperature Control Actuator Feedback | Anti-Fog Actuator (Close) |
| 7 | Intake Actuator Feedback | ⁻ |
| 8 | Evaporator Sensor (+) | ⁻ |
| 9 | Ambient Sensor (+) | ⁻ |
| 10 | Mode Control Actuator (VENT) | ⁻ |
| 11 | Mode Control Actuator (DEF) | Defrost Current |
| 12 | Temperature Control Actuator (COOL) | Anti-Fog Temperature |
| 13 | Temperature Control Actuator (WARM) | Defrost |
| 14 | Intake Actuator (FRE) | Anti-Fog Data |
| 15 | Intake Actuator (REC) | ⁻ |
| 16 | HTD | Ground |
| 17 | Rear Heater Switch | |
| 18 | ⁻ | |
| 19 | ⁻ | |
| 20 | Illumination (-) | |
| 21 | IGN2 | |
| 22 | IGN1 | |
| 23 | Fan Motor (+) | |
| 24 | Photo Sensor (-) | |
| 25 | ⁻ | |
| 26 | ⁻ | |
| 27 | ⁻ | |
| 28 | PTC Relay 3 | |
| 29 | PTC Relay 2 | |
| 30 | PTC Signal | |
| 31 | Latch Out (-) | |
| 32 | ⁻ | |
| 33 | Chassis_CAN (High) | |
| 34 | Chassis_CAN (Low) | |
| 35 | FET (Drain Hose Feedback) | |
| 36 | FET (Gate) | |
| 37 | ECV (+) | |
| 38 | ECV (-) | |
| 39 | Sensor Ground | |
| 40 | Ground |
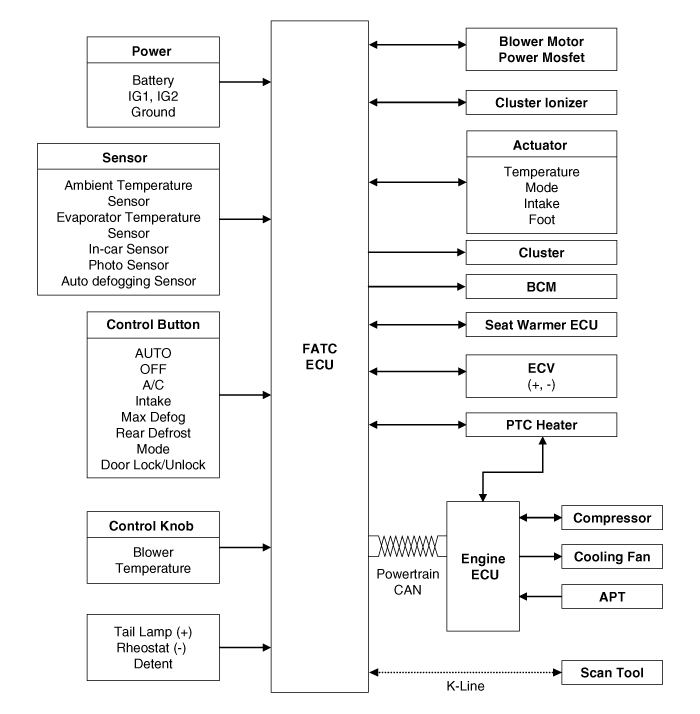
Circuit Diagrams
Schematic Diagrams
Repair Procedures
Self-Diagnosis
Self-Diagnosis Procedure
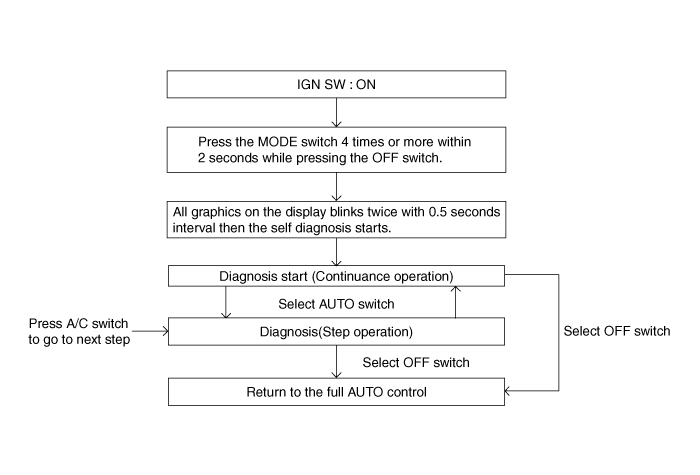
How to Read the Self-Diagnosis Code
During self-diagnosis, the corresponding trouble code flashes on the display. The temperature setting display panel flashes every 0.5 seconds and shows two digits.
Trouble codes are displayed in numeric format.
Display Description of Malfunction 00 Normal 11 In-Car Sensor Open 12 In-Car Sensor Short Circuit 13 Ambient Temperature Sensor Open Circuit 14 Ambient Temperature Sensor Short Circuit 17 Evaporator Temperature Sensor Open Circuit 18 Evaporator Temperature Sensor Short Circuit 19 Temperature Door Potentiometer Open/Short 20 Temperature Door Potentiometer Malfunction 21 Mode Door Potentiometer Open/Short 22 Mode Door Potentiometer Malfunction 25 Intake Door Potentiometer Open/Short Circuit 26 Intake Door Potentiometer Malfunction 43 Foot Door Potentiometer Open/Short 44 Foot Door Potentiometer Malfunction 45 APT (A/C Pressure Transducer) CAN Signal Malfunction 47 RPM CAN Signal Malfunction 48 Vehicle Speed CAN Signal Malfunction 49 Engine Coolant Temperature CAN Signal Malfunction 50 Cluster ionizer malfunction 51 Communication with the auto anti-fog sensor and sensor input malfunction Trouble Code Display
Continuous operation: DTC is 0 or 1.

Continuous operation: DTC is 2 or more.

STEP Operation
A. Normal code or one trouble code is the same as continuous operation.
B. DTC is 2 or more.
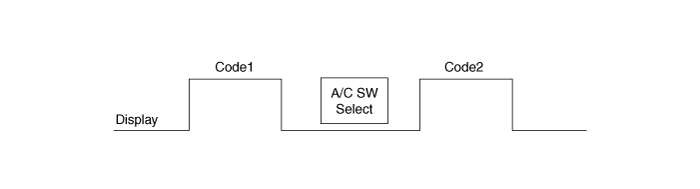
If trouble codes are displayed during inspection, check the causes of the malfunction using the trouble code table.
Fail-safe
No Sensor Failure Condition Fail-Safe Function 1 Vehicle Sensor < 0.1 V or > 4.9 V 23°C (73.4°F) 2 Ambient Temperature Sensor < 0.1 V or > 4.9 V 20°C (68°F) 3 Evaporator Temperature Sensor < 0.1 V or > 4.9 V -2°C (28.4°F) 4 Temperature Control Actuator Feedback < 0.1 V or > 4.9 V Set temperature is 24 °C or lower: MAX COOL.
Set temperature is 25 °C or higher: Max. heating
5 Mode Control Actuator Feedback < 0.5 V or > 4.5 V Vent: Vent
Others: Anti-Fog
6 Intake Actuator Feedback < 0.1 V or > 4.9 V Recirculation: Recirculation
Other: Fresh
7 Foot Actuator Feedback < 0.5 V or > 4.5 V Vent: Open
Others: Close
8 Anti-Fog Sensor
(Relative Humidity)Communication Error Relative Humidity: 60%,
Ambient Temperature: 23 °C
9 Automatic Defog Sensor
(Glass Temperature)< 0.1 V or > 4.9 V Glass Temperature: 23 °C 10 Engine Coolant Temperature Communication Error 85°C (185°F) 11 ECV Feedback No ECV input
feedback signalECV Malfunction Signal: 1
PWM control output: Hold
Trade: 0
Replacement
Disconnect the negative (-) battery terminal.
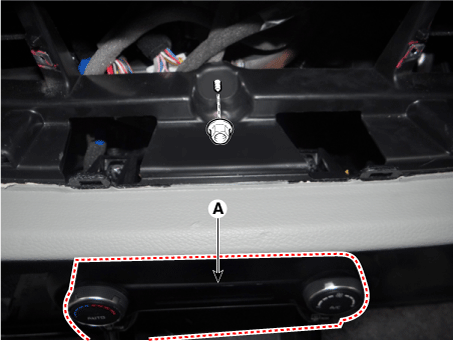
Remove the heater and A/C controller (A) after loosening the mounting assembly.
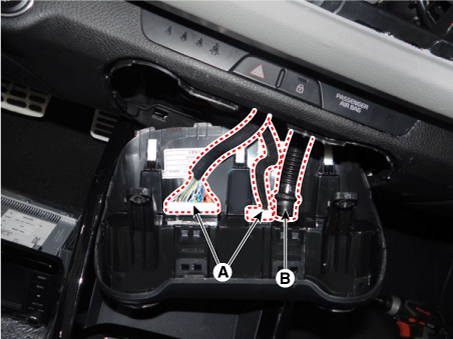
Disconnect the connectors (A) and the air hose (B).
Installation is the reverse of removal.
Test yourself
A quick Kia Rio YB quiz: every answer comes with an explanation and a link to the manual page.