If you have a flat tire (vehicles with a spare tire)
The tire change procedure for the Lexus GS L10 describes step by step how to proceed safely in the event of a flat tire. From proper preparation and the use of the jack to correctly installing the spare wheel, everything is explained in a practical way. Important safety warnings, such as how to position the jack correctly or how to use wheel chocks, help prevent accidents and allow you to handle your Lexus GS confidently in emergency situations.
Your vehicle is equipped with a spare wheel. The wheel with the flat tire can be replaced with the spare wheel.
WARNING
■If you have a flat tire
If you have a flat tire, do not continue driving.
Even driving a short distance on a flat tire can cause irreparable damage to the tire and wheel and may result in an accident.
Before jacking up the vehicle
- Park the vehicle on firm, level ground.
- Apply the parking brake.
- Shift the shift lever to "P".
- Turn the engine off.
- Switch on the hazard warning lights.
Storage location of the spare wheel, jack, and tools
Type A (GS350/GS200t with temporary spare)
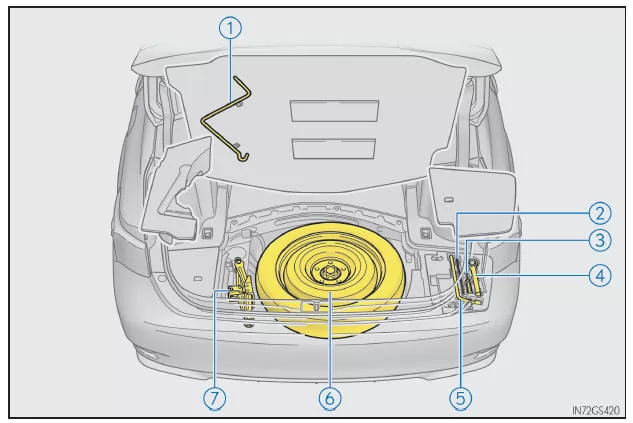
- Jack handle
- Parking brake release tool
- Screwdriver
- Emergency towing eye
- Wheel nut wrench
- Spare wheel
- Jack
Type B (GS350/GS200t with full-size spare wheel)
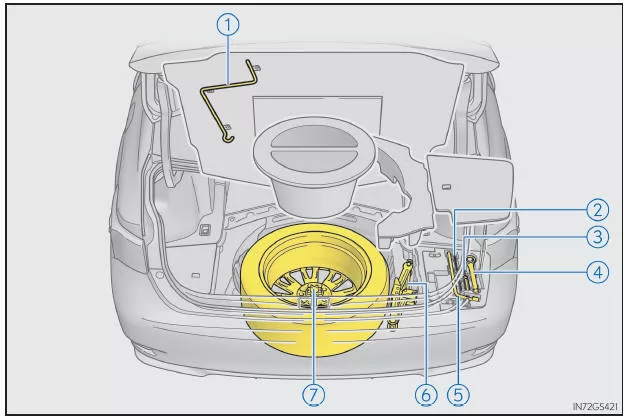
- Jack handle
- Parking brake release tool
- Screwdriver
- Emergency towing eye
- Wheel nut wrench
- Jack
- Spare wheel
Type C (GS F)
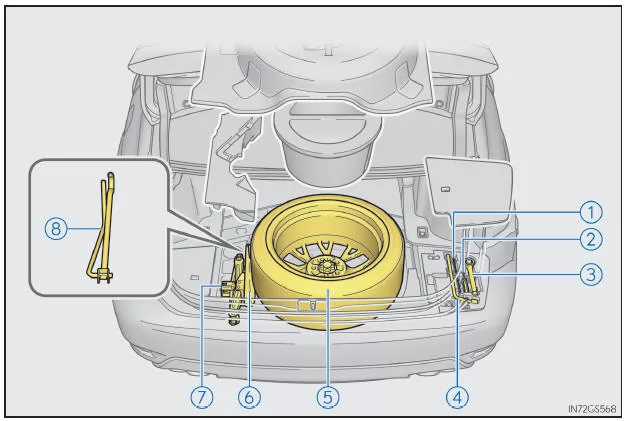
- Parking brake release tool
- Screwdriver
- Emergency towing eye
- Wheel nut wrench
- Spare wheel
- Tool bag
- Jack
- Jack handle
WARNING
■ Using the jack
Observe the following precautions.
If the jack is used improperly, the vehicle may suddenly fall off the jack, which may result in death or serious injury.
- Use the jack only for changing wheels or for installing and removing snow chains.
- To change a wheel with a flat tire, use only the jack supplied with this vehicle. Do not use it on other vehicles, and do not use any other jack to change wheels on this vehicle.
- Place the jack correctly at the designated jacking point.
- Never get under a vehicle that is supported only by a jack, either completely or partially.
- Do not start the engine or drive while the vehicle is supported by the jack.
- Never raise the vehicle while anyone is inside it.
- Do not place any object on or under the jack when raising the vehicle.
- Do not raise the vehicle higher than necessary to change the wheel.
- Use jack stands when it is necessary to get under the vehicle.
- Before lowering the vehicle, make sure no one is near the vehicle. If anyone is nearby, warn them before lowering the vehicle.
Removing the jack and jack handle
- Remove the center luggage mat.
- Remove the spacer and take out the jack handle.
Type A
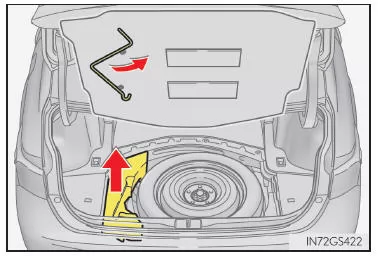
Type B
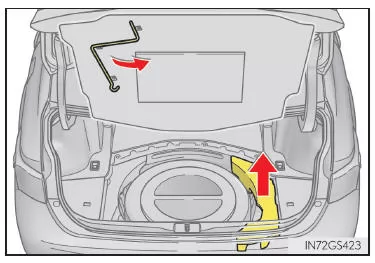
Type C
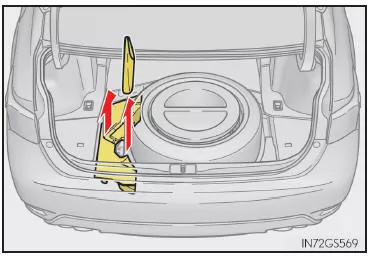
- Remove the jack.
Type A and C
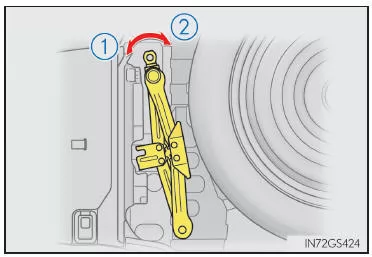
Type B
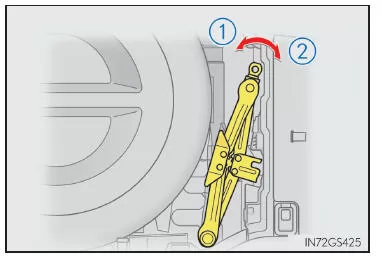
Removing the spare wheel
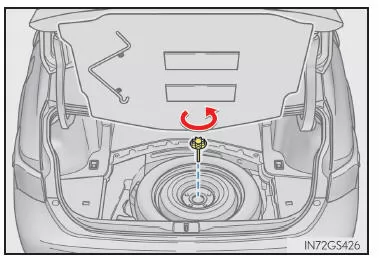
Type A
- Remove the center luggage mat.
- Loosen the center fastening device that secures the spare wheel.
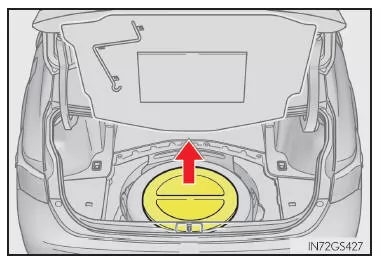
Type B
- Remove the center luggage mat.
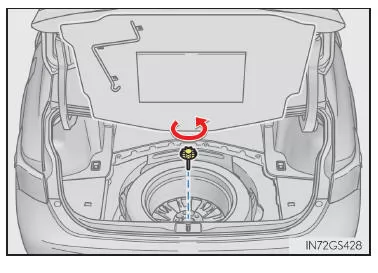
- Remove the spacers.
- Loosen the center fastening device that secures the spare wheel.
Type C
- Remove the center luggage mat.
- Remove the spacers.
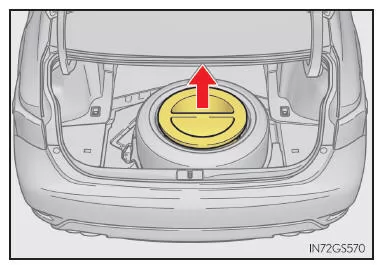
- Loosen the center fastening device that secures the spare wheel.

WARNING
■ When stowing the spare wheel
Be careful not to pinch your fingers or other body parts between the spare wheel and the body.
Changing a wheel after a flat tire
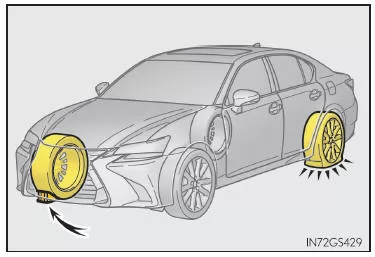
1. Chock the wheels with wheel chocks.

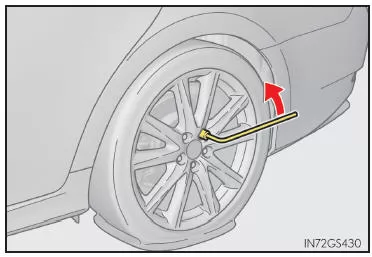
2. Loosen the wheel nuts slightly (one turn).
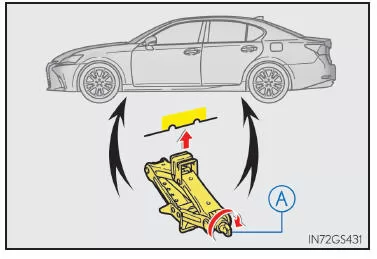
3. Turn part "A" of the jack by hand until the groove of the jack contacts the jacking point.
The jacking point markings are located under the rocker panel. They indicate the jacking points for the jack.
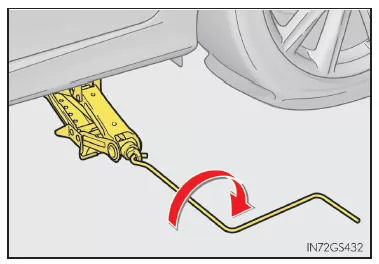
4. Raise the vehicle until the wheel is slightly off the ground.
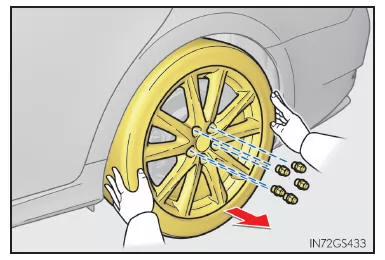
5. Remove all wheel nuts and the wheel.
When placing the wheel on the ground, make sure the outer side of the wheel faces up to prevent scratching the wheel surface.
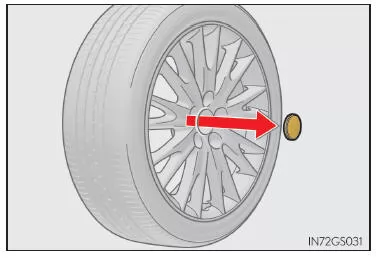
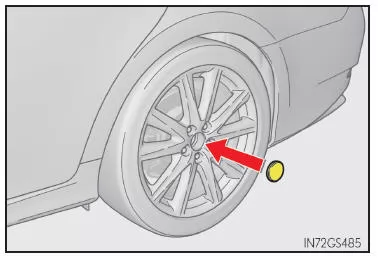
6. Vehicles with a standard spare tire: Remove the wheel cap by pressing against it from the back.
WARNING
■ Changing a Wheel After a Flat Tire
- Observe the following precautions. Otherwise, serious injury may result:
- Failure to observe these precautions may cause the wheel nuts to loosen and the wheel to come off, which could result in death or serious injury.
Installing the Spare Tire
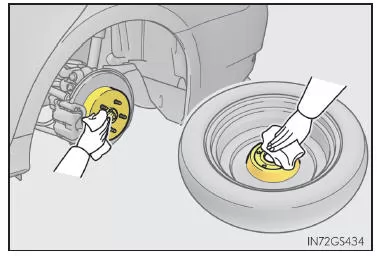
1. Remove dirt and foreign matter from the wheel mounting surface.
If foreign matter is on the wheel mounting surface, the wheel nuts may loosen while driving and the wheel may come off.
2. Install the wheel and tighten all wheel nuts by hand, evenly and loosely.
When replacing an alloy wheel with a steel wheel, tighten the wheel nuts until the tapered part makes light contact with the seat in the wheel.
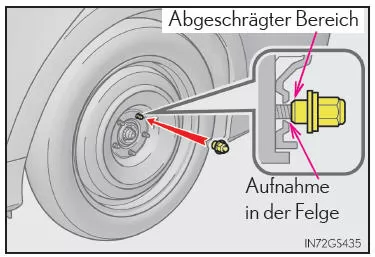
When replacing an alloy wheel with an alloy wheel, tighten the wheel nuts until the washers make contact with the seat in the wheel.
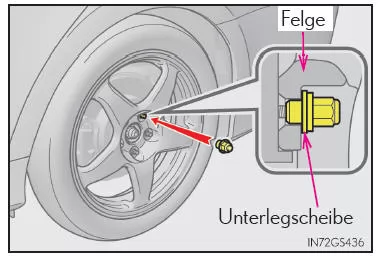
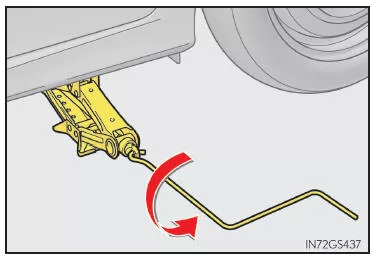
3. Lower the vehicle.
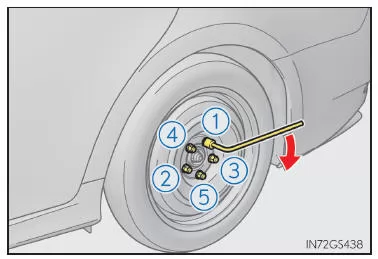
4. Tighten all wheel nuts two or three times in the order shown.
Tightening torque: 103 N·m (10.5 kgf·m)
5. Vehicles with a standard spare tire: Reinstall the wheel cap.
6. Stow the flat tire, the jack, and all tools.
■ Spare Tire (GS350/GS200t with Temporary Spare Tire and GS F)
- GS350/GS200t: You can identify the temporary spare tire by the “TEMPORARY USE ONLY” marking on the tire sidewall.
- Use the spare tire only temporarily and only in an emergency.
- Remember to check the tire pressure of the spare tire.
■ When Using the Spare Tire* (Vehicles with Tire Pressure Monitoring System)
Because the spare tire is not equipped with a valve and transmitter of the tire pressure monitoring system, low spare tire pressure will not be detected by the system. Furthermore, the tire pressure warning light will not turn off when you install the spare tire after the light has come on.
*: GS350/GS200t with Temporary Spare Tire and GS F
■ With the Spare Tire Installed (GS350/GS200t with Temporary Spare Tire and GS F)
With the spare tire installed, the vehicle may sit lower than when driving on standard wheels.
■ Flat Rear Tire on a Snow- or Ice-Covered Road (Only Vehicles with Front and Rear Tires of the Same Size and a Temporary Spare Tire)
Install the temporary spare tire on one of the front wheels of the vehicle. Perform the following steps and fit snow chains to the rear tires:
- Replace one front wheel with the temporary spare tire.
- Replace the rear wheel with the flat tire with the wheel removed from the front axle.
- Fit snow chains to the rear tires.
WARNING
■ When Using the Spare Tire (GS350/GS200t with Temporary Spare Tire and GS F)
- Note that the spare tire is designed specifically for use on your vehicle. Do not use the spare tire on another vehicle.
- Never use more than one spare tire at the same time.
- Replace the spare wheel with a standard wheel as soon as possible.
- Avoid sudden acceleration, abrupt steering maneuvers, sudden braking and shifting that causes sudden engine braking.
■ With the spare wheel installed (GS350/GS200t with temporary spare and GS F)
The vehicle speed may not be detected correctly, and the following systems may not operate properly:
ABS and Brake Assist VSC TRC Cruise Control (if equipped) Dynamic Radar Cruise Control (if equipped) Dynamic Radar Cruise Control with Full-Speed Range Following Function (if equipped) PCS (Pre-Collision System) (if equipped) EPS AFS (Adaptive Front-lighting System) (if equipped) Active Damper System (if equipped) LDA (Lane Departure Alert with Steering Control) (if equipped) LKA (Lane Keeping Assist) (if equipped) Tire Pressure Warning System (if equipped) VDIM Lexus Parking Assist Monitor (if equipped) Lexus Parking Assist Sensor (if equipped) Navigation System (if equipped)In addition, the following system may operate with limited functionality, and drivetrain components may also be affected:
All-Wheel Drive■ Speed limit when using the spare wheel (GS350/GS200t with temporary spare and GS F)
Do not drive faster than 80 km/h with the spare wheel installed.
The spare wheel is not suitable for high-speed driving. Failure to observe this precaution may result in an accident causing death or serious injury.
■ After using tools and the jack
Before driving on, check that the tools and jack are securely stowed in their designated places to reduce the risk of injury in a collision or sudden braking.
NOTICE■ Use caution when driving over bumps with the spare wheel installed.
(GS350/GS200t with temporary spare and GS F)
With the spare wheel installed, the vehicle may sit lower than when driving on standard wheels. Therefore, use particular caution when driving on uneven roads.
■ Driving with snow chains and the spare wheel (GS350/GS200t with temporary spare and GS F)
Never mount snow chains on the spare wheel.
Snow chains can damage the body and adversely affect driving performance.
■ When changing a wheel (vehicles with Tire Pressure Warning System)
To remove or install wheels, tires, or tire pressure warning system valves and transmitters, contact a Lexus dealer or repairer, or another qualified and properly equipped professional workshop, as the valves and transmitters of the tire pressure warning system can be damaged if handled improperly.
The Lexus GS GRL1 (2016–2020) provides clear instructions for safely changing a tire in the event of a flat. Every step, from the correct use of the jack to tightening the wheel nuts, is explained precisely. The standard tools and spare wheel are optimally stowed and ready for immediate use.
Particular emphasis is placed on safety: warnings on correct jack placement, handling hot components, and correct use of the spare wheel protect the driver and passengers alike. This keeps the sports sedan a reliable companion even in emergencies.
FAQHow fast can I drive with the spare wheel?
Maximum 80 km/h. The spare wheel is designed for temporary emergency use only.
Do I need to retighten the wheel nuts after changing a wheel?
Yes, have the wheel nuts retightened to 103 N·m by a qualified workshop as soon as possible.
Test yourself
A quick Lexus GS quiz: every answer comes with an explanation and a link to the manual page.