If you have a flat tire (vehicles without a spare wheel)
The tire repair kit for the Lexus GS (4th generation, 2016–2020) allows temporary repair of a tire with minor damage. This section describes in detail the safe use of the compressor, sealant, and tire pressure check. Special notes cover the limits of the kit, such as sidewall damage or severely damaged tires. Tips are also provided for driving safely after a temporary repair to take the Lexus GS safely to a workshop.
Your vehicle is not equipped with a spare wheel, but with a tire repair kit.
A flat tire caused by a nail or screw penetrating the tread can be temporarily repaired using the tire repair kit.
WARNING
■If you have a flat tire
If you have a flat tire, do not continue driving.
Even driving a short distance on a flat tire can cause irreparable damage to the tire and wheel and may result in an accident.
Driving on a flat tire can cause cracks to form in the sidewall.
In this case, the tire may burst when the repair kit is used.
Before Repairing the Vehicle
- Stop the vehicle in a safe location on a firm, level surface.
- Apply the parking brake.
- Shift the shift lever to "P".
- Turn the engine off.
- Switch on the hazard warning lights.
Location of Tire Repair Kit, Jack and Tools
Type A

- Jack handle
- Tire Repair Kit
- Parking brake release tool
- Screwdriver
- Emergency towing eye
- Wheel nut wrench
- Jack*
*: Using the jack
Type B

- Jack handle
- Tire Repair Kit
- Parking brake release tool
- Screwdriver
- Emergency towing eye
- Wheel nut wrench
- Jack*
*: Using the jack
Components of the Tire Repair Kit

- Sealant bottle
- Hose
- Tire pressure gauge
- Compressor switch
- Air compressor
- Label
- Power plug
- Air release cap
Removing the Tire Repair Kit
- Remove the center luggage mat.
- Remove the tire repair kit.
Type A

Type B
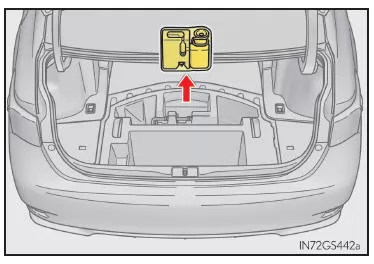
Removing the Jack
- Remove the center luggage mat.
- Remove the center auxiliary storage tray.
Type A

Type B

- Remove the jack.
Type A

Type B

- Tightening torque
- Releasing
Before Performing an Emergency Repair
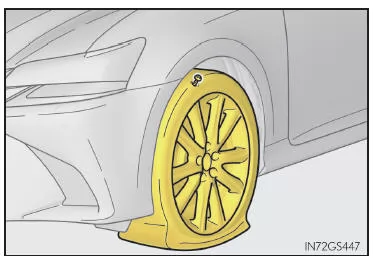
Check the extent of the tire damage.
A tire may only be repaired with the tire repair kit if the damage was caused by a nail or screw penetrating the tread.
- Leave the nail or screw in the tire. Removing the object may enlarge the hole, making an emergency repair with the kit no longer possible.
- To prevent sealant from leaking out, move the vehicle until the damaged area of the tire, as far as known, is at the top.
Emergency Repair Procedure
1. Remove the valve cap from the valve of the flat tire.
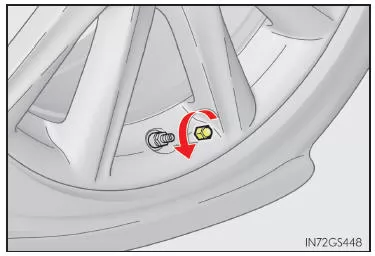
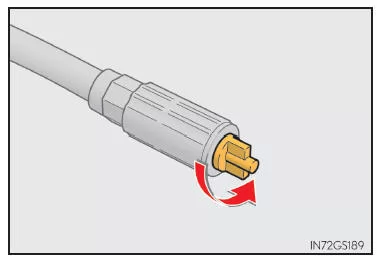
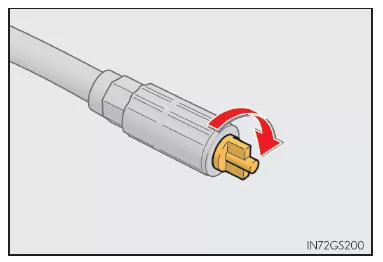
2. Remove the air release cap from the hose.
You will need the air release cap later. Store it in a safe place.
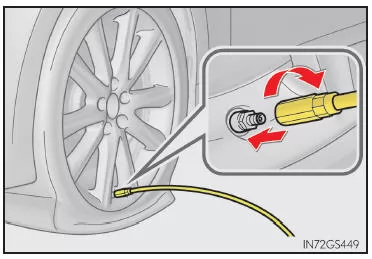
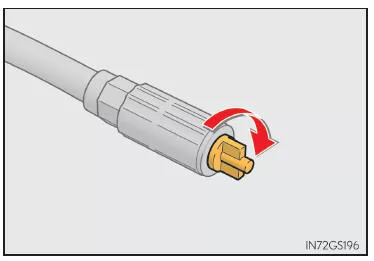
3. Connect the hose to the valve.
Turn the end of the hose clockwise as far as it will go.
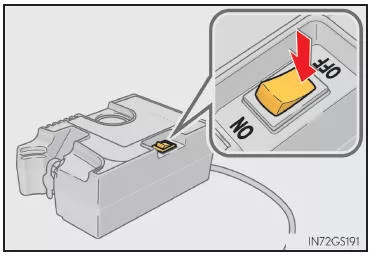
4. Make sure the compressor switch is turned off.
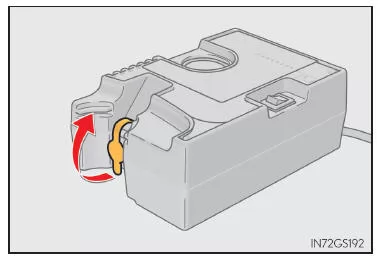
5. Remove the rubber plug from the air compressor.
6. Insert the power plug into the power outlet.
Inside of console box
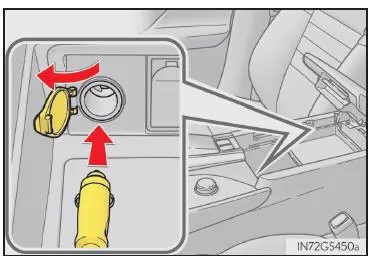
Back of console box
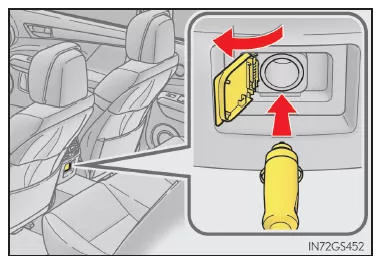
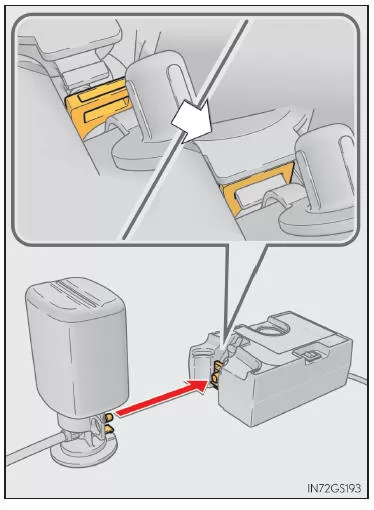
7. Connect the sealant bottle to the air compressor.
To connect the bottle, insert it straight into the air compressor, making sure the protruding part of the bottle is correctly aligned with the groove on the housing.
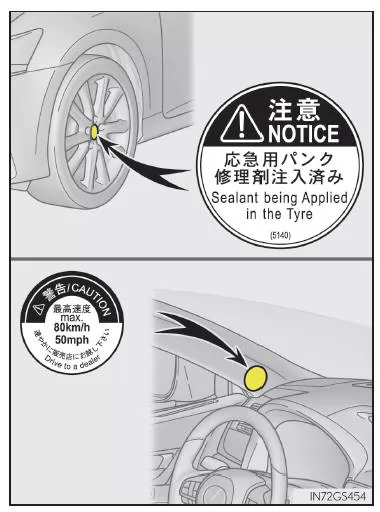
8. Attach the 2 labels as shown in the illustration.
Remove dirt and moisture from the wheel before attaching the label.
If you are unable to attach the labels, inform the nearest Lexus dealer or authorized repair shop, or another qualified and properly equipped repair shop that you have engaged to repair or replace the tire, that the flat tire was repaired with sealant.
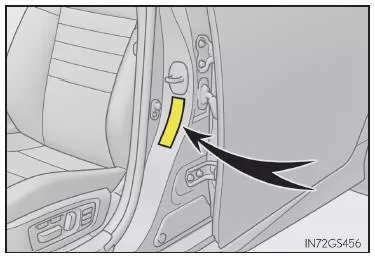
9. Determine the recommended tire pressure.
The tire pressure is shown on the label illustrated.
10. Start the engine.
11. Turn on the compressor switch to inject the sealant and inflate the tire.
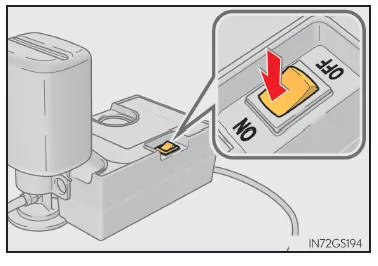
12. Inflate the tire until the recommended pressure is reached.
1The sealant is injected, and the pressure rises to 300 kPa (3.0 kgf/cm2 or bar) or 400 kPa (4.0 kgf/cm2 or bar) and then gradually decreases.2The tire pressure gauge shows the actual tire pressure approx. 1 minute (15 minutes at low temperatures) after the switch is turned on.3Inflate to the recommended pressure. Turn off the compressor switch, then check the tire pressure.Repeat the check and inflation until the specified tire pressure is reached, taking care not to overinflate the tire. If the tire pressure is still lower than the specified value after 10 minutes of inflation (35 minutes at low temperatures) with the switch on, the tire is too severely damaged to be repaired. Turn off the compressor switch and contact a Lexus dealer or authorized repairer, or another qualified workshop with suitable equipment. If the tire pressure exceeds the recommended value, release some air.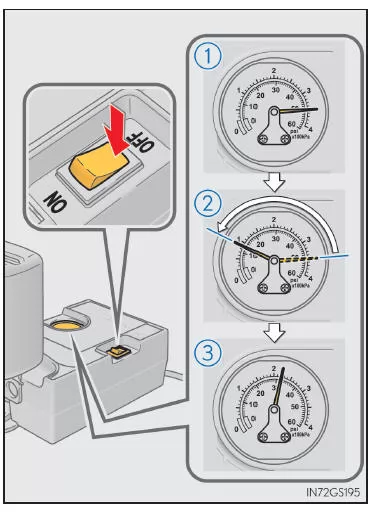
13. With the compressor off, disconnect the hose from the tire valve, then unplug the power plug from the power outlet.
Some sealant may leak out when the hose is removed.
14. Install the valve cap on the valve of the emergency-repaired tire.
15. Install the air release cap on the end of the hose.
If the air release cap is not installed, sealant may leak out and soil the vehicle.
16. Temporarily store the sealant bottle with the air compressor still connected in the luggage compartment.
17. To distribute the liquid sealant evenly inside the tire, drive immediately and carefully for approximately 5 km at less than 80 km/h.
18. After driving approximately 5 km, stop the vehicle in a safe location on a hard, level surface and remove the air release cap from the hose before reconnecting the repair kit.
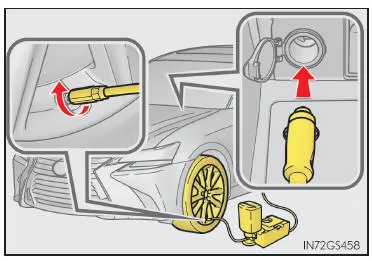
19. Turn on the compressor switch and wait a few seconds before turning it off again. Check the tire pressure.
1If the tire pressure is less than 130 kPa (1.3 kgf/cm2 or bar): The tire cannot be repaired. Contact a Lexus dealer or authorized repairer, or another qualified workshop with suitable equipment.2If the tire pressure is at least 130 kPa (1.3 kgf/cm2 or bar) but below the recommended value: Proceed to step 20.3If the tire pressure matches the recommended value: Proceed to step 21.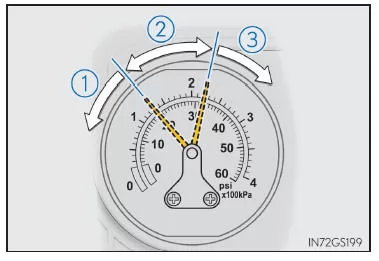
20. Turn on the compressor switch and inflate the tire until the recommended tire pressure is reached. Drive approximately 5 km, then perform step 18.
21. Attach the air release cap to the end of the hose.
If the air release cap is not installed, sealant may leak out and soil the vehicle.
22. Store the bottle with the air compressor connected in the luggage compartment.
23. Avoid sudden braking, sudden acceleration and sharp turns. Drive carefully at less than 80 km/h to a Lexus dealer or authorized service center, or another qualified workshop with suitable equipment, that is less than 100 km away, to have the tire repaired or replaced.
■ In the following cases, the tire cannot be repaired using the tire repair kit. Contact a Lexus dealer or authorized service center, or another qualified workshop with suitable equipment.
- If the tire damage is the result of driving with insufficient tire pressure
- If the tire has lost air due to a crack or damage to the sidewall
- If the tire has visibly separated from the wheel
- If the cut or damage in the tread is 4 mm long or longer
- If the wheel is damaged
- If two or more tires are damaged
- If the damaged tire has more than one hole or cut
- If the sealant has passed its expiration date
■ Tire repair kit
- The sealant has a limited shelf life. The expiration date is printed on the bottle.
Replace the sealant before its expiration date. Replacements are available from any Lexus dealer or authorized service center, or another qualified workshop with suitable equipment.
- The sealant in the tire repair kit can only be used once, to temporarily repair a single tire. If the sealant has been used and needs to be replaced, contact a Lexus dealer or authorized service center, or another qualified workshop with suitable equipment.
- The sealant can be used at outside temperatures from -40 °C to 60 °C.
- The repair kit is intended only for the type and size of tire originally fitted to your vehicle. Do not use it for tire sizes other than the original size or for any other purpose.
- The sealant may stain your clothing.
- If the sealant is not removed immediately, it may leave permanent stains on a wheel or on the vehicle body. Wipe off the sealant immediately with a wet cloth.
- The tire repair kit generates a loud noise during operation. This does not indicate a malfunction.
- Do not use the tire repair kit to check or adjust tire pressure.
■ If the tire is inflated above the recommended value
- Disconnect the hose from the valve.
- Attach the air release cap to the end of the hose, then press the nozzle of the air release cap onto the tire valve to release some air.
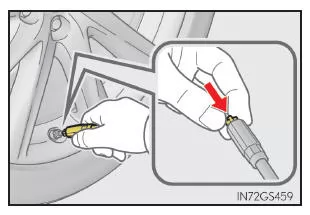
- Disconnect the hose from the valve, remove the air release cap from the hose, and reconnect the hose.
- Turn on the compressor switch and wait a few seconds before turning it off again. Make sure the tire pressure gauge shows the recommended value.
If the air pressure is below the recommended value, turn the compressor switch on again and repeat the inflation procedure until the recommended pressure is reached.
■ After repairing a tire with the tire repair kit
- The valve and the transmitter of the tire pressure monitoring system must be replaced.
- Vehicles with a tire pressure monitoring system: Even if the tire pressure matches the specified air pressure, the tire pressure warning light may come on or flash.
■ Note on checking the tire repair kit
Check the expiration date of the sealant from time to time.
The expiration date is printed on the bottle.
Do not use sealant whose expiration date has passed. Otherwise, a repair with the tire repair kit may not be carried out properly.
WARNING
■ Precautions while driving
Observe the following precautions.
Otherwise, an accident may occur.
- The tire repair kit is intended exclusively and specifically for your vehicle. Do not use it on other vehicles.
- Do not use the tire repair kit for tire sizes other than the specified size or for any other purpose. Otherwise, the tires cannot be repaired properly.
■ Precautions for using the sealant
- Swallowing sealant is harmful to health. If you swallow sealant, drink as much water as possible and consult a doctor immediately.
- If sealant gets into your eyes or onto your skin, wash it off immediately with water. If irritation persists, consult a doctor.
WARNING
■ When repairing a flat tire
- Stop the vehicle in a safe, level place.
- Do not touch the wheels or the area around the brakes immediately after driving. After driving, the wheels and the area around the brakes are extremely hot. Touching these areas with your hands, feet or other body parts may cause burns.
- Connect the valve and the hose securely to the tire mounted on the vehicle.
- If the hose is not connected properly to the valve, air pressure may leak or sealant may be sprayed out.
- If the hose comes off the valve while inflating the tire, the hose may whip around suddenly due to the air pressure.
- After tire inflation is complete, sealant may spray out if the hose is disconnected or air is released from the tire.
- When repairing the tire, follow the operating instructions. If these instructions are not followed, sealant may spray out.
- Stay clear of the tire during repair, as it may burst while the repair is being carried out. If you notice cracks or deformation on the tire, switch off the compressor and stop the repair procedure immediately.
- The repair kit may overheat during prolonged operation. Do not operate the repair kit continuously for more than 35 minutes.
- Parts of the repair kit become hot during operation. Use caution when handling the repair kit and after operation. Do not touch the metal part that connects the bottle to the compressor. It becomes extremely hot.
- Do not attach the speed warning label in any location other than the specified one. If the label is attached in an area where an SRS airbag is located, such as the steering wheel pad, it may interfere with proper operation of the SRS airbag.
■ Distributing the liquid sealant evenly by driving
- Drive the vehicle carefully at low speed. Be especially careful when turning and cornering.
- If the vehicle does not drive straight or you feel a pull on the steering wheel, stop the vehicle and check the following:
■ When performing an emergency repair
- Perform the emergency repair without removing the nail or screw lodged in the tread. If the object causing the puncture is removed, repair using the tire repair kit may no longer be possible.
- The repair kit is not waterproof. Make sure the repair kit does not get wet when used in the rain.
- Do not place the repair kit directly on dusty surfaces such as sand at the roadside.
If the repair kit draws in dust, etc., it may malfunction.
■ Handling the tire repair kit
- The power supply for the repair kit must be 12 V DC for vehicles.
Do not connect the repair kit to any other power source.
- The repair kit may be damaged by gasoline splashes. Make sure it does not come into contact with gasoline.
- Store the tire repair kit in the luggage compartment.
Otherwise the kit may be thrown around and damaged during sudden braking, etc.
- Store the repair kit in the luggage compartment, out of the reach of children.
- Do not modify or disassemble the repair kit. Do not subject parts such as the tire pressure gauge to shocks. This could cause a malfunction.
■ How to prevent damage to the tire pressure warning system valves and transmitters (vehicles with tire pressure warning system)
If a tire is repaired with liquid sealant, the valve and transmitter of the tire pressure monitoring system may become inoperative. When using liquid sealant, contact a Lexus dealer or authorized repair shop, or another qualified and properly equipped repair facility, as soon as possible. When repairing or replacing a tire, make sure the valve and transmitter of the tire pressure monitoring system are also replaced.
For vehicles without a spare tire, the Lexus GS GRL1 offers a modern tire repair kit that provides quick help for minor damage to the tread. The clear instructions and well-thought-out design ensure that an emergency repair can be carried out safely even while on the road.
The handling instructions for the sealant and compressor underline the high safety standards of the fourth-generation Lexus GS sports sedan. This allows the vehicle to remain mobile in the event of a breakdown until a qualified repair shop can be reached.
Test yourself
A quick Lexus GS quiz: every answer comes with an explanation and a link to the manual page.