Rear View Monitor
The Rear View Monitor is a visual aid system used when reversing the vehicle, which provides images of the area behind the vehicle.
WARNING
Always drive carefully, checking the rear and surroundings of the vehicle directly with your own eyes:
It is dangerous to reverse while looking only at the monitor, as this may cause an accident or collision with an object. The Rear View Monitor is only a visual aid for reversing the vehicle. The images on the screen may differ from actual conditions.
WARNING
Do not use the Rear View Monitor under the following conditions. Using the Rear View Monitor under the following conditions is dangerous and may cause personal injury, vehicle damage, or both.
- Icy or snow-covered roads
- Snow chains or a temporary spare tire are installed
- The tailgate is not fully closed.
- The vehicle is on a sloped road.
When the display is cold, images may flicker across the screen and brightness may be abnormally low, making it impossible to confirm the conditions around the vehicle. Always drive carefully, checking the rear and surroundings of the vehicle directly with your own eyes.
Do not apply force to the camera. The camera position and angle may shift.
Do not disassemble, modify, or remove the camera, as this will cause it to lose its water resistance.
The camera cover is made of plastic. Do not apply degreaser, organic solvents, wax, or glass coating to the camera cover. If any of these substances spill on the cover, wipe it off immediately with a soft cloth.
Do not rub the cover excessively, and do not polish it with an abrasive agent or a hard brush. The cover may be damaged, which may affect the image.
NOTE
- If water, snow, or mud adheres to the camera lens, wipe it off with a soft cloth. If it cannot be removed by wiping, use a mild detergent.
- If the camera temperature changes suddenly (from very hot to cold, or from cold to very hot), the Rear View Monitor may not function properly.
- To replace the tires, contact an authorized Mazda dealer. Replacing the tires may cause the guide lines displayed on the screen to shift.
- If the vehicle has been involved in a collision at the front, sides, or rear, the alignment of the rear view camera (location, installation angle) may have shifted. Always have the vehicle inspected by an authorized Mazda dealer.
Location of the Rear View Camera
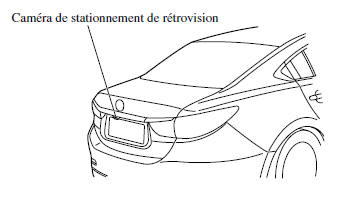
Switching to the Rear View Monitor
Shift the selector lever to R when the ignition switch is in ON to switch to the Rear View Monitor.
NOTE
When the selector lever is moved from R to another position, the previous display reappears on the screen.
Field of View on Screen
The images on the screen may differ from actual conditions.

NOTE
- The field of view varies depending on the vehicle and road conditions.
- The field of view is limited. Objects below the bumper or near the ends of the bumper may not be displayed.
- The distance shown on the displayed image differs from the actual distance because the rear view parking camera is equipped with a special lens.
- Some optional equipment may be visible to the camera. Do not install any optional parts that may obstruct the camera's view, such as a light-reflecting or reflective object.
- It may be difficult to see the display under the following conditions. This does not indicate a malfunction.
- In a dark place.
- When the temperature around the lens is high/low.
- When the camera is wet, in rain or in very humid conditions.
- When foreign matter, such as mud, is stuck around the camera.
- When the camera lens reflects sunlight or headlights.
- Image display may be delayed if the temperature around the camera is low.
Viewing the display
The guide lines that indicate the vehicle width (yellow) appear on the screen for reference, to show the approximate width of the vehicle compared with the width of the parking space you are about to reverse into.
Use this display view to park the vehicle in a parking space or garage.
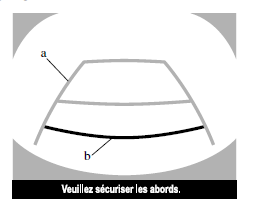
- Vehicle width guide lines (yellow) The guide lines serve as a reference to indicate the approximate width of the vehicle.
- Distance guide lines
These guide lines indicate the approximate distance to a point measured from the rear of the vehicle (from the end of the bumper).
The red and yellow lines indicate points approximately 50 cm (red) and 1 m (yellow) from the rear bumper (at the center point of each line).
WARNING
The guide lines on the screen are fixed lines. They are not synchronized with the driver's steering wheel rotation. Always pay close attention, and check the area behind the vehicle and the surrounding area directly with your eyes when reversing.
Using the rear view monitor
The use of the rear view monitor when reversing the vehicle varies depending on traffic, road and vehicle conditions. The amount of steering and timing also vary depending on these conditions; therefore, check the surrounding conditions directly with your eyes and steer the vehicle according to these conditions.
Before using the rear view monitor, read the above precautions carefully.
NOTE
The images shown on the display from the rear view parking camera are reversed (mirror images).
- Move the shift lever to the R position to display the rear view monitor.
- While checking the surrounding conditions, reverse the vehicle.

Display status
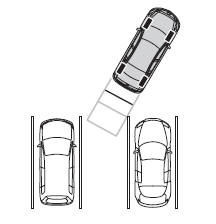
Vehicle status
- After the vehicle has started to enter the parking space, continue reversing slowly so that the distances between the vehicle width lines and the left and right sides of the parking space are approximately equal.
- Continue turning the steering wheel until the vehicle width guide lines are parallel to the left and right sides of the parking space.
- Once they are parallel, straighten the wheels and slowly reverse the vehicle into the parking space. Continue checking the area around the vehicle, then stop the vehicle in the best possible position. (If the parking space has division lines, check that the vehicle width guide lines are parallel to them.)

Display status

Vehicle status
- When you move the shift lever from the R position to another position, the previous display reappears on the screen.
NOTE
As there may be a difference between the displayed image, as shown below, and the actual parking conditions, always ensure safety behind the vehicle and in the surrounding area directly with your eyes.
- In the image of the parking space (or garage) shown below, although the rear end and the distance guide lines appear parallel on the screen, they may not actually be parallel on the ground.
- When parking in a space with a division line on only one side of the parking space, the division line and the vehicle width guide line may appear parallel on the screen, but they may not actually be parallel on the ground.
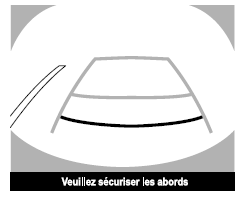
Discrepancy between actual road conditions and the displayed image
There are some discrepancies between the actual road and the displayed road. Such distance perspective deviations may lead to an accident. Be aware of the following conditions that may cause a discrepancy in distance perception.
When the vehicle is tilted due to passenger and cargo weight
When the rear of the vehicle is lowered, the object shown on the screen appears farther away than it actually is.
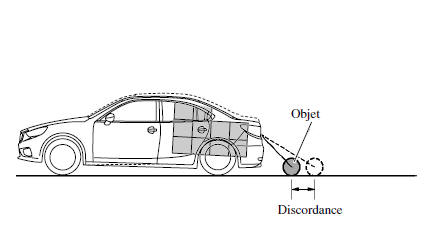
When there is a steep slope behind the vehicle
When there is a steep upward (or downward) slope behind the vehicle, the object shown on the screen appears farther away (or closer on a downward slope) than it actually is.
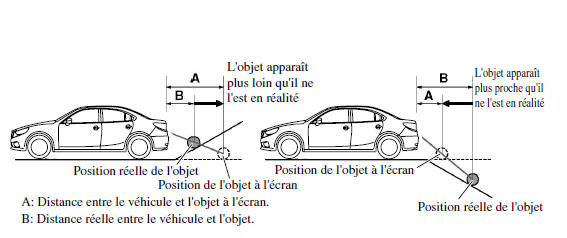
- Distance between the vehicle and the object on the screen.
- Actual distance between the vehicle and the object.
Three-dimensional object behind the vehicle
Because the distance guide lines are displayed on a flat plane, the three-dimensional object distance shown on the screen differs from the actual distance.
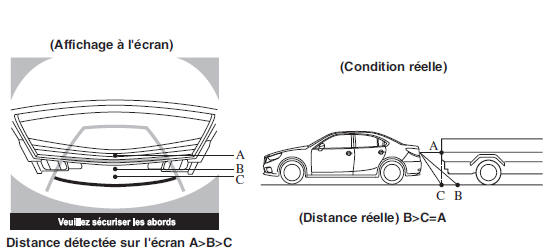
Adjusting Image Quality
WARNING
Always adjust the rear view monitor image quality while the vehicle is stopped:
Do not adjust the rear view monitor image quality while the vehicle is moving. Adjusting the rear view monitor image quality, such as brightness, contrast, color and tint, while driving is dangerous because it may distract your attention from vehicle operation and cause an accident.
Image quality can be adjusted while the selector lever is in the (R) reverse position.
Four settings can be adjusted: brightness, contrast, color, and tint. While adjusting, always pay attention to the area around the vehicle.
- Press the setting button (
 ) to display the
image quality adjustment screen. - Briefly press the buttons
 and
 on the screen to change the
setting value.
Briefly press the button
on the screen to return to the camera view screen.
Reset
All screen setting values can be reset to their initial settings.
- Press the setting button (
 ) to display the
image quality adjustment screen. - Briefly press the button
 on the screen.
- Briefly press the button
 on the screen.
Test yourself
A quick Mazda 6 quiz: every answer comes with an explanation and a link to the manual page.