360° camera
The 360° camera of the Mercedes E-Class (4th gen., W212, 2009–2016) provides comprehensive all-round visibility and makes maneuvering in tight spaces easier. Various views, from top view to trailer view, support the driver in different situations. Notes on the limits of the display promote safe use.
General Notes
The 360° camera is a camera system consisting of four cameras.The system evaluates images from the following cameras:
- Rear view camera
- Front camera
- Two cameras in the exterior mirrors
You can display 360° camera images as a full-screen view or in seven different split-screen views on the COMAND/Audio 20 display. A split-screen view also includes a top view of the vehicle. This is calculated from the data of the installed cameras (virtual camera).
The 7 split-screen views are:- Top view and reversing camera image (130° angle)
- Top view and front camera image (130° angle, without display of maximum steering angle)
- Top view and enlarged rear view
- Top view and enlarged front view
- Top view and trailer view (vehicles with tow hitch)
- Top view and rear side mirror camera images (rim view of rear wheels)
- Top view and front side mirror camera images (rim view of front wheels)
When you switch between gear selector positions D and R, you see the most recently selected front or rear view.
In addition, the distances measured by PARKTRONIC are shown visually:- in split screen as a red or yellow bracket around the vehicle symbol in the top view, or
- at the bottom right as a red or yellow bracket around the vehicle symbol in full-screen view
- yellow bracket with thin line: PARKTRONIC active
- yellow bracket with normal line thickness: object in the close range of the vehicle
- red line: object in the immediate close range of the vehicle
Important Safety Notes
The 360° camera is only an aid and may display obstacles distorted in perspective, incorrectly, or not at all. The 360° camera cannot replace your attention.You are always responsible for safe maneuvering and parking. Make sure that no persons, animals or objects are in the maneuvering area when maneuvering or parking.
You are always responsible for safety and must continue to watch your immediate surroundings when parking and maneuvering. This applies to the areas behind, in front of and beside the vehicle. Otherwise you endanger yourself and others.The 360° camera does not work or works only in a limited way if
- the doors are open
- the exterior mirrors are folded in
- the trunk lid/tailgate is open
- it is raining heavily, snowing or foggy
- it is night or you are in a very dark place with your vehicle
- the cameras are exposed to very strong bright light
- the surroundings are illuminated by fluorescent or LED lighting (flickering may appear on the display)
- there is a rapid temperature change, e.g. when you drive from cold into a heated garage in winter
- the camera lenses are dirty or covered
- the vehicle parts in which the cameras are installed are damaged. In this case, have the position and setting of the cameras checked at a qualified specialist workshop.
Guide lines are always displayed at road surface level. In trailer mode, the guide lines are displayed at the height of the trailer coupling.
On vehicles with height-adjustable suspension, leaving the standard ride height may technically- result in inaccuracies in the guide lines
- result in inaccuracies in the display of calculated images (top view).
Activation conditions
The 360° camera image can be displayed when- Your vehicle is equipped with the 360° camera
- the key is in position 2 in the ignition lock
- COMAND Online/Audio 20 is switched on
- the 360° camera function is switched on.
Switch on 360° camera
 The button
 Press and hold the button on the center console for more than 2 seconds.
- a split screen with top view and front camera image, or
- a split screen with top view and reversing camera image.
or
The buttonPress the button on the center console.
Select 360° camera and confirm with confirm.
- a split screen with top view and front camera image, or
- a split screen with top view and reversing camera image.
Switch on the 360 camera with reverse gear engaged
You can have the 360° camera images displayed automatically by selecting reverse gear.Make sure the key is in position 2 in the ignition lock.
Make sure the Automatic when in reverse function is selected in COMAND Online/Audio 20 (see separate COMAND Online/Audio 20 Operator's Manual).
To display the 360 camera image: Engage reverse gear.
Selecting split screens and full-screen display
Switching the split-screen viewTo move to the row with the vehicle symbols: Push the controller .
To select one of the vehicle symbols: Turn the controller .
To switch to the 180 view: Select 180 view with the controller(turn) and pressconfirm.
Info

The 180 view option is only available in the following views:
- Bird's-eye view with reversing camera image
- Bird's-eye view with front camera image
Displays on the COMAND/Audio 20 display
Important safety notesThe camera system may display obstacles distorted in perspective, incorrectly, or not at all. The system does not display obstacles in the following areas:
- under the front and rear bumpers
- very close to the front and rear bumpers
- at close range above the handle recess of the tailgate/trunk lid
- at close range to the exterior mirrors
- in the transition areas between different cameras in the virtual bird's-eye view
Objects that are not at ground level appear farther away than they actually are, e.g.
- the bumper of a parked vehicle
- the drawbar of a trailer
- the ball neck of a trailer hitch
- the rear of a truck
- an inclined post
Bird's-eye view with reversing camera image
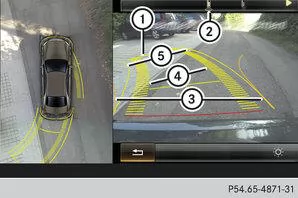
 |
Yellow guide line at approx. 4.0 m distance from the rear area |
 |
Symbol for the split-screen setting with bird's-eye view and reversing camera image |
 |
Guide line for maximum steering wheel lock |
 |
Yellow tire track at current steering wheel lock (dynamic) |
 |
Yellow guide line of the vehicle width across the exterior mirrors, at current steering wheel lock (dynamic) |
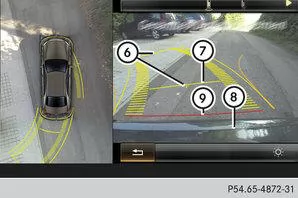
 |
Vehicle centerline (sighting aid) |
 |
Yellow guide line at approx. 1.0 m distance from the rear area |
 |
Bumper |
 |
Red guide line at approx. 0.30 m distance from the rear area |
The distance values apply only to objects located at ground level.
Bird's-eye view with front camera image
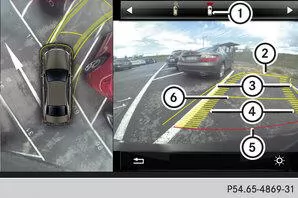
|
Symbol for the split-screen setting with bird's-eye view and front camera image |
|
Yellow guide line at approx. 4.0 m distance from the front area |
|
Yellow guide line of the vehicle width across the exterior mirrors, at current steering wheel lock (dynamic) |
|
Yellow tire track at current steering wheel lock (dynamic) |
|
Red guide line at approx. 0.30 m distance from the front area |
|
Yellow guide line at approx. 1.0 m distance from the front area |
Top view and enlarged rear view
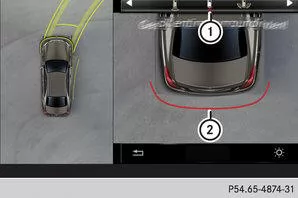
|
Symbol for the enlarged split-screen setting with bird's-eye view and reversing camera image |
|
Red guide line at approx. 0.30 m distance from the rear area |
Info
This setting can also be selected as an enlarged front view.
Bird's-eye view with side mirror camera image
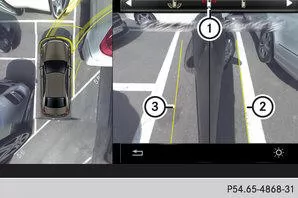
|
Symbol for the forward side mirror camera bird's-eye view setting |
|
Yellow guide line for vehicle width across the exterior mirrors (right side of vehicle) |
|
Yellow guide line for vehicle width across the exterior mirrors (left side of vehicle) |
Info
You can also select the side mirror camera setting for the rearward view.
Bird's-eye view with trailer view
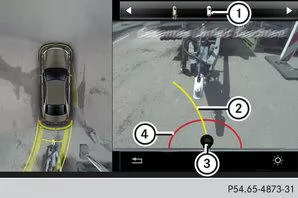
|
Symbol for the trailer view setting |
|
Drawbar alignment aid |
|
tow ball |
|
Red guide line approx. 0.30 m from the tow ball |
180 view
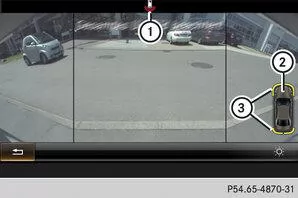
|
Symbol for the full-screen setting with reversing camera image |
|
Own vehicle |
|
PARKTRONIC warning displays |
Select this display, for example, when exiting a driveway and your view of cross traffic is restricted.
Ending the 360 camera display
The 360 camera display ends,- when you select transmission position P, or
- as soon as you drive at moderate speed.
 in the display and then with the controllerconfirm.
The 360 camera of the Mercedes E-Class W212 (model years 2009–2016) provides all-round visibility that makes parking and maneuvering significantly safer. Thanks to the combination of four cameras and a virtual bird's-eye view, the surroundings are displayed precisely.
This innovative technology supports the driver in confusing situations and helps prevent collisions.
Question: When does the 360 camera display end automatically?
Answer: As soon as the transmission is shifted to P or a certain speed is exceeded.
Question: What does the red bracket in the PARKTRONIC display indicate?
Answer: An object is located in the immediate close range of the vehicle.
Test yourself
A quick Mercedes-Benz E-Class quiz: every answer comes with an explanation and a link to the manual page.