Compressor
D7F ENGINE
REMOVAL
Drain the R134a refrigerant circuit.
Disconnect the battery.
Remove:
the compressor drive belt,
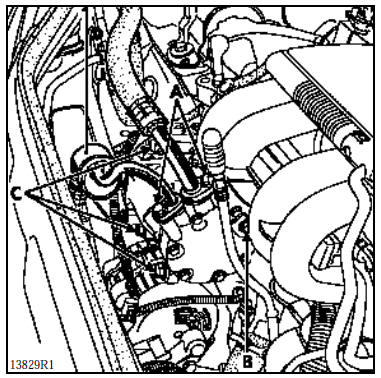
the two connecting pipes (A),
the bolt (B) of the support bracket,
the three compressor mounting bolts (C).
Remove the compressor.
NOTE: always fit plugs to the pipes and to the compressor to prevent moisture entering the circuit.
INSTALLATION
If the compressor is replaced, it is supplied pre-filled with oil.
Position the compressor the correct way round (filler plug facing up).
Tighten the three bolts (C) (tightening torque: 2.1 daN.m).
Fit the support bracket bolt (B).
Refit the two R134a refrigerant pipes (A) to the compressor (tightening torque: 2.1 daN.m).
Fit the drive belt and adjust its tension.
Evacuate the system, then charge the R134a refrigerant circuit using the recharging station.
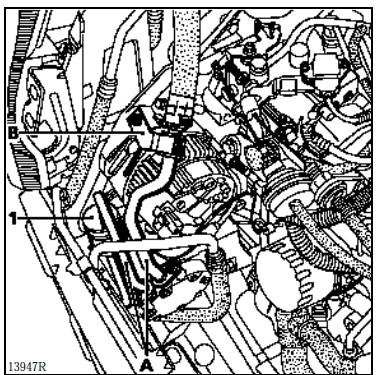
NOTE: when refitting the connecting pipes to the compressor, fit all the bolts, then bring them into contact before tightening to torque. This ensures the pipe is correctly positioned and not damaged at the "muffler" (1). Check the condition of the seals and lubricate them with P.A.G. SP 10 oil.
IMPORTANT
When replacing the compressor, it is essential to correctly top up the oil level.
F8Q ENGINE
REMOVAL
Vehicle on a lift.
Drain the R134a refrigerant circuit.
Disconnect the battery.
Remove the front bumper.
From above, remove:
the compressor drive belt,
the two connecting pipes (A),
the connecting pipe support bracket (B).
From below the vehicle, remove the three compressor mounting bolts and remove the compressor.
NOTE: always fit plugs to the pipes and to the compressor to prevent moisture entering the circuit.
INSTALLATION
If the compressor is replaced, it is supplied pre-filled with oil.
Position the compressor the correct way round (filler plug facing up).
Tighten the three mounting bolts (tightening torque: 2.1 daN.m).
Refit the two R134a refrigerant pipes (A) to the compressor (tighten to 2.1 daN.m), then the bracket (B).
Fit the drive belt and adjust its tension.
Evacuate the system, then charge the R134a refrigerant circuit using the recharging station.
NOTE: when refitting the connecting pipes to the compressor, fit all the bolts, then bring them into contact before tightening to torque. This ensures the pipe is correctly positioned and not damaged at the "muffler" (1). Check the condition of the seals and lubricate them with P.A.G. SP 10 oil.
IMPORTANT
When replacing the compressor, it is essential to correctly top up the oil level.
E7J ENGINE
REMOVAL
Vehicle on a lift.
Drain the R134a refrigerant circuit.
Disconnect the battery.
Remove:
the engine undertray,
the bumper.
From above, remove:
the accessory drive belt,
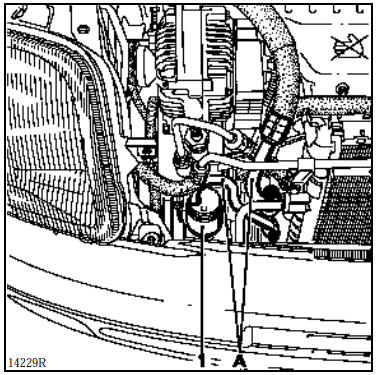
the two R134a connecting pipes (A).
From below the vehicle, remove:
the compressor drive belt,
the compressor mounting bolts, and remove the compressor.
NOTE: always fit plugs to the pipes and to the compressor to prevent moisture entering the circuit.
INSTALLATION
If the compressor is replaced, it is supplied pre-filled with oil.
Position the compressor the correct way round (filler plug facing up).
Tighten the mounting bolts (tightening torque: 2.1 daN.m).
Refit the two R134a refrigerant pipes (A) to the compressor (tightening torque: 2.1 daN.m).
Fit the drive belts and adjust their tension.
Evacuate the system, then charge the R134a refrigerant circuit using the recharging station.
NOTE: when refitting the connecting pipes to the compressor, fit all the bolts, then bring them into contact before tightening to torque. This ensures the pipe is correctly positioned and not damaged at the "muffler" (1). Check the condition of the seals and lubricate them with P.A.G. SP 10 oil.
IMPORTANT
When replacing the compressor, it is essential to correctly top up the oil level.
Test yourself
A quick Renault Kangoo quiz: every answer comes with an explanation and a link to the manual page.