Air conditioning
Compressor
In this manual: Air conditioning
~4min read
K4J or K4M or K9K
Essential equipment |
| charging station |
Tightening torques |
|
| compressor fixing bolts | 2.5 daN.m |
| reinforcing plate fixing bolts | 2.1 daN.m |
| pipe connection fixing bolts | 1 daN.m |
| battery cover bolts | 0.4 daN.m |

REMOVAL
- Position the vehicle on a two-post lift.
- Disconnect the battery, starting with the negative terminal.
- Drain the refrigerant circuit using the charging station tool.
- Remove:
- the engine undershield,
- the front right wheel,
- the mudguard,
- the front bumper (see Front Bumper).
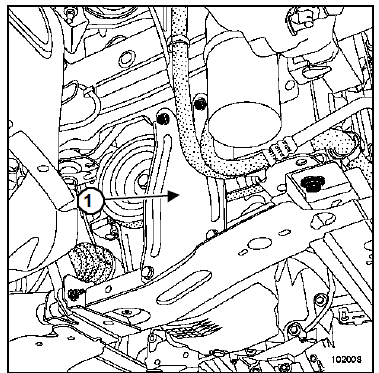
- Remove:
- the reinforcing plate (1),
- the drive belt (see Drive Belt).
WARNING: Always replace a belt that has been removed.
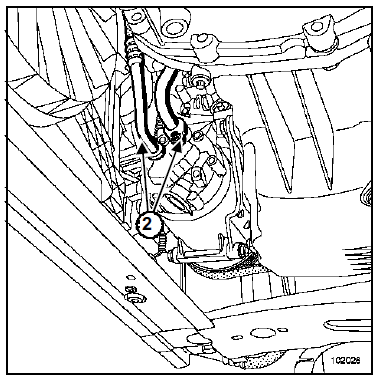
- Unscrew the pipe connections (2) from the compressor.
- Disconnect the pipes.
- Fit plugs to the openings.
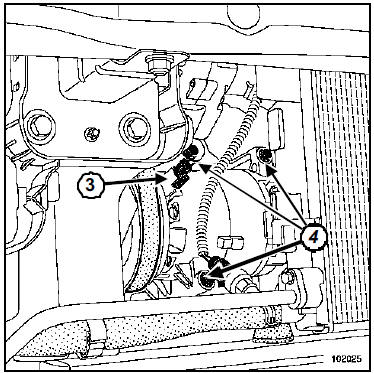
- Disconnect the compressor connector (3).
- Remove:
- the three compressor mounting bolts (4),
- the compressor.
INSTALLATION
- Refit in the reverse order of removal.
- When replacing a compressor, do not add oil.
- Strictly observe the instructions regarding oil top-up when working on air conditioning circuit components (Chapter Air Conditioning).
- Replace the seals.
- Lubricate with the recommended air conditioning oil to ease fitting.
WARNING: Any damaged seal requires replacing the pipe.
- Tighten to the following torques:
- the compressor mounting bolts (2.5 daN.m),
- the reinforcement plate mounting bolts (2.1 daN.m),
- the pipe connection mounting bolts (1 daN.m),
- the battery cover bolts (0.4 daN.m).
- Refill the refrigerant circuit using the charging station tool.
Connect the battery; carry out the necessary relearn procedures (Chapter Battery).
Note:- Check the air conditioning operates correctly with the fan unit at maximum speed.
- If there is no cooling, carry out a leak check (see Air Conditioning chapter).
F4R or F9Q
Essential equipment |
| charging station |
Tightening torques |
|
| compressor fixing bolts | 2.5 daN.m |
| reinforcing plate fixing bolts | 2.1 daN.m |
| pipe connection fixing bolts | 0.8 daN.m |
| front radiator crossmember mounting bolt | 10.5 daN.m |
| rear radiator crossmember mounting bolt | 2.1 daN.m |
| battery cover bolts | 0.4 daN.m |

REMOVAL
- Position the vehicle on a two-post lift.
- Disconnect the battery, starting with the negative terminal.
- Drain the refrigerant circuit using the charging station tool.
- Remove:
- the engine undershield,
- the front right wheel,
- the mudguard,
- the front bumper (see Front Bumper).
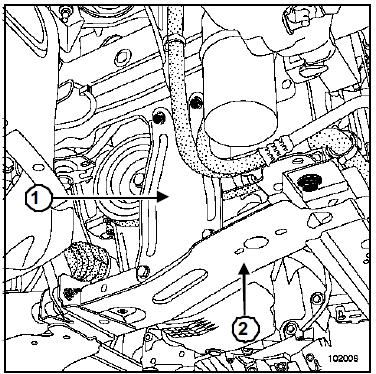
- Remove:
- the reinforcing plate (1),
- the radiator crossmember (2),
- the drive belt (see Drive Belt).
WARNING: Always replace a belt that has been removed.
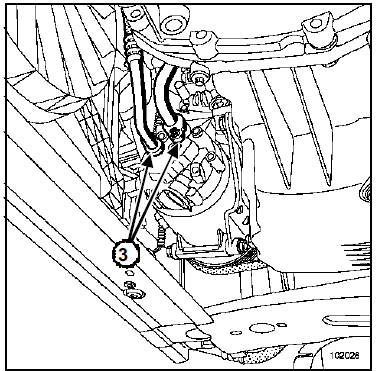
- Unscrew the pipe connections (3) from the compressor.
- Disconnect the pipes.
- Fit plugs to the openings.
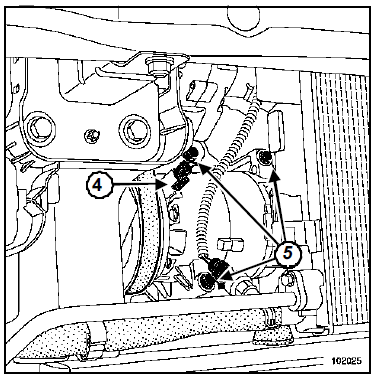
- Disconnect the compressor connector (4).
- Remove:
- the three compressor mounting bolts (5),
- the compressor.
INSTALLATION
- Refit in the reverse order of removal.
- When replacing a compressor, do not add oil.
- Strictly observe the instructions regarding oil top-up when working on air conditioning circuit components (Chapter Air Conditioning).
- Replace the seals.
- Lubricate with the recommended air conditioning oil to ease fitting.
WARNING: Any damaged seal requires replacing the pipe.
- Tighten to the following torques:
- the compressor mounting bolts (2.5 daN.m),
- the reinforcement plate mounting bolts (2.1 daN.m),
- the pipe connection mounting bolts (0.8 daN.m),
- the front radiator crossmember mounting bolts (10.5 daN.m),
- the rear radiator crossmember mounting bolts (2.1 daN.m),
- the battery cover bolts (0.4 daN.m).
- Refill the refrigerant circuit using the charging station tool.
Connect the battery; carry out the necessary relearn procedures (Chapter Battery).
Note:- Check the air conditioning operates correctly with the fan unit at maximum speed.
- If there is no cooling, carry out a leak check (see Air Conditioning chapter).
Test yourself
A quick Renault Megane quiz: every answer comes with an explanation and a link to the manual page.
Was this page helpful?