Air conditioning
Evaporator
In this manual: Air conditioning
~3min read
Essential equipment |
| diagnostic tool |
| charging station |
Tightening torques |
|
| evaporator housing mounting bolt | 0.65 daN.m |
| pipe connection fixing bolts | 1 daN.m |
| elastic mount mounting screw | 0.2 daN.m |
| battery cover bolts | 0.4 daN.m |

Note: The evaporator is supplied fitted in its housing.
REMOVAL
IMPORTANTBefore any work on the airbag system, lock the electronic control unit using the diagnostic tools (Chapter Airbag and Pretensioners).
- Drain the refrigerant circuit using the charging station tool.
- Disconnect the battery, starting with the negative terminal.
- Remove the two pipes attached to the connecting flange (Chapter Air Conditioning).
- Fit plugs to the openings.
- Fit hose clamps to the heater hoses of the cooling circuit at the bulkhead.
- Remove the dashboard (Chapter Interior Trim).
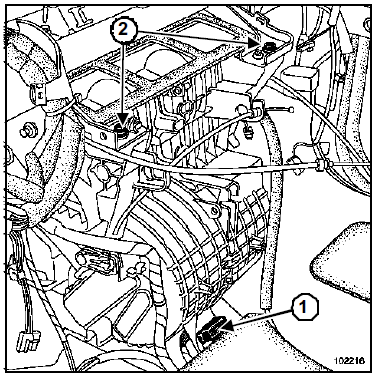
- Release the connector (1).
- Remove the three bolts (2) from the distribution box.
- Remove the dashboard crossmember (Chapter Upper Front Structure).
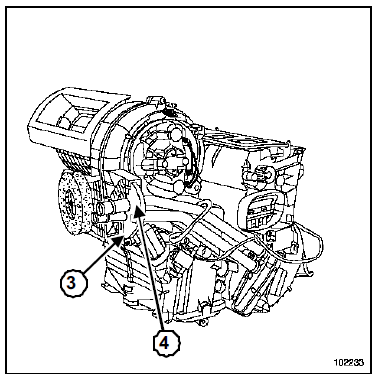
- Remove the bolt (3) from the heater hose bracket.
- Unlock the bracket (4).
- Lift the bracket to extract it from the evaporator housing.
- Place a container to collect the coolant.
- Remove the two clamps securing the heater hoses.
- Pull the hoses out of their guide on the distribution box.
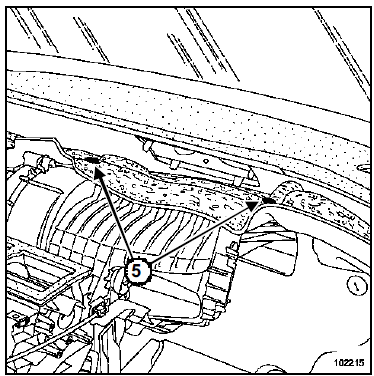
- Unclip the insulation mounting clips (5) from the evaporator housing.
- Remove the climate control unit.
- Remove the condensate drain hose.
- Remove from the climate control unit:
- the cabin filter,
- the control cables (if fitted),
- the blend door motor (if fitted),
- the distribution motor (if fitted),
- the recirculation motor (if fitted).
- the cooling fan assembly,
- the heater unit,
- the electronic control unit (electric heater) or the power module,
- the heater resistor box, and the wiring harness.
INSTALLATION
- Refit all components onto the new evaporator housing.
- Refit the condensate drain hose.
- Replace the seals.
- Lubricate the hose seals with the recommended oil.
- Refit in the reverse order of removal.
- Tighten to the following torques:
- the evaporator housing mounting bolts (0.65 daN.m),
- the pipe connection mounting bolts (1 daN.m),
- the resilient mount bolt (0.2 daN.m),
- the battery cover bolts (0.4 daN.m).
- Reshape the air duct by working through the air outlet holes and applying pressure by hand, perpendicular to the fold.
- Refill the refrigerant circuit using the charging station tool.
Connect the battery and carry out the necessary re-learning procedures (see Battery chapter).
Note: When replacing the evaporator, add 30 ml of the recommended oil to the quantity recovered.Test yourself
A quick Renault Megane quiz: every answer comes with an explanation and a link to the manual page.
Was this page helpful?