No automatic response
DESCRIPTION
In some cases, the remote door lock central locking functions are normal, but the hazard warning light and remote door lock buzzer*1 automatic response functions do not operate. In this case, the hazard warning light and remote door lock buzzer*1 signal outputs from the Main Body ECU (Multiplex Network Body ECU) may be malfunctioning.
- *1: with Toyota Safety Sense P system
WIRING DIAGRAM
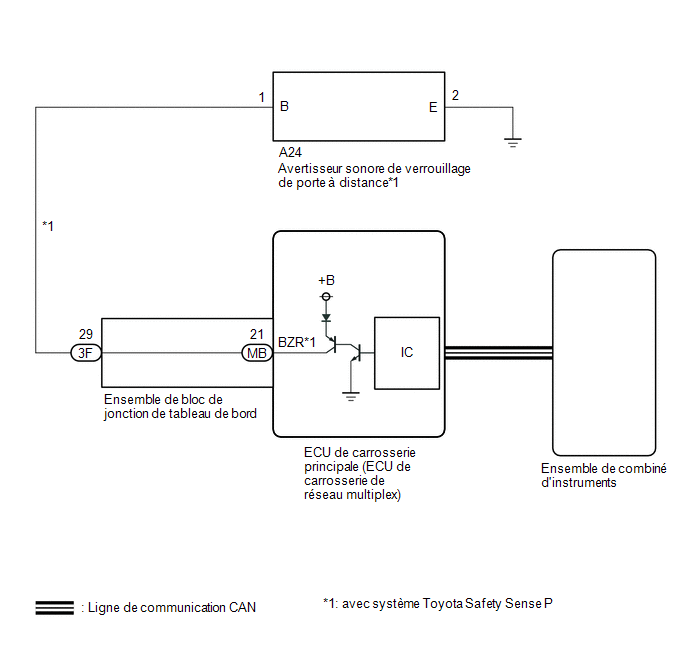
PRECAUTION / NOTICE / HINT
NOTICE:
The remote door lock central control system and the key reminder system use the CAN communication system. Check the communication function by following the procedure described in the HOW TO PROCEED WITH TROUBLESHOOTING section. Perform troubleshooting of the remote door lock central control system only after confirming that the communication system operates normally.
Click here
PROCEDURE
READ VALUE USING TECHSTREAM (Hazard Answer Back, Wireless Buzzer Resp, Wireless Buzzer Vol)
(a) Connect the Techstream to the DLC3.
(b) Turn the ignition switch to ON.
(c) Turn on the Techstream.
(d) Select the following menus: Customize Setting / Wireless Door Lock.
(e) Select the setting by referring to the table below.
Remote Central Door LockTester display | Description | Default setting | Setting | ECU |
|---|---|---|---|---|
Hazard Answer Back |
This function flashes the hazard lights once when the doors are locked using the remote control, and twice when the doors are unlocked using the remote control. |
ON |
0 : OFF, 1 : ON |
Main body ECU (multiplex network body ECU) |
Wireless Buzzer Resp |
Remote door lock buzzer response*1 |
ON |
0 : OFF, 1 : ON |
Main body ECU (multiplex network body ECU) |
Wireless Buzzer Vol |
Remote door lock buzzer volume*1 |
Level5 |
0000: Level7, 0001: Level6, 0010: Level5, 0011: Level4, 0100: Level3, 0101: Level2, 0110: Level1, 0111: Level0 |
Main body ECU (multiplex network body ECU) |
- *1: with Toyota Safety Sense P system
Result:
Result | Proceed to |
|---|---|
Both items are ON, except Level 0 |
A |
Either item is OFF or Level 0 |
B |
| B |  |
PERFORM CUSTOMIZE FUNCTION |
|

CHECK REMOTE DOOR LOCK FUNCTIONS
(a) Check the remote door lock central locking function using the Door Control Transmitter Assembly.
Result:
Result | Proceed to |
|---|---|
Remote door lock/unlock operates normally |
A |
Remote door lock/unlock does not operate normally |
B |
| B | |
REFER TO SYMPTOM TROUBLESHOOTING TABLE |
|
READ VALUE USING TECHSTREAM (FR Door Lock Pos, FL Door Lock Pos, RR-Door Lock Pos SW, RL-Door Lock Pos SW)
(a) Connect the Techstream to the DLC3.
(b) Turn the ignition switch to ON.
(c) Turn on the Techstream.
(d) Select the following menus: Body Electrical / Main Body / Data List.
(e) Read the Data List by following the instructions on the Techstream.
Body Electrical > Main Body > Data ListTester display | Item | Range | Normal Condition | Diagnostic Note |
|---|---|---|---|---|
FR Door Lock Pos |
Front Right Door Unlock Detection Switch Signal |
LOCK or UNLOCK |
LOCK: Front right door locked. UNLOCK: Front right door unlocked. |
- |
FL Door Lock Pos |
Front Left Door Unlock Detection Switch Signal |
LOCK or UNLOCK |
LOCK: Front left door locked. UNLOCK: Front left door unlocked. |
- |
RR-Door Lock Pos SW |
Rear RH door unlock detection switch signal |
OFF or ON |
OFF: Rear RH door locked ON: Rear RH door unlocked |
- |
RL-Door Lock Pos SW |
Rear RH door unlock detection switch signal |
OFF or ON |
OFF: Rear LH door locked ON: Rear LH door unlocked |
- |
Tester display |
|---|
FR Door Lock Pos |
FL Door Lock Pos |
RR-Door Lock Pos SW |
RL-Door Lock Pos SW |
OK:
The Techstream display changes correctly according to the lock/unlock operation.
| NG | |
GO TO LIGHTING SYSTEM (go to door unlock detection switch circuit) |
|
CHECK AUTOMATIC ANSWER BACK OPERATION
(a) Check the remote automatic response operation using the Door Control Transmitter Assembly.
Result:
Result | Proceed to |
|---|---|
Only the remote door lock buzzer automatic answer back does not operate (with Toyota Safety Sense P) |
A |
Only the hazard light automatic answer back does not operate |
B |
| B | |
GO TO STEP 9 |
|
PERFORM ACTIVE TEST USING TECHSTREAM (Wireless Buzzer)
(a) Connect the Techstream to the DLC3.
(b) Turn the ignition switch to ON.
(c) Turn on the Techstream.
(d) Select the following menu items: Body Electrical / Main Body / Active Test.
(e) Perform the Active Test by following the Techstream instructions.
Body Electrical > Main Body > Active TestTester display | Item | Control Range | Limitation Condition |
|---|---|---|---|
Wireless Buzzer |
Remote Door Lock Buzzer |
OFF / ON |
- |
Wireless Buzzer
Result:
Result | Proceed to |
|---|---|
The remote door lock buzzer does not sound |
A |
The remote door lock buzzer sounds |
B |
| B | |
REPLACE MAIN BODY ECU (MULTIPLEX NETWORK BODY ECU) |
|
INSPECT THE REMOTE DOOR LOCK BUZZER
(a) Disconnect the remote door lock buzzer connector.
(b) Connect the Techstream to the DLC3.
(c) Turn the ignition switch to ON.
(d) Turn on the Techstream.
(e) Select the following menu items: Body Electrical / Main Body / Active Test.
(f) Perform the Active Test by following the instructions shown on the Techstream screen.
Body Electrical > Main Body > Active TestTester display | Item | Control Range | Diagnostic Note |
|---|---|---|---|
Wireless Buzzer |
Remote Door Lock Buzzer |
OFF / ON |
- |
Wireless Buzzer
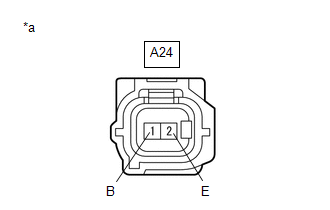
(g) While performing the Active Test, measure the voltage between the terminals of the remote door lock buzzer. Standard voltage:
|
|
| OK | |
REPLACE THE REMOTE DOOR LOCK BUZZER |
|
INSPECT THE WIRE HARNESS AND CONNECTOR (REMOTE DOOR LOCK BUZZER - MAIN BODY ECU (MULTIPLEX NETWORK BODY ECU) AND BODY GROUND)
(a) Remove the main body ECU (multiplex network body ECU) from the instrument panel junction block assy.
Click here
(b) Disconnect connector A24 from the remote door lock buzzer.
(c) Reconnect connector 3F of the instrument panel junction block assembly.
(d) Measure the resistance according to the value(s) in the table below.
Standard resistance:
Tester Connection | Condition | Specified Condition |
|---|---|---|
A24-1 (B) - MB-21 (BZR) |
Always |
Below 1 Ω |
A24-2 (E) - Body ground |
Always |
Below 1 Ω |
A24-1 (B) or MB-21 (BZR) - Body ground |
Always |
10 kΩ minimum |
| OK | |
REPLACE MAIN BODY ECU (MULTIPLEX NETWORK BODY ECU) |
|
INSPECT THE WIRE HARNESS AND CONNECTOR (REMOTE DOOR LOCK BUZZER - INSTRUMENT PANEL JUNCTION BLOCK ASSEMBLY)
(a) Disconnect the 3F connector from the instrument panel junction block assembly.
(b) Disconnect connector A24 from the remote door lock buzzer.
(c) Measure the resistance according to the value(s) in the table below.
Standard resistance:
Tester Connection | Condition | Specified Condition |
|---|---|---|
A24-1 (B) - 3F-29 |
Always |
Below 1 Ω |
A24-1 (B) or 3F-29 - Body ground |
Always |
10 kΩ minimum |
| OK | |
REPLACE INSTRUMENT PANEL JUNCTION BLOCK ASSEMBLY |
| NG | |
REPAIR OR REPLACE HARNESS OR CONNECTOR |
CHECK HAZARD LIGHT OPERATION
(a) Check whether the hazard lights flash when the hazard switch is pressed.
OK:
The hazard lights flash.
| OK | |
REPLACE MAIN BODY ECU (MULTIPLEX NETWORK BODY ECU) |
| NG | |
GO TO LIGHTING SYSTEM (go to hazard switch circuit) |