Only the back door cannot be opened
DESCRIPTION
The main body ECU (multiplex body ECU) receives signals from the back door opener switch assembly. When a signal is received, the main body ECU (multiplex body ECU) activates the back door lock motor.
WIRING DIAGRAM
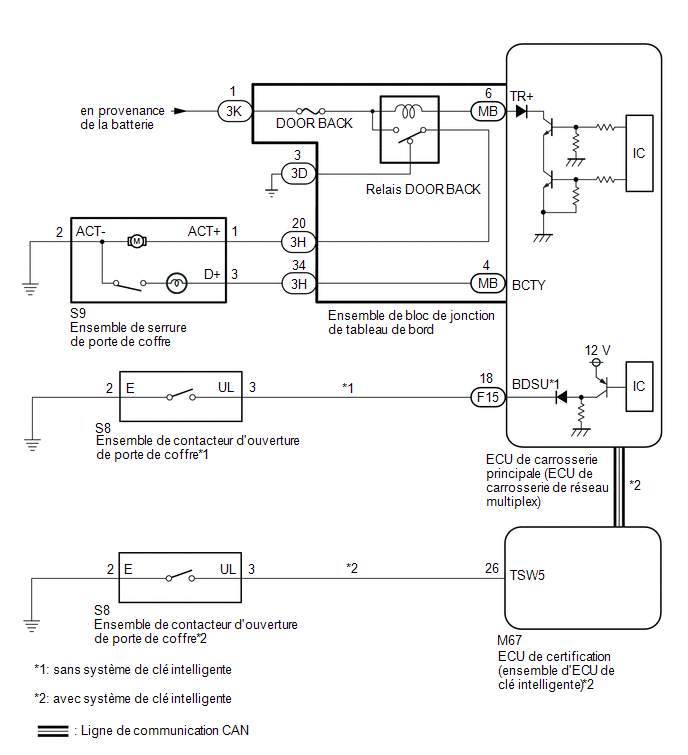
PRECAUTION / NOTICE / HINT
NOTICE:
- Before replacing the main body ECU (multiplex network body ECU), refer to the registration*.
Click here

- *: with smart key system
- The power door lock control system uses CAN communication. Check the communication function by following the procedure described in HOW TO PROCEED WITH TROUBLESHOOTING. Perform troubleshooting of the power door lock control system only after confirming that the communication systems operate properly.*
Click here
- *: with smart key system
- Before performing this troubleshooting, first perform troubleshooting of the smart access system with push button start (for opening function) (back door unlock function does not operate).
Click here
- *: with smart key system
PROCEDURE
CONFIRM MODEL
(a) Select the model to be checked.
Result:
Result | Proceed to |
|---|---|
with Smart Key System |
A |
without Smart Key System |
B |
| B |  |
GO TO STEP 6 |
|

CHECK LUGGAGE COMPARTMENT DOOR LOCK ASSY
(a) Remove the Luggage Compartment Door Lock Assy.
Click here
(b) Inspect the back door lock assembly.
Click here
| NG | |
REPLACE LUGGAGE COMPARTMENT DOOR LOCK ASSY |
|
CHECK HARNESS AND CONNECTOR (LUGGAGE COMPARTMENT DOOR LOCK ASSY - INSTRUMENT PANEL JUNCTION BLOCK ASSY)
(a) Disconnect connector 3H from the Instrument Panel Junction Block Assy.
(b) Measure the resistance according to the value(s) in the table below.
Standard resistance:
Tester Connection | Condition | Specified Condition |
|---|---|---|
S9-1 (ACT+) - 3H-20 |
Always |
Below 1 Ω |
S9-3 (D+) - 3H-34 |
Always |
Below 1 Ω |
S9-2 (ACT-) - Body ground |
Always |
Below 1 Ω |
S9-1 (ACT+) or 3H-20 - Body ground |
Always |
10 kΩ minimum |
S9-3 (D+) or 3H-34 - Body ground |
Always |
10 kΩ minimum |
| NG | |
REPAIR OR REPLACE HARNESS OR CONNECTOR |
|
INSPECT INSTRUMENT PANEL JUNCTION BLOCK ASSEMBLY
(a) Remove the instrument panel junction block assembly.
Click here
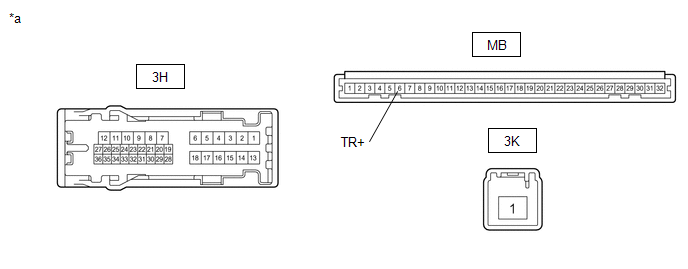
*a |
Component without wire harness connected (instrument panel junction block assembly) |
- |
- |
(b) Remove the main body ECU (multiplex network body ECU) from the instrument panel junction block assembly.
(c) Measure the voltage according to the value(s) shown in the table below.
Standard resistance:
Tester Connection | Condition | Specified Condition |
|---|---|---|
3H-20 - Body ground |
Battery voltage not applied between 3K-1 and MB-6 (TR+) |
Below 1 V |
3H-20 - Body ground |
Battery voltage applied between 3K-1 and MB-6 (TR+) |
11 à 14 V |
| NG | |
REPLACE INSTRUMENT PANEL JUNCTION BLOCK ASSEMBLY |
|
CHECK BACK DOOR OPEN OPERATION
(a) Check that the back door can be opened.
OK:
The back door can be opened.
| OK | |
END |
| NG | |
REPLACE MAIN BODY ECU (MULTIPLEX NETWORK BODY ECU) |
CHECK POWER DOOR LOCK CONTROL SYSTEM OPERATION (BASIC FUNCTION)
(a) Check the basic function of the power door lock control system.
OK:
The basic functions of the power door lock control system operate normally.
| NG | |
REFER TO SYMPTOM TROUBLESHOOTING TABLE |
|
READ VALUE USING TECHSTREAM (Back Door Open)
(a) Connect the Techstream to the DLC3.
(b) Turn the ignition switch to ON.
(c) Turn on the Techstream.
(d) Select the following menus: Body Electrical / Main Body / Data List.
(e) Read the Data List by following the instructions on the Techstream.
Body Electrical > Main Body > Data ListTester display | Item | Range | Normal Condition | Diagnostic Note |
|---|---|---|---|---|
Back Door Open |
Back door lock signal |
Prohibit or Permit |
Prohibit: Back door is locked Permit: Back door is unlocked |
- |
Back Door Open
OK:
On the Techstream screen, Prohibit or Permit is displayed accordingly.
| NG | |
REPLACE MAIN BODY ECU (MULTIPLEX NETWORK BODY ECU) |
|
PERFORM ACTIVE TEST USING TECHSTREAM (Trunk and Back Door Open)
(a) Select the following menus: Body Electrical / Main Body / Active Test.
(b) Perform the Active Test by following the instructions on the Techstream.
Body Electrical > Main Body > Active TestTester display | Item | Control Range | Diagnostic Note |
|---|---|---|---|
Trunk and Back-Door Open |
Trunk Lock Motor |
OFF / ON |
- |
Trunk and Back-Door Open
OK:
The Luggage Compartment Door Lock Assy is functioning normally.
| NG | |
GO TO STEP 12 |
|
READ VALUE USING TECHSTREAM (Back Door Open Handle SW)
(a) Select the following menus: Body Electrical / Main Body / Data List.
(b) Read the Data List following the Techstream instructions.
Body Electrical > Main Body > Data ListTester display | Item | Range | Normal Condition | Diagnostic Note |
|---|---|---|---|---|
Back Door Open Handle SW |
Back Door Opening Switch Signal |
OFF or ON |
OFF: Back door closed. ON: Back door open. |
- |
Back Door Open Handle SW
OK:
On the Techstream screen, ON or OFF is displayed accordingly.
| OK | |
REPLACE MAIN BODY ECU (MULTIPLEX NETWORK BODY ECU) |
|
CHECK BACK DOOR OPENER SWITCH ASSEMBLY
(a) Remove the luggage compartment door opening switch assembly.
Click here
(b) Inspect the luggage compartment door opening switch assembly.
Click here
| NG | |
REPLACE THE LUGGAGE COMPARTMENT DOOR OPENING SWITCH ASSEMBLY |
|
CHECK WIRE HARNESS AND CONNECTOR (BACK DOOR OPENER SWITCH ASSEMBLY - MAIN BODY ECU (MULTIPLEX BODY ECU))
(a) Disconnect the F15 connector from the main body ECU (multiplex network body ECU).
(b) Disconnect connector S8 from the luggage compartment door opening switch assembly.
(c) Measure the resistance according to the value(s) in the table below.
Standard resistance:
Tester Connection | Condition | Specified Condition |
|---|---|---|
F15-18 (BDSU) - S8-3 (UL) |
Always |
Below 1 Ω |
S8-2 (E) - Body ground |
Always |
Below 1 Ω |
F15-18 (BDSU) or S8-3 (UL) - Body ground |
Always |
10 kΩ minimum |
| OK | |
REPLACE MAIN BODY ECU (MULTIPLEX NETWORK BODY ECU) |
| NG | |
REPAIR OR REPLACE HARNESS OR CONNECTOR |
CHECK LUGGAGE COMPARTMENT DOOR LOCK ASSY
(a) Remove the Luggage Compartment Door Lock Assy.
Click here
(b) Inspect the back door lock assembly.
Click here
| NG | |
REPLACE LUGGAGE COMPARTMENT DOOR LOCK ASSY |
|
CHECK HARNESS AND CONNECTOR (LUGGAGE COMPARTMENT DOOR LOCK ASSY - INSTRUMENT PANEL JUNCTION BLOCK ASSY)
(a) Disconnect connector 3H from the Instrument Panel Junction Block Assy.
(b) Disconnect connector S9 from the back door lock assembly.
(c) Measure the resistance according to the value(s) in the table below.
Standard resistance:
Tester Connection | Condition | Specified Condition |
|---|---|---|
S9-1 (ACT+) - 3H-20 |
Always |
Below 1 Ω |
S9-3 (D+) - 3H-34 |
Always |
Below 1 Ω |
S9-2 (ACT-) - Body ground |
Always |
Below 1 Ω |
S9-1 (ACT+) or 3H-20 - Body ground |
Always |
10 kΩ minimum |
S9-3 (D+) or 3H-34 - Body ground |
Always |
10 kΩ minimum |
| NG | |
REPAIR OR REPLACE HARNESS OR CONNECTOR |
|
INSPECT INSTRUMENT PANEL JUNCTION BLOCK ASSEMBLY
(a) Remove the instrument panel junction block assembly.
Click here
*a |
Component without wire harness connected (instrument panel junction block assembly) |
- |
- |
(b) Remove the main body ECU (multiplex network body ECU) from the instrument panel junction block assembly.
(c) Measure the resistance according to the value(s) in the table below.
Standard resistance:
Tester Connection | Condition | Specified Condition |
|---|---|---|
3H-20 - Body ground |
Battery voltage not applied between 3K-1 and MB-6 (TR+) |
Below 1 V |
3H-20 - Body ground |
Battery voltage applied between 3K-1 and MB-6 (TR+) |
11 à 14 V |
| NG | |
REPLACE INSTRUMENT PANEL JUNCTION BLOCK ASSEMBLY |
|
CHECK BACK DOOR OPEN OPERATION
(a) Check that the back door can be opened.
OK:
The back door can be opened.
| OK | |
END |
| NG | |
REPLACE MAIN BODY ECU (MULTIPLEX NETWORK BODY ECU) |